Using Cystocentesis to Obtain Sterile Urine Samples
Rachel Victoria Poulin, RVT, VTS (SAIM), Wheat Ridge Animal Hospital, Wheat Ridge, Colorado

Part 1 of a 2-part series
Cystocentesis, the insertion of a needle into the urinary bladder to obtain a sterile urine sample, is routinely performed in feline and canine patients with suspected urinary tract infections (UTIs) and other conditions that require sterile diagnostic samples. Aseptic and proper technique must be followed before, during, and after cystocentesis to minimize the risk for sample contamination from environmental bacteria, abdominal contents, and iatrogenic hemorrhage.
Ideally, cystocentesis is performed in a patient that has a distended, easily palpated and isolated urinary bladder to ensure correct needle placement and minimize injury to the bladder and surrounding organs. When possible, the patient should be restricted from urinating for several hours before cystocentesis to ensure a full bladder. Abdominal ultrasonography is helpful for guiding needle placement and may be necessary to locate the urinary bladder in obese patients and patients with small or difficult-to-locate bladders.
Patient behavior and temperament should be evaluated before cystocentesis and sedation considered for any patient unlikely to remain still during restraint.
Because sudden movement and squirming during needle insertion, urine aspiration, and needle withdrawal can cause injury to internal structures, only well-trained team members should restrain patients and perform cystocentesis. (See Table 1.)
Table 1: Contraindications for Cystocentesis5
Supplies Needed
Be sure to have the following supplies on hand before beginning cystocentesis.
Alcohol wipes or antiseptic solution and gauze squares
Clippers
3- to 10-mL syringe3,4
22- to 25-gauge, 0.75- to 1.5-inch needles, depending on the size of the patient and bladder
Related Article: Top 3 Conditions Missed by Skipping Urinalysis with Dr. Chu
Related Article: Quiz: Cystocentesis
Technique
Before starting cystocentesis, gather all supplies that may be needed to perform the procedure. (See Supplies Needed.) Then, follow these steps.
Position the patient in dorsal or lateral recumbency, or allow him or her to stand; choose the position that provides the most direct access to the urinary bladder and ensures the patient the greatest comfort.
If necessary, clip excess hair over the ventral abdomen and ensure aseptic technique is used to prepare the area.
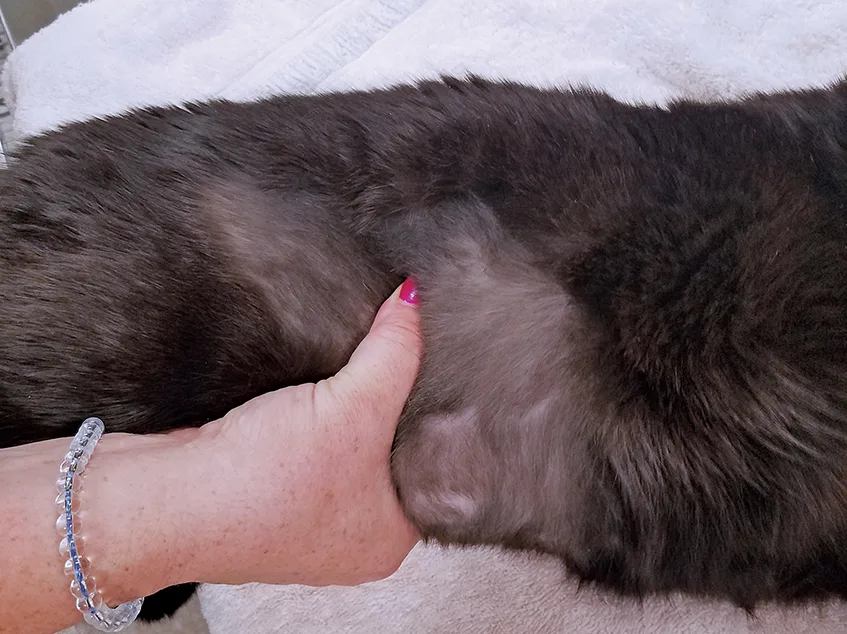
Use the nondominant hand to locate and gently isolate the urinary bladder. (See Figures 1 and 2.) Slow, gentle movement may help the patient become familiar with the process and relax before needle insertion.1
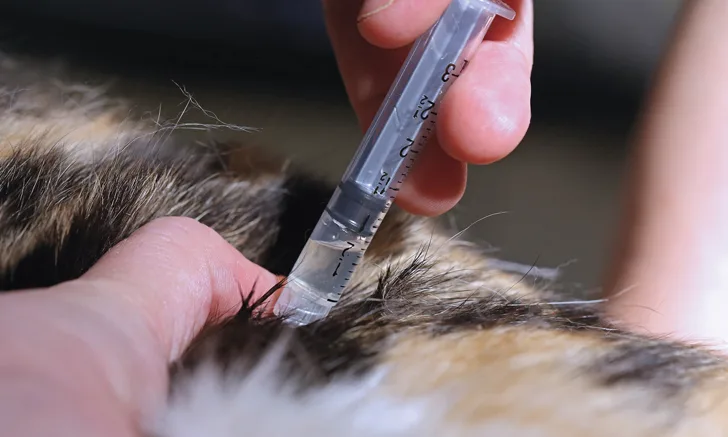
Position the patient's head on the same side as the team members dominant hand and use that hand to hold the syringe while the non-dominant hand isolates the bladder. Insert the needle at an oblique angle directed dorsocaudally through the ventral abdominal wall into the bladder. This technique allows the needle tip to remain in the bladder lumen and decreases the risk for distal aortic laceration.2

FIGURE 1
Gentle palpation of the ventral abdomen of a cat to isolate the urinary bladder for cystocentesis
Figures courtesy of Rachel Victoria Poulin, RVT, VTS (SAIM)
Use the following techniques to isolate and stabilize the bladder in both dogs and cats.
Dorsal recumbency: Stabilize the bladder with the nondominant hand against the pelvis.
Lateral recumbency: Stabilize the bladder with the nondominant hand, place the thumb in front of the bladder, and use the fingers to gently raise the bladder.
Standing: Stabilize the bladder with the nondominant hand, squeeze gently, and immobilize the bladder between the fingers and thumb.
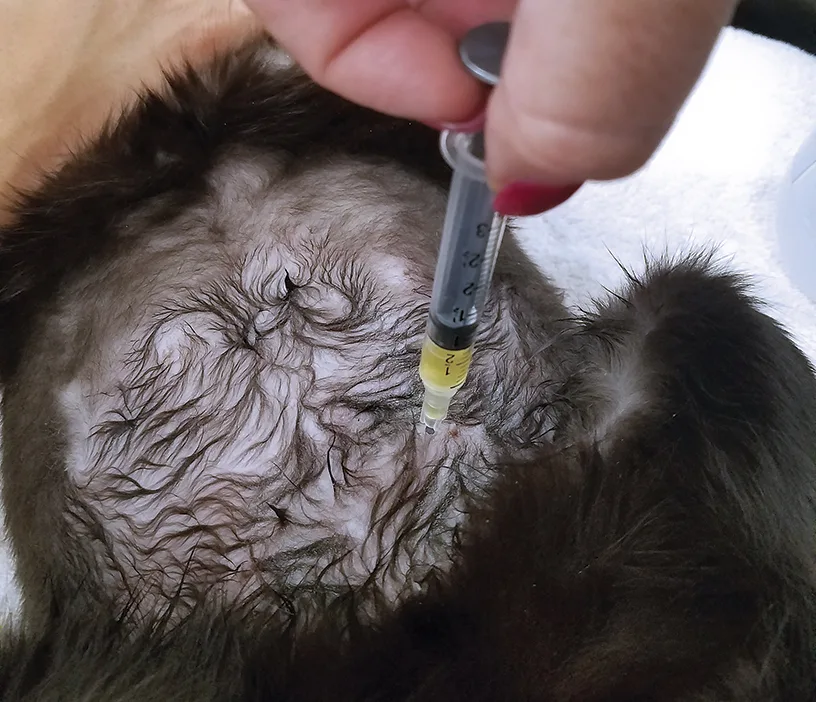
Aspirate approximately 3 mL to 10 mL of urine (ie, the preferred amount for most urine testing3,4), release the pressure from the syringe, and relax the nondominant hand before removing the needle to prevent aspiration of fat and abdominal contents.1 (See Figure 3.)
If urine cannot be aspirated, withdraw the needle. Obtain a new needle and syringe, and palpate and isolate the urinary bladder again before inserting the needle. A new needle and syringe should be used with each attempt to minimize the risk for infection from skin and intestinal bacteria,1 eliminate the risk for sample contamination with blood or abdominal contents in the syringe barrel, and ensure the needle is sharp enough to easily pierce the skin.
Once urine has been obtained successfully, change the needle before placing the urine in the collection tube. Using a new needle ensures that bacteria and other contaminants present on the collection needle are not introduced into the collection tube.
Examine the needle insertion site and clean it with hydrogen peroxide if blood is present.
If the urinary bladder cannot be palpated or isolated, the patient should be allowed to rest until the urinary bladder is full, or ultrasonography should be considered to guide needle placement.
Ultrasound-Guided Cystocentesis
If a patient's bladder is small and/or nonpalpable, then ultrasound-guided cystocentesis could be appropriate. An ultrasound machine allows the veterinary team member to visualize the bladder and watch the needle being inserted during the procedure, which can be performed in dorsal or lateral recumbency. (See Figure 4.) Follow these guidelines:
Before the procedure, identify the probe marker, which will be indicated on the screen by an arrow, to reveal the cranial aspect of the bladder.
Place the probe on the caudal portion of the abdomen.
Insert the needle at an approximately 15 angle under the probe and in line with the mark on the probe indicating the cranial aspect.
Watch the ultrasound machine screen to confirm the needle is inserted accurately, then aspirate urine into the syringe until the desired amount is obtained or the urine stops flowing.
Stop aspirating before removing the needle from the abdomen.
If at any time the patient begins to move, stop aspiration and remove the needle to avoid any complications.
The ultrasound probe and equipment are very delicate, so ensure team members take these precautions:
Avoid dropping the probe by securing the grip or placing the cord around the team members neck.
Take time when inserting the needle to make sure the needle is not hitting the probe, which is very fragile and can break easily when stuck with needles.
After acquiring the sample, clean the probe with hospital-approved agents.
Do not let alcohol or gel stay on the probe for an extended period of time.

FIGURE 3
Aspiration of urine from the urinary bladder of a cat in dorsal recumbency
Potential Complications
When performed correctly, cystocentesis should result in few, if any, complications. However, injuries can occur, including life-threatening conditions, and the veterinary team should be prepared to quickly provide appropriate treatment. (See Table 2.)
Related Article: Top 5 Urinalysis Errors in Veterinary Medicine
Table 2: Potential Cystocentesis Complications5,6
* This list does not include all of the signs and treatment options for these complications.
Conclusion
Qualified and well-trained veterinary team members can efficiently and successfully perform cystocentesis to obtain diagnostic urine samples. Proper restraint and sedation, if necessary, help ensure patient safety and comfort.