Updated September 2025 by Jennifer Peterson-Levitt, DVM, MS, DACVS-SA; MSPCA–Angell
Feline lower urinary tract disease (FLUTD) is estimated to occur in 1% to 2% of cats worldwide.1 These cats are typically presented with hematuria, stranguria, pollakiuria, inappropriate elimination, or, in emergent cases, anuria due to urethral obstruction. Urolithiasis and UTIs are manageable causes of FLUTD; however, idiopathic cases (ie, feline idiopathic cystitis) predominate and are challenging to treat.
Initially, a sterile urine sample should be obtained for urinalysis and culture. Culture is recommended in all cases, as detecting bacteria or white cells in cats with dilute urine may be challenging. Radiography can be performed to rule out radiopaque uroliths, but ultrasonography is preferred due to its ability to detect radiopaque (eg, struvite, calcium oxalate) and radiolucent (eg, cystine, ammonium urate) uroliths. If obstruction of the urinary tract is suspected, kidney values (ie, BUN and creatinine) and electrolytes (eg, potassium, ionized calcium) should be evaluated.
Medical management is recommend in most cats with FLUTD and should focus on reducing stress to minimize flare-ups. Cats that develop either cystitis or urethral obstructions due to urocystoliths should have the stones removed and receive appropriate medical management for the type of stone to minimize risk for recurrent stone formation. Urethral stones should be retropulsed into the urinary bladder and removed via cystotomy. Cats with recurrent episodes of idiopathic urethral obstructions, caudal urethral strictures, or obstructive uroliths that cannot be retropulsed from the urethra into the bladder are generally treated with perineal urethrostomy (PU). This salvage procedure involves anastomosis of the naturally wider postprostatic portion of the urethra to the skin to make a new urinary stoma. This procedure dramatically reduces the risk for recurrent urethral obstructions, and most cats have an excellent quality of life postoperatively.2 It is important to be aware that the procedure does not cure the underlying urinary tract disease.
Step-by-Step: Perineal Urethrostomy
What You Will Need
Clippers
Chlorhexidine or iodine solution and alcohol
3-0 nylon suture for rectal purse strong (optional)
Scalpel blade (#10 or #15) and handle
Metzenbaum scissors
Senn-Miller retractor
Mosquito hemostats
Gauze sponges
Iris or tenotomy scissors
Small needle holders (eg, Derf, Castroviejo)
Fine thumb forceps (eg, Debakey)
10-French (Fr) red rubber urethral catheter
4-0 or 5-0 rapidly absorbable monofilament sutures
Sterile cotton swabs
Freer periosteal elevator (optional)
Magnification (optional)
Monopolar electrosurgery (optional)
Elizabethan collar
Step 1: Prepare the Patient
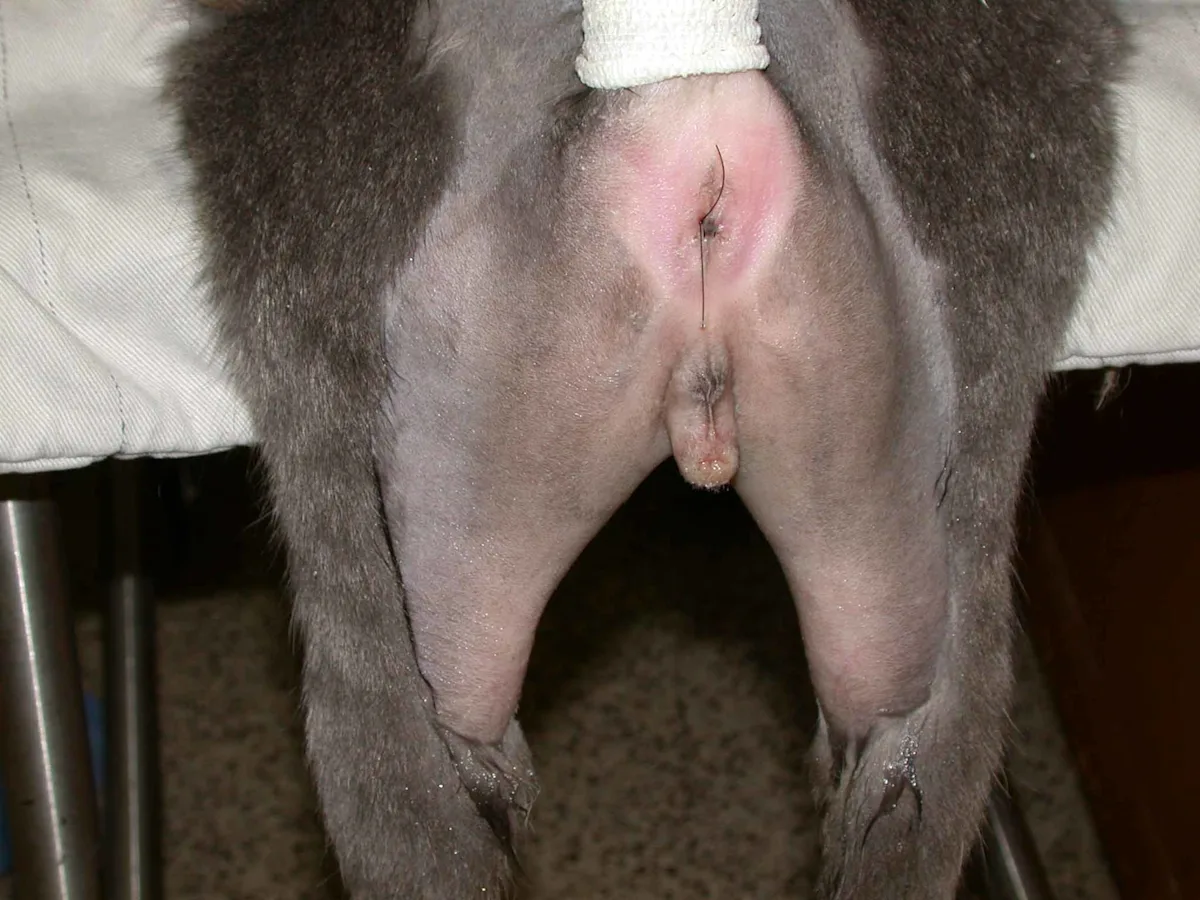
Clip the perineal region, including the prepuce and scrotum, and place a purse-string suture in the anocutaneous junction. Complete sterile preparation once the cat is positioned on the surgery table.
Author Insight
Perineal urethrostomies are typically performed with the cat in sternal recumbency in the perineal position, with the pelvic limbs suspended over the padded back edge of a surgery table (left) and the table tilted so the head is down. PU can also be performed with the cat in dorsal recumbency and the pelvic legs pulled cranially so the pelvis is tilted upward and the anus is facing the surgeon (right). This position provides excellent exposure to the pelvic attachments of the penile body and is useful for cats that also require cystotomy.
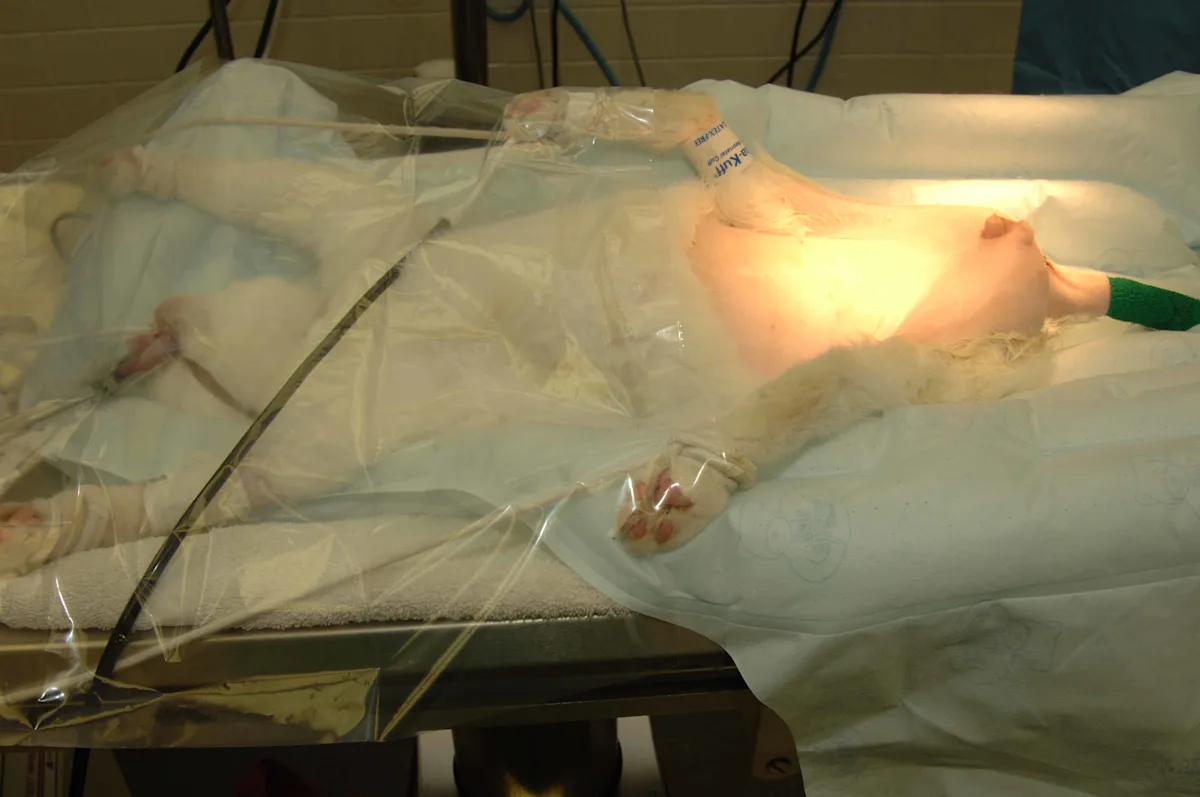
Because of increased diaphragmatic pressure, cats in a sternal position may require ventilatory assistance; however, this can be avoided by placing support under the sternum and extending the thoracic limbs so the abdomen is not resting on the table.
Step 2: Neuter the Patient
For intact cats undergoing a perineal urethrostomy, a neuter must be performed for anatomical/surgical reasons. A routine scrotal castration is appropriate.
Step 3: Approach
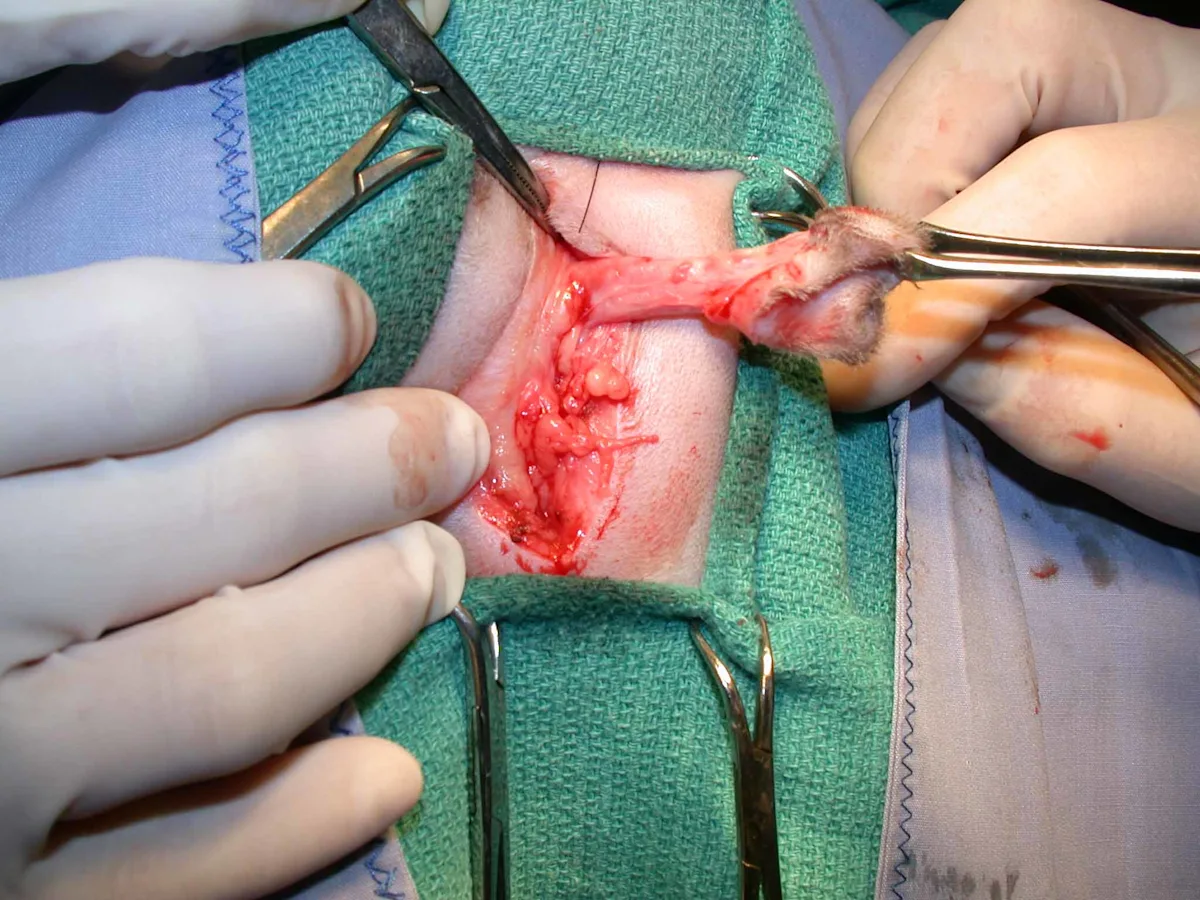
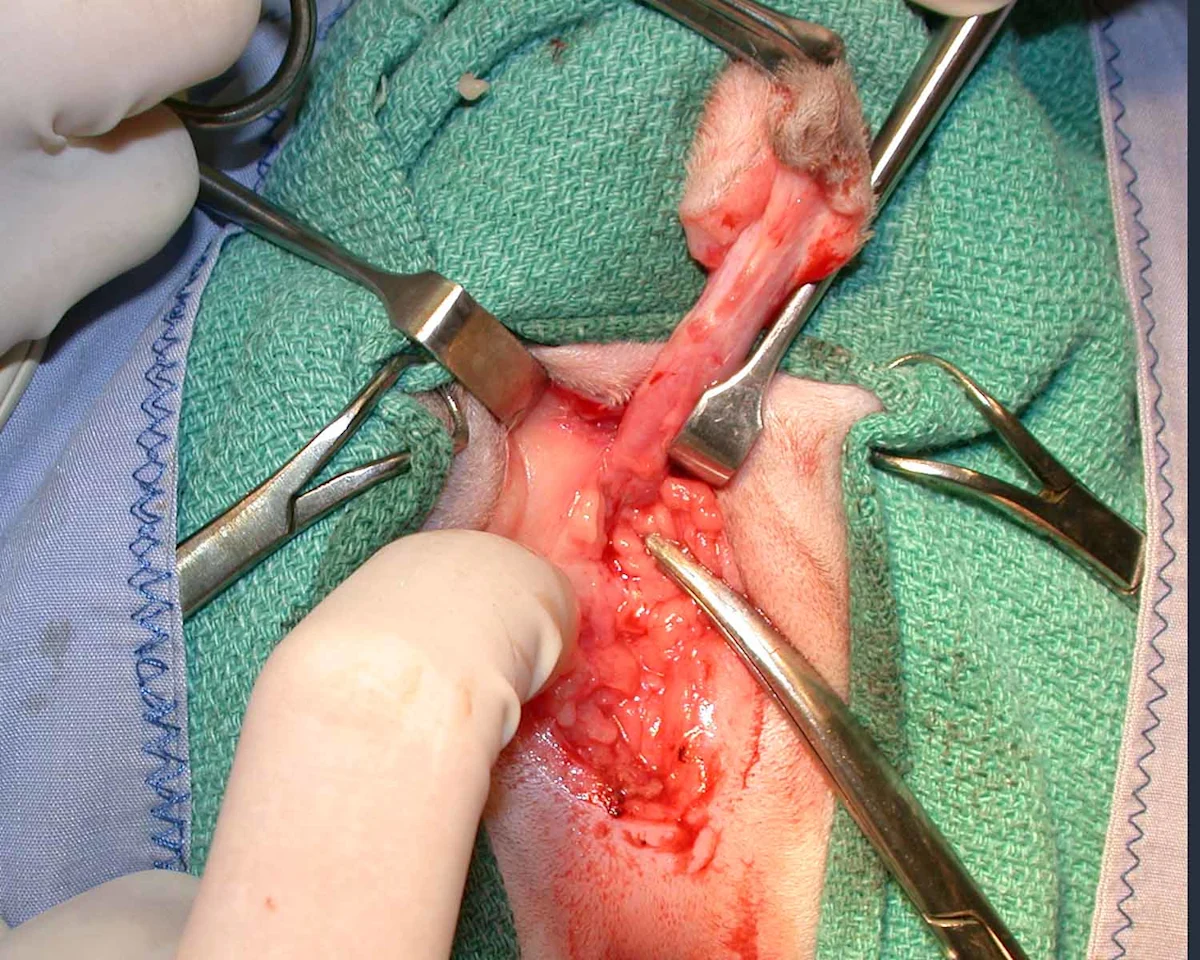
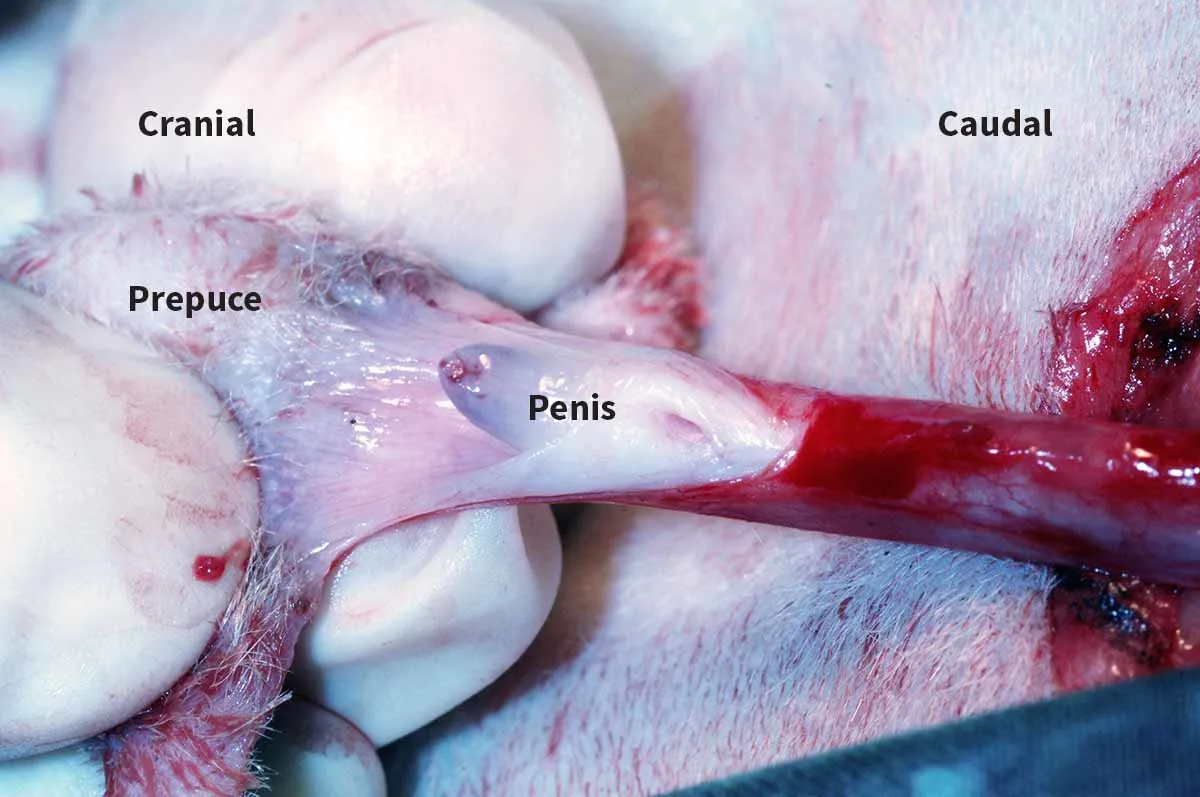
Use a #10 or #15 scalpel blade to create an elliptical incision around the prepuce and scrotum. Extend the incision ≈5 mm circumferentially around these structures to allow removal without putting excessive tension on the urethrostomy site. Use Metzenbaum scissors and/or monopolar electrosurgery to dissect and isolate the distal tip of the penis from the surrounding subcutaneous tissue. Continue dissection immediately adjacent to the penile body to the base where firmly attached to the pelvis (left, ventral recumbency).
Author Insight
Alternatively, subcutaneous tissues around the penile body can be stripped toward the pelvis with a gauze sponge (right, dorsal recumbency), which quickly and cleanly removes adipose tissues.
Step 4: Dissection
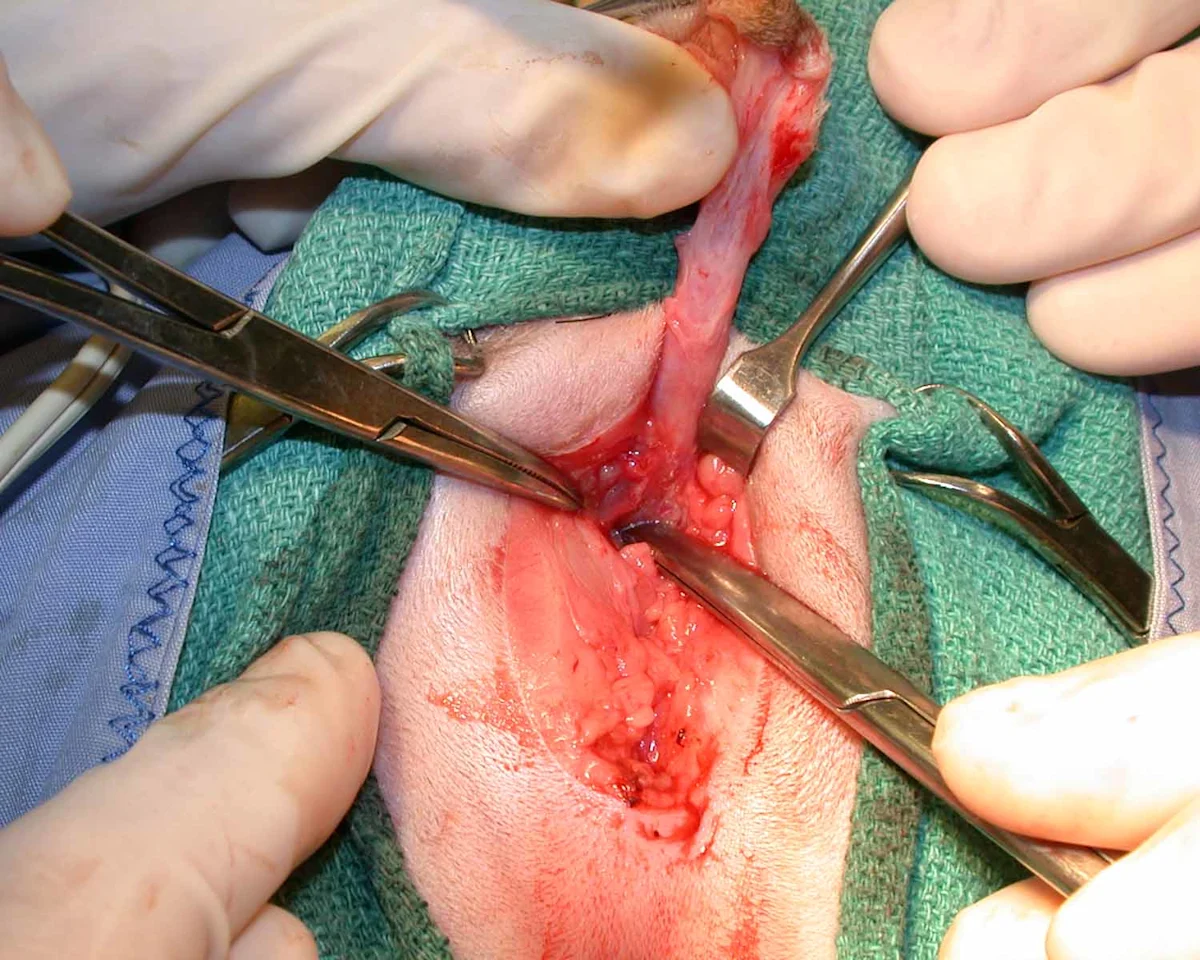
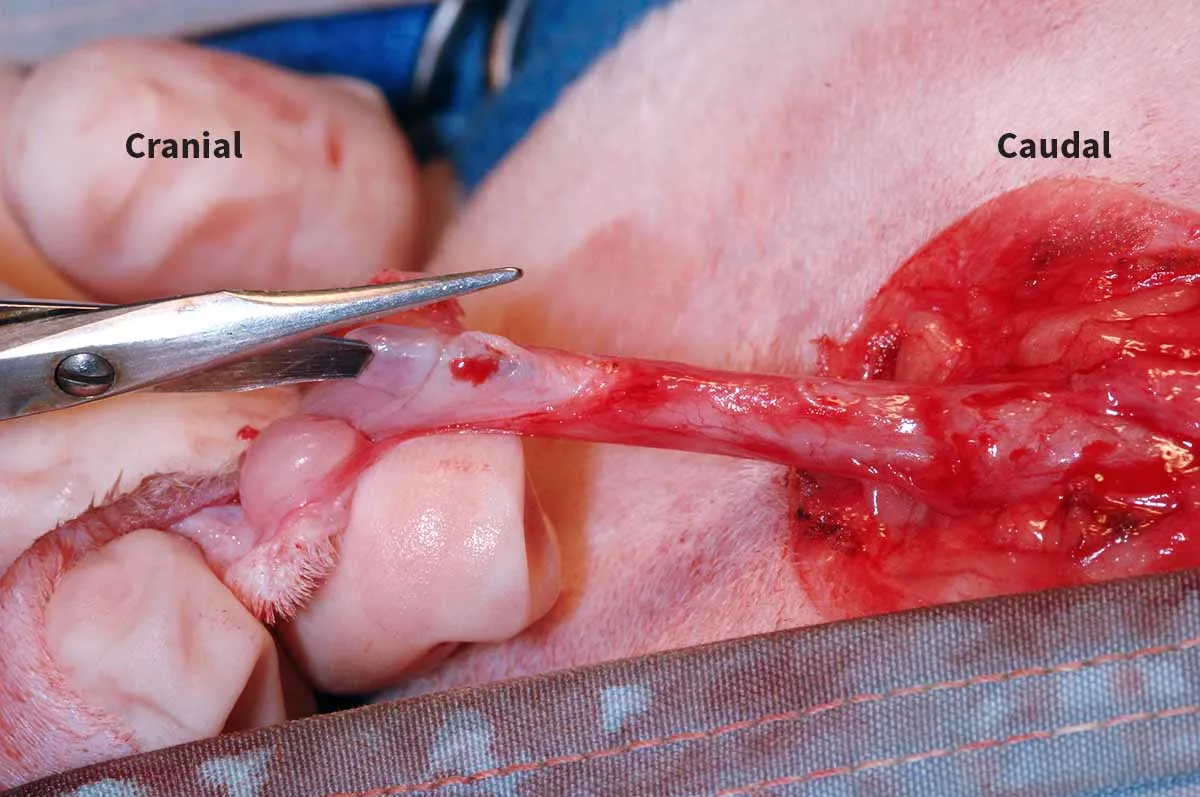
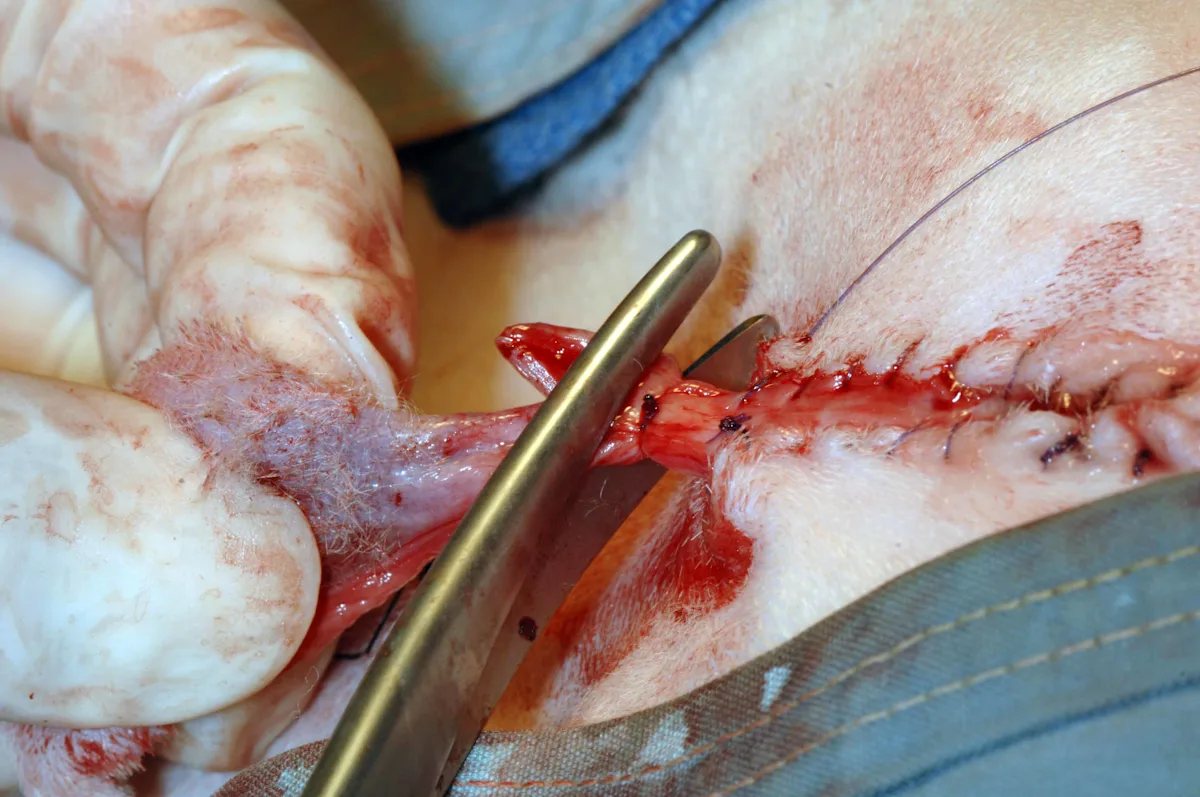
Continue dissection circumferentially around the penis until the bulbourethral glands are visualized as 2 small nodules (size of lentils or green peas) on either side of the dorsal aspect of the penis. Provide adequate dissection, which should allow the urethra at the level of the bulbourethral glands to sit adjacent to the skin with little to no tension pulling it back into the pelvic canal, by transecting the ventral penile ligament, ischiocavernosus muscles, and retractor penis muscle. Ventrally, gently elevate and transect the ventral penile ligament, which traverses the entire course of the ventral penis, off the penis with Metzenbaum scissors (left). Note the greater exposure of the penis that is possible following transection of this ligament (right).
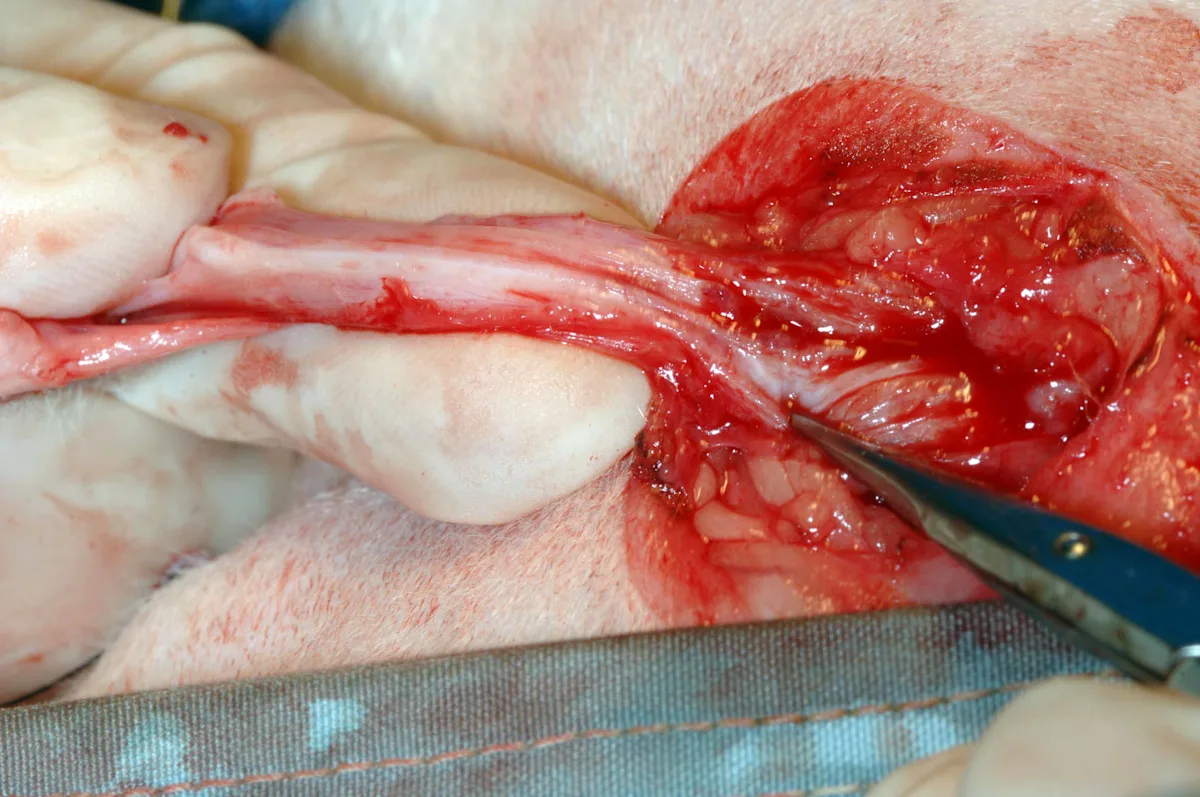
Step 5: Transect the Ischiocavernosus Muscles
Free the ischiocavernosus muscles (right ischiocavernosus muscle, long arrow) for anatomical/surgical reasons from their insertions on the ischium in the 4-o’clock and 8-o’clock positions using a periosteal elevator to elevate the muscles and either monopolar electrosurgery or Metzenbaum scissors to transect the tendinous insertion on the lateral aspect of the muscles (short arrows). Mid-body transection of these muscles results in excessive bleeding.

Author Insight
Cutting close to periosteal attachments reduces hemorrhage from these muscles. Alternatively, the muscles can be elevated off the pubic rim using a periosteal elevator to further minimize hemorrhage. Once the muscle attachments are freed from the pelvis, the penile body should be freely moveable and no attachments to the pelvis will be palpable.
To avoid nerve damage, subcutaneous dissection should not extend cranial to the brim of the pubis.
Step 6: Excise the Retractor Penis Muscle
If still present, excise the retractor penis muscle from the dorsal penile body.
Author Insight
This muscle may already have been removed if subcutaneous dissection was performed with a gauze sponge.
Step 7: Cut the Prepuce
Cut the prepuce open dorsally (left) to expose the distal penis and urethral opening (right). (Cystotomy had previously been performed in the left image.)
Step 8: Incise the urethra
Insert 1 blade of an iris scissors into the urethral opening, and cut on the dorsal midline cranially to the level of the bulbourethral glands. Extend the urethral incision fully to the length of the bulbourethral glands.
Author Insight
Alternatively, if a urethral catheter is in place, a #15 or a #11 blade can be used to incise the penis and urethra over the catheter.
Step 9: Insert the Catheter
Ensure the final urethral diameter is large enough to permit insertion of a 10-Fr red rubber urethral catheter.
Author Insight
The catheter should be placed with minimal resistance and can be left in place while suturing the urethral mucosa to the skin or can be removed for this step based on surgeon preference. If removed while suturing, the catheter should be replaced a final time prior to leaving the operating room to ensure the final stoma is of adequate size. A urethral catheter does not need to be left in place postoperatively unless a urethral tear is suspected.
Placement of a 10-Fr catheter minimizes the risk for obstruction following naturally occurring postoperative fibrosis. The urethral catheter can be left in place while suturing the urethral mucosa to the skin and removed prior to recovery from anesthesia.
Step 10: Preplace Interrupted Sutures
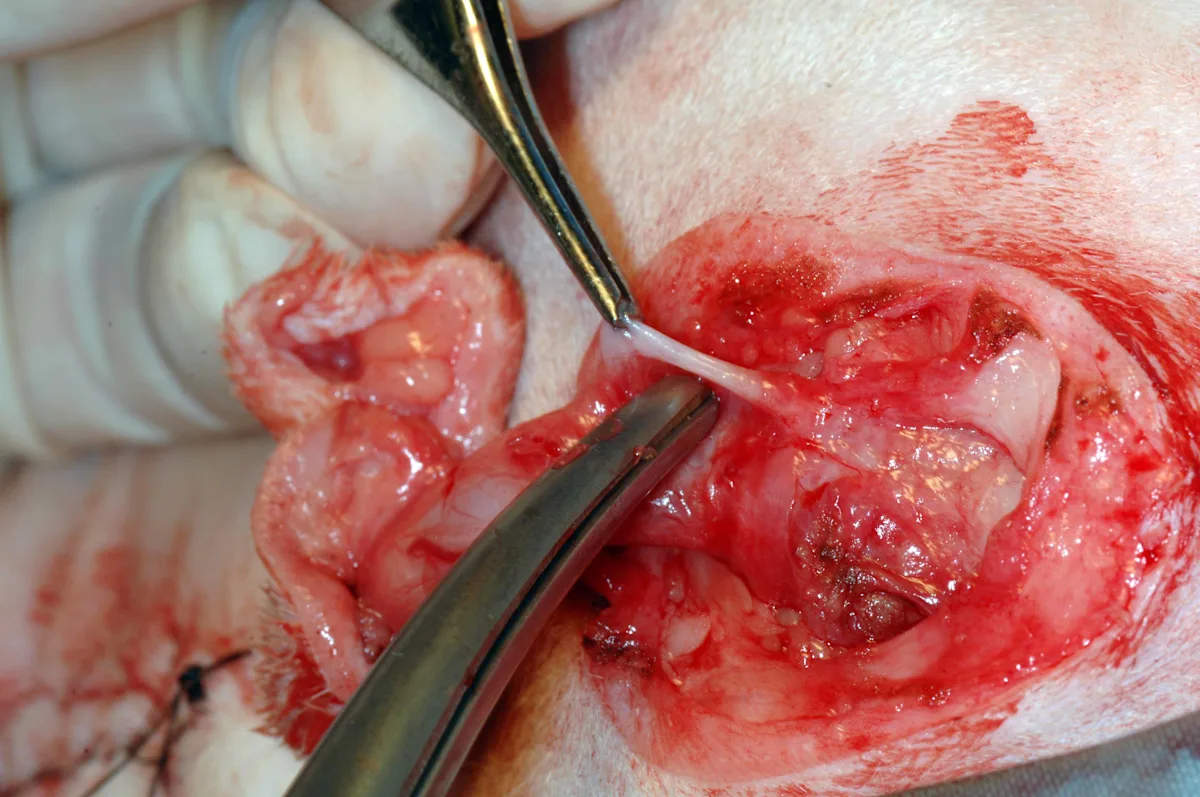
Identify the striated, white, glistening urethral mucosa at the dorsal extent of the incision (left); the mucosa retracts away from the penile body and can be easily missed, especially if obscured by hemorrhage. Using 4-0 or 5-0 rapidly absorbable monofilament suture (eg, glycomer 631, poliglecaprone 25) preplace interrupted sutures at the 10-o’clock (middle), 12-o’clock (right), and 2-o’clock positions between the skin and the urethral mucosa. To avoid grabbing the ventral portion of the urethra during placement of the 12-o’clock suture, insert a hemostat in the urethral stoma and open the jaws to separate the dorsal and ventral portions of the urethra (right), or leave a 10-Fr catheter in place while suturing. The penile body and subcutaneous tissues are not included in the sutures. Tie the preplaced sutures once appropriate positioning is confirmed.

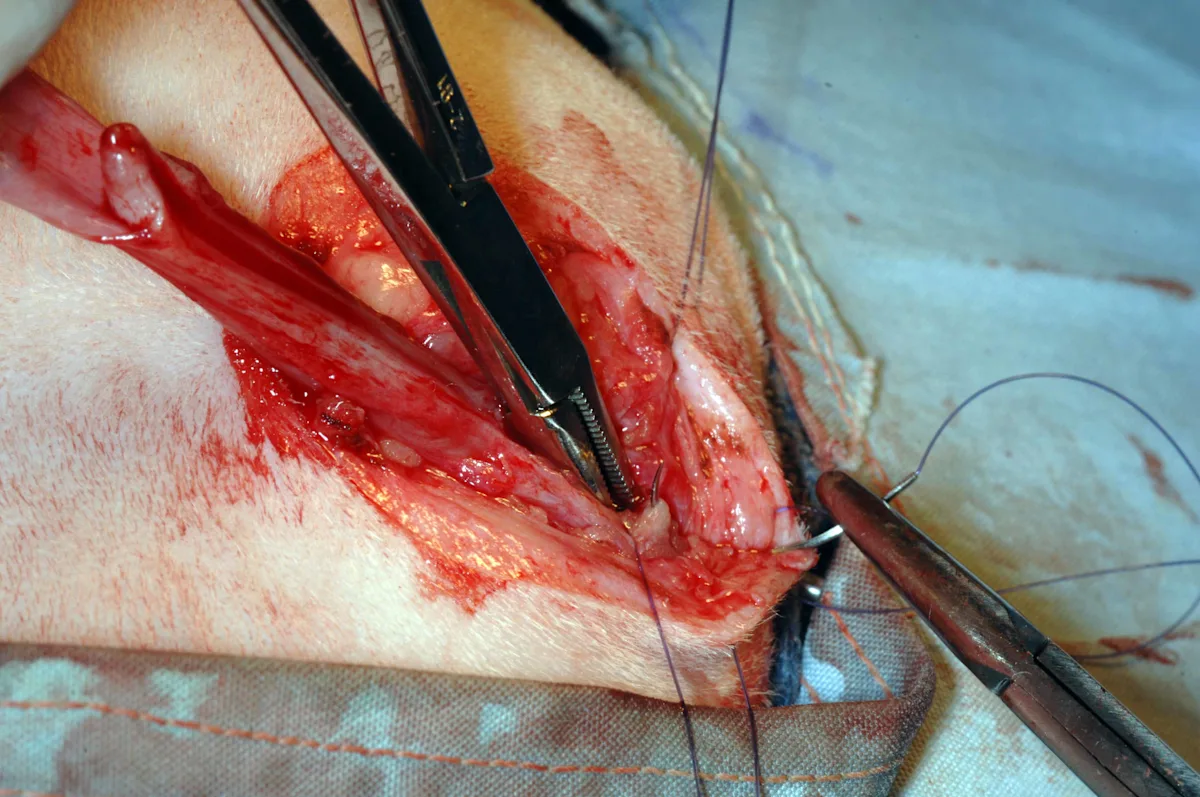
To avoid narrowing the stoma, take bites of the urethral mucosa that are less than one-third of the diameter of the urethra. Avoid trauma to the mucosa by using a cotton-tipped applicator to gently remove any blood that obscures vision while suturing, rather than wiping the delicate mucosa with a gauze sponge. Use small needle holders (eg, Castreviejo, Derf) for suturing. If grasping urethral mucosa directly, use fine tissue forceps (eg, DeBakey). Alternatively, grasp the periurethral tissue with DeBakey thumb forceps and evert to expose the mucosa during suturing.
Author Insight
Excellent illumination is essential; magnification may be helpful.
Step 11: Apply the Suture
Starting dorsally, appose the urethral mucosa on one side of the urethral incision to the skin with a simple continuous or interrupted pattern using the same suture material. Continue the suture pattern until the penile body and urethra begin to narrow. Tie off at this point, and cut the suture ends of the knot short. Appose the remaining urethral mucosa ventral to the stoma to the skin to create a mucosal strip (or drainboard) in an effort to minimize urine scalding.

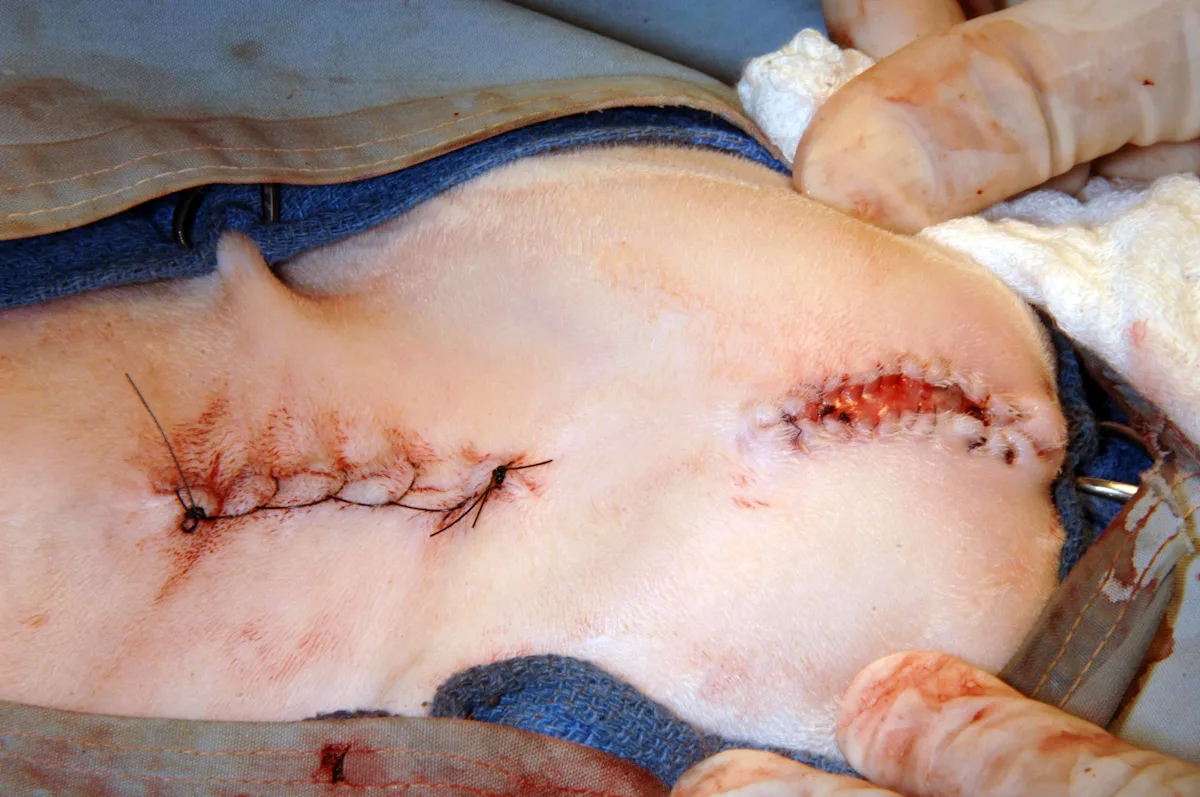
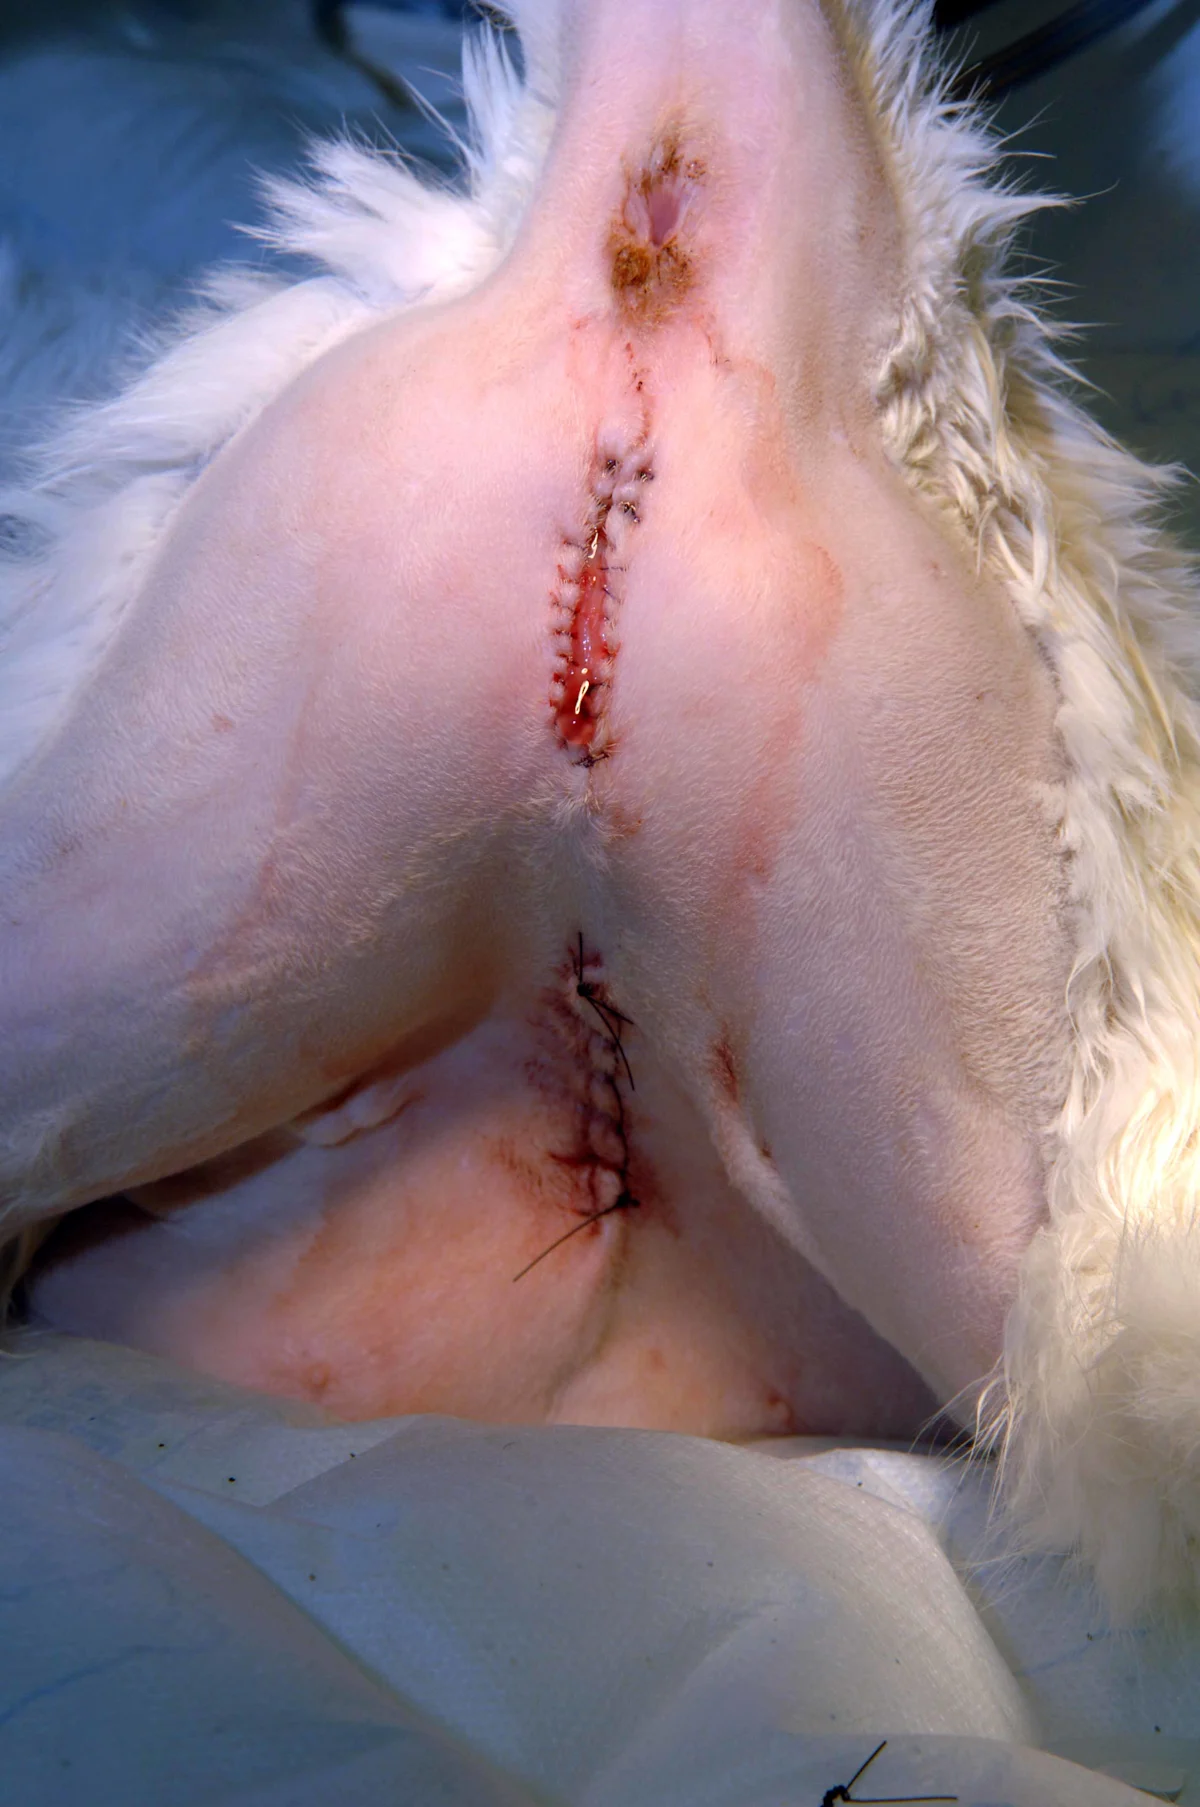
Step 12: Complete the Procedure
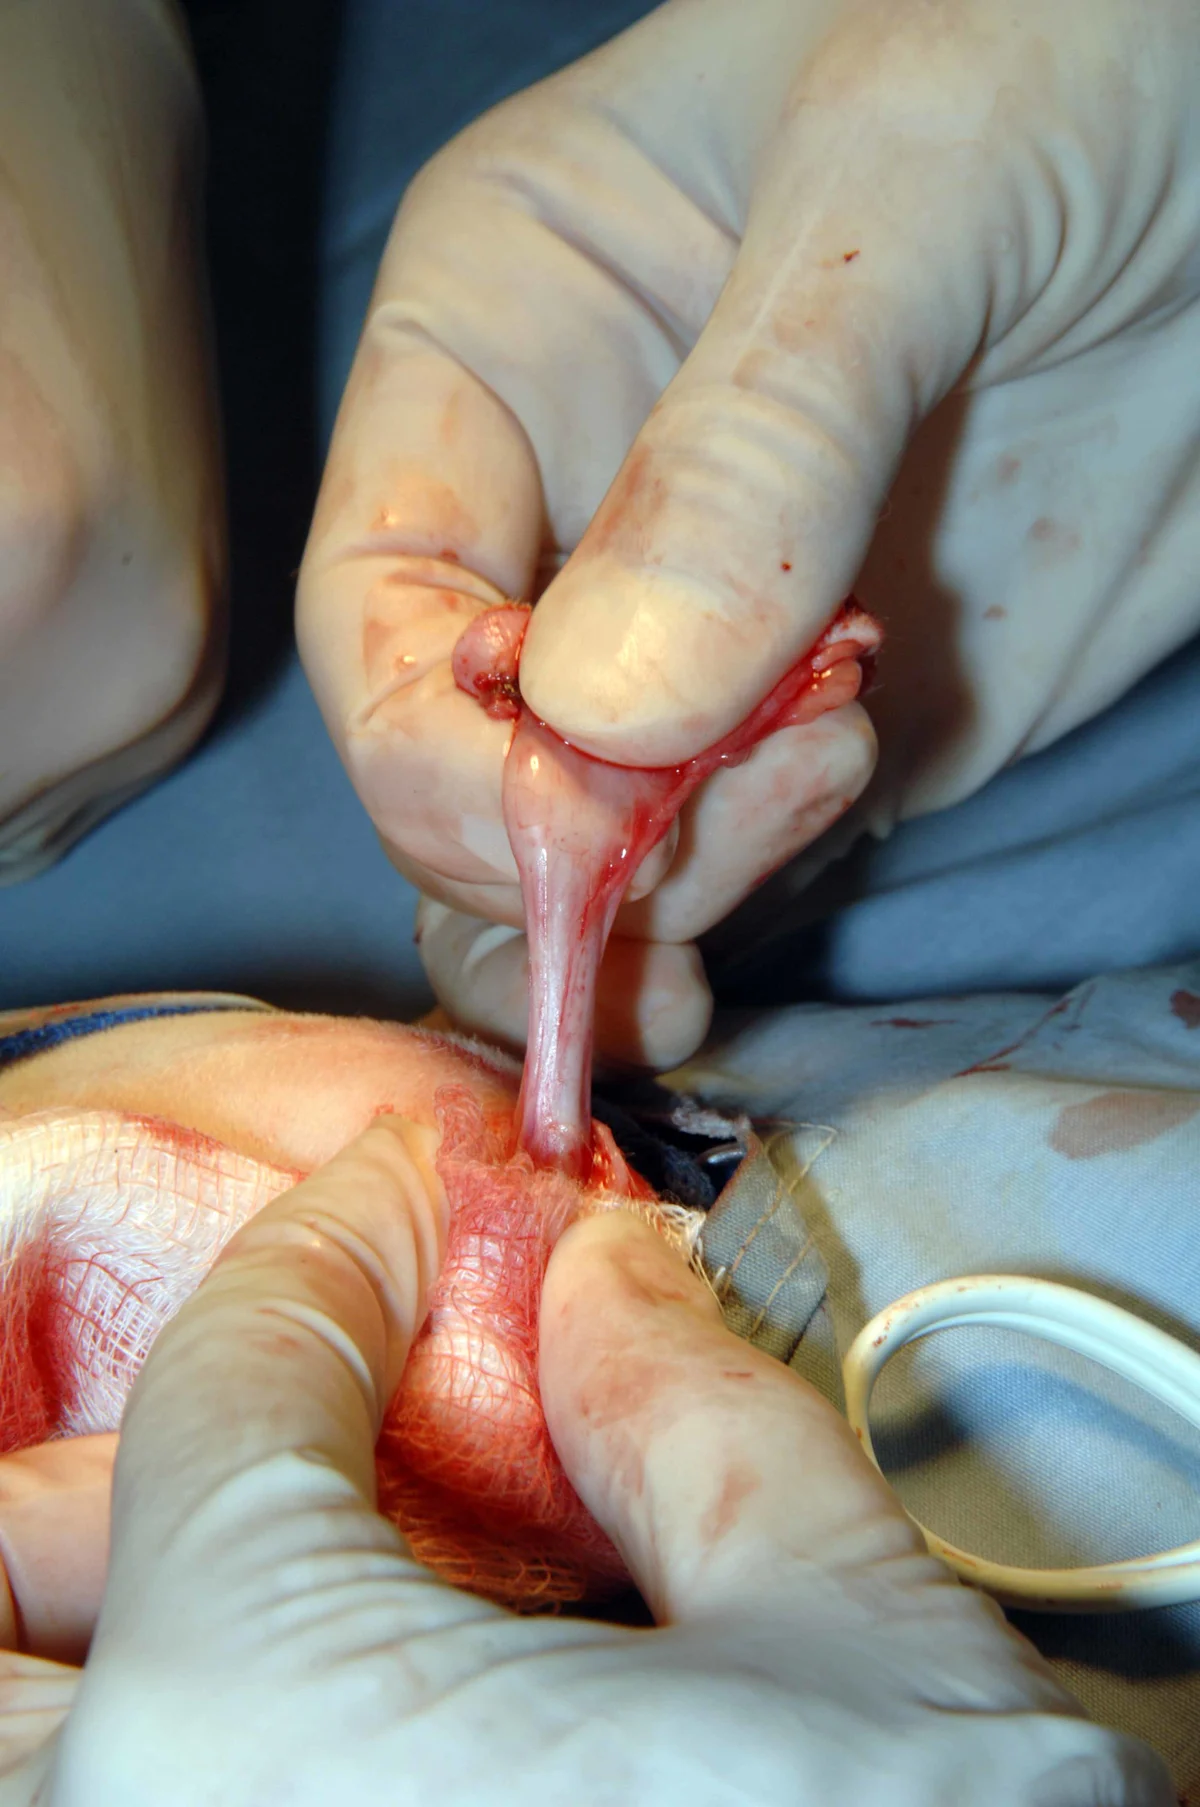
Ligate the penile body distal to the mucocutaneous closures, and amputate the tip of the penis before finishing the ventral portion of the second mucocutaneous suture pattern. Close any remaining gaps in the subcutaneous tissues and skin with buried sutures. Remove the purse- string suture from the anus.
Author Insight
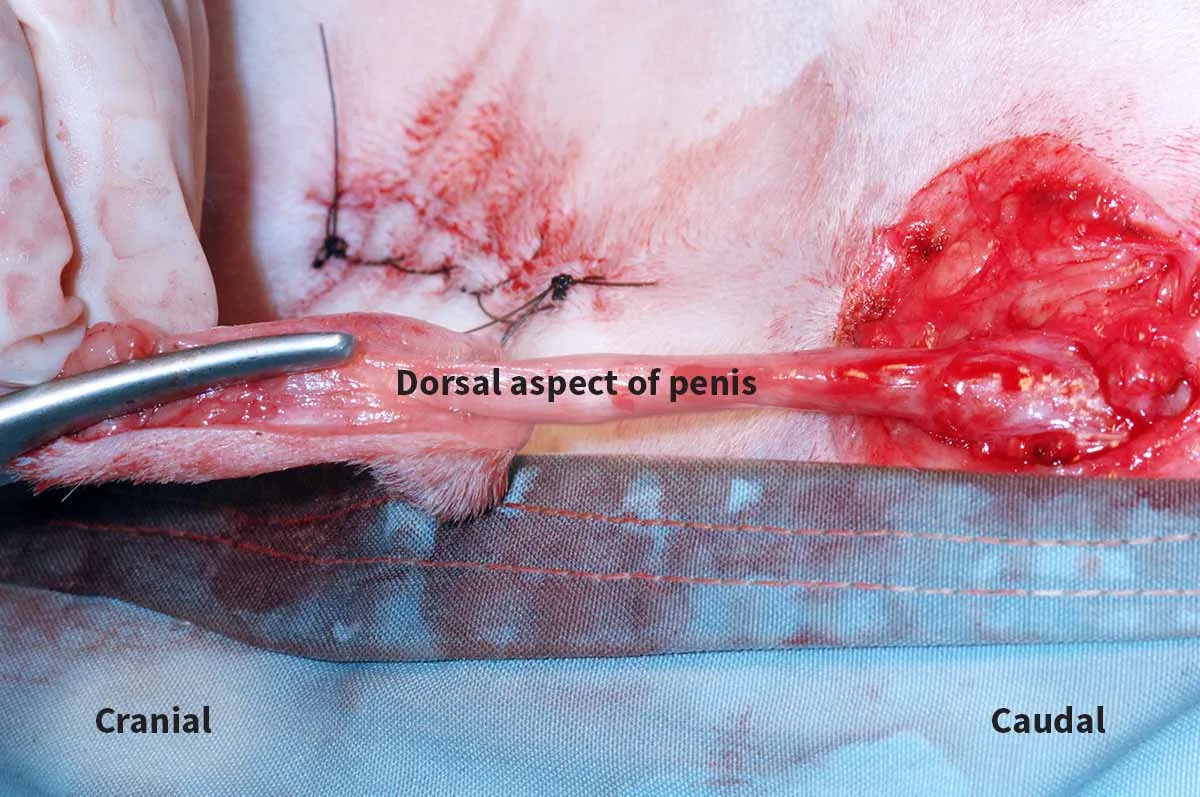
The completed PU will have a drainboard that is 1.5 to 2 cm long (left, right). The stoma should allow the passage of a 10-Fr urethral catheter.
Postoperative Care
An Elizabethan collar should be placed before recovery and left on for at least 3 weeks. Sutures do not need to be removed in most cats. Once the site is healed, dissolvable sutures likely come out during grooming. Urine cultures are recommended if any signs of UTI develop because the risk for UTIs is increased following a PU.
Potential Complications
Complications include dysuria, pollakiuria, hematuria, hemorrhage, dehiscence, perineal urine extravasation, stricture, dermatitis, UTI, and persistence of lower urinary tract disease. Rarely, urinary incontinence may be seen. Stricture (5%-12%) and bacterial UTIs (23%) are the most common postoperative complications.1 Strictures usually occur at the mucocutaneous junction and are related to inadequate mobilization of the body of the penis (failure to identify and transect the ischiocavernosus muscles, retractor penis muscle, and/or ventral penile ligament), which causes excessive tension, or inadequate mucosa-to-skin apposition with subsequent urine extravasation.
Placement of an Elizabethan collar is essential to prevent patient interference during the healing phase and subsequent stricture formation. Although catheters can cause urethral trauma in cats, a catheter can be left in place if needed to allow time for resolution of urethral tearing proximal to the site in these rare cases.3
Managing Surgical Patients
Does thinking about surgery make you a little nervous? Just like surgery itself, successful management of a surgical patient, from the presurgical consult to the final follow-up visit, should be addressed step by step.
Remember these essential pieces of the surgical puzzle:
Preparation is key—for you, the patient, and the client. Clients should be advised of what treatment is being planned and must give informed consent.
Mistakes happen when winging it. The most efficient way to remove doubt about patient treatment (and thereby reduce the risk for errors) is to introduce checklists and standard operating procedures that encourage all team members to carefully examine what is being done and why.
Everyone should feel comfortable speaking up. It is essential to develop a culture within the team that allows anyone to voice questions or concerns in the best interest of optimal patient care without fear of reprisal.
Clients are part of the team. To improve chances of a successful outcome, provide carefully thought out, concise discharge instructions that outline the client’s responsibilities.
Content modified from this article on Managing the Surgical Patient's Journey Through the Hospital.