A Step-by-Step Guide to Exploratory Celiotomy
Kelley Thieman Mankin, DVM, MS, DACVS (Small Animal), Texas A&M University
An exploratory celiotomy is a common nonelective surgery in veterinary medicine. An exploratory celiotomy should be systematic to ensure every structure is examined without the clinician becoming distracted by obvious lesions and missing other subtle abnormalities.
Preparing for Surgery
A sufficient incision from the xiphoid to the pubis must be created for the entire abdomen to be accessible. Therefore, the abdomen must be appropriately clipped, prepped, and draped. The clipping should extend from ≈4 cm cranial to the xiphoid to ≈4 cm caudal to the cranial brim of the pubis. The abdomen should be clipped ≈3 to 4 cm lateral to the nipples. The entire clipped area should be prepped with initial skin cleaning and the prepuce flushed with dilute 0.05% chlorhexidine diacetate solution1 in a sufficient volume to result in mild distention of the prepuce. The fluid should be agitated in the prepuce, then drained and repeated for a total of 2 minutes. The patient should then be placed in the operating room, and a sterile surgical scrub should be performed, after which the patient can be draped. The drapes should be applied ≈2 cm from the hairline, 2 cm cranial to the xiphoid, and 2 cm caudal to the pubis. For male dogs in which the urethra does not need to be accessed during surgery, the prepuce should be towel clamped out of the field prior to quarter draping. Once the prepuce is lateralized, the quarter drape should be placed over the preputial orifice. If the urinary tract needs to be accessed during surgery (eg, to facilitate urocystolith removal), the prepuce should remain in the surgical field.
Identifying & Incising the Linea Alba
The linea alba should be identified and incised.2 In female dogs, the skin, subcutaneous, and fascial incisions should be made on the ventral midline. In male dogs, the skin incision should be curved around the prepuce, and the subcutaneous tissue should be dissected to identify the linea alba.
Managing the Falciform Fat
Following incision through the linea alba, the falciform fat can be visualized attached along the ventral midline. This fat should be inspected for abnormalities (eg, acquired portosystemic shunts, metastatic disease), then removed from each side of the midline using electrosurgery or scissors and ligated cranially at the level of the xiphoid. Ligation of the falciform fat helps prevent hemorrhage from the normal vessels coursing through the fat.
Once the falciform fat is removed, the edges of the incision should be covered with moistened laparotomy pads. Use of an abdominal retractor (eg, Balfour retractor) is important to allow the surgeon to easily inspect the entire abdomen. Once the retractor is in place, the abdomen should be quickly examined for active hemorrhage or lesions that require immediate attention. If none are detected, the systematic abdominal exploration can commence.
Evaluating the Abdomen
Often, the surgeon will divide the abdomen into imaginary sections: cranial, right dorsal, left dorsal, midventral (which includes the GI tract), and caudal.
Cranial Abdomen
The cranial abdomen is often inspected first. The liver should be gently retracted caudally with a flat hand to examine the diaphragm. Then, each liver lobe should be inspected. The liver lobes from left to right are: left lateral, left medial, quadrate, right medial, right lateral, and the caudate process of the caudate lobe. The papillary process of the caudate lobe is located cranial to the lesser curvature of the stomach, dorsal to the lesser omentum. The caudate process of the caudate lobe and the right lateral liver lobes can be more easily seen during inspection of the right dorsal abdomen.
Examining the biliary tree during liver inspection is ideal. The gallbladder is located between the right medial and quadrate lobes of the liver. When indicated, it can be gently squeezed with continuous gentle pressure to assess patency of the biliary tree. The cystic and common bile ducts can be inspected by gently retracting the gallbladder with attached quadrate and right medial liver lobes cranioventrally and retracting the duodenum caudally. The common bile duct courses through the hepatoduodenal ligament to empty in the duodenum ≈2 to 3 cm aboral to the pylorus.
Right Dorsal Abdomen
Next, the right dorsal abdomen, often referred to as the right gutter, should be inspected. The right gutter can be accessed by gently grasping the descending duodenum and using the mesoduodenum as a retractor. The duodenum should be lifted and retracted medially to expose the right dorsal abdominal structures. While the right gutter is exposed, the caudate process of the caudate lobe, the right lateral lobe of the liver, and the right limb of the pancreas can be more easily visualized. The caudate process of the caudate lobe is located dorsally, cupping the right kidney and often overlying the right adrenal gland. The right adrenal gland may not be visualized, but it can be palpated for masses. The portal vein and caudal vena cava can be seen best while the right gutter is exposed.
Left Dorsal Abdomen
To examine the left dorsal section/left gutter, the descending colon can be grasped on the left side of the abdomen, lifted, and pulled toward the right body wall, using the mesocolon as a natural retractor and exposing the left dorsal abdominal structures. The left adrenal gland can easily be seen cranial to the left kidney.
Midventral Abdomen
The spleen is a mobile structure. It can be grasped gently and lifted to facilitate full inspection. All surfaces of the spleen should be evaluated, along with the vasculature supplying it. Siderotic plaques (Figure) are a common, normal finding. The size of the spleen can be variable based on the condition of the patient and the drugs that have been administered.
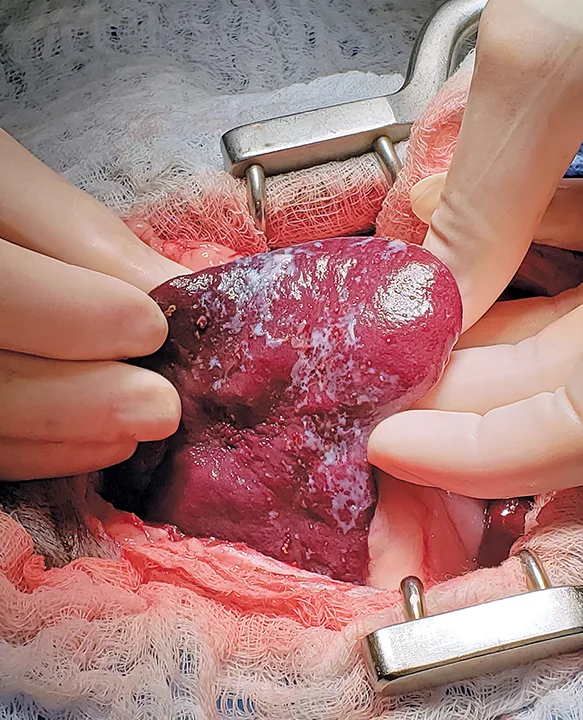
Spleen with a siderotic plaque. Siderotic plaques are nonpathologic and require no treatment.
The caudal duodenal flexure is rendered relatively immobile by the duodenocolic ligament. To facilitate examination, the jejunum can be swept cranially and to the right and the colon swept to the left. Complete examination is important, as GI foreign bodies may have difficulty making this tight turn and become lodged in this location. Each surface of the jejunum, ileum, cecum, and colon should be inspected and gently palpated for abnormalities. The mesentery, mesenteric lymph nodes, and cecal lymph nodes should also be inspected.
Caudal Abdomen
Next, the caudal abdomen should be visualized and inspected. To identify the ureters entering the urinary bladder, the bladder must be reflected ventrally. At the same time, the uterus or uterine stump can be inspected in its location dorsal to the urinary bladder. Cranial traction may be placed on the urinary bladder to palpate the prostate. Although the prostate may be far enough in the pelvic canal that it may not be visualized, it should still be palpated. The sacral lymph nodes are located in the pelvic canal and can typically only be palpated when enlarged.
Abnormalities
As the exploratory celiotomy progresses, abnormalities should be noted and biopsied or aspirated when appropriate. If no abnormalities are detected, biopsies should be taken from the organs that are most likely involved in the patient’s disease (eg, stomach, duodenum, jejunum, and ileum in animals with vomiting and diarrhea; liver in a dog with elevated liver enzymes). When GI biopsies are performed, multiple locations should be biopsied, including 2 to 3 locations from the jejunum. The colon is not routinely biopsied unless colonic disease is likely.
Step-by-Step: Exploratory Celiotomy
What You Will Need
Balfour retractor
Sterile saline
Laparotomy pads
Standard surgical pack
± Babcock forceps
STEP 1
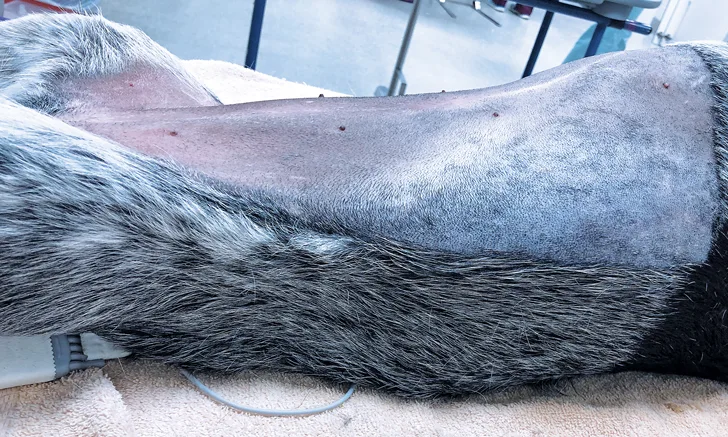
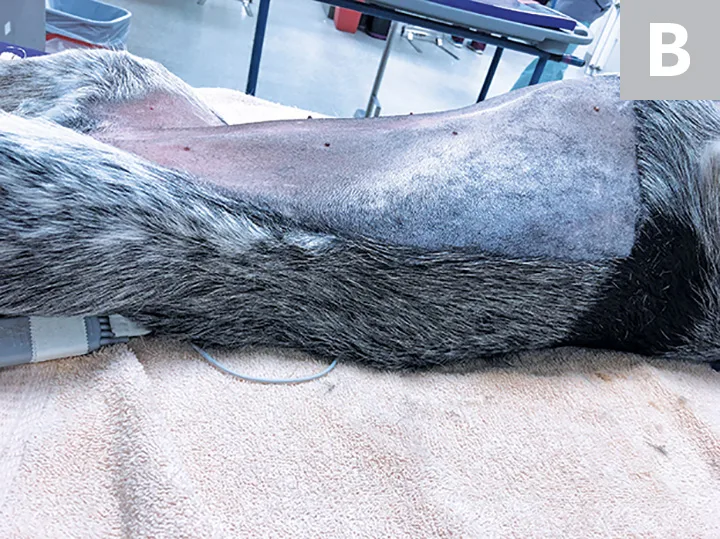
Clip the patient’s abdomen, extending from ≈4 cm cranial to the xiphoid to ≈4 cm caudal to the cranial brim of the pubis (A) and ≈3 to 4 cm lateral to the nipples (B). Clean the clipped area, and, in male dogs, flush the prepuce with dilute chlorhexidine solution.
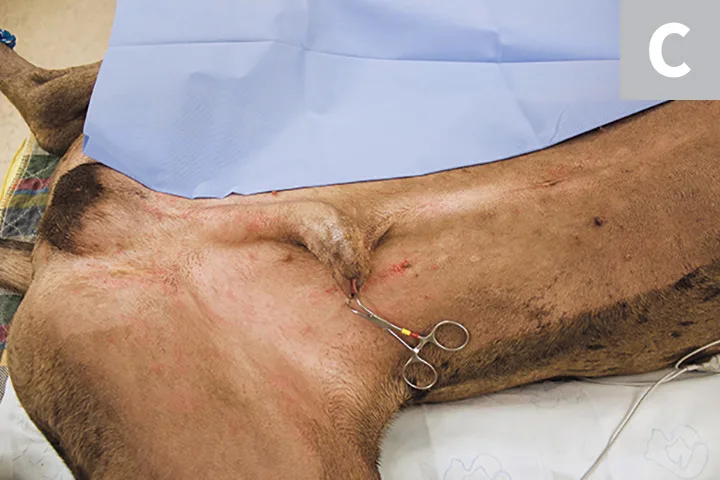
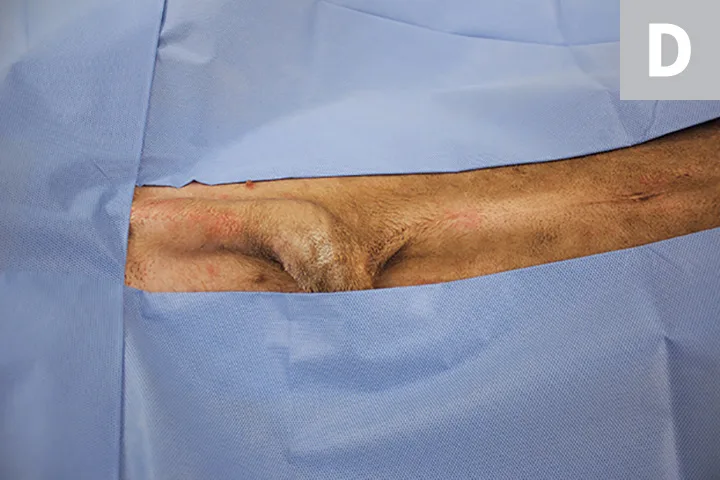
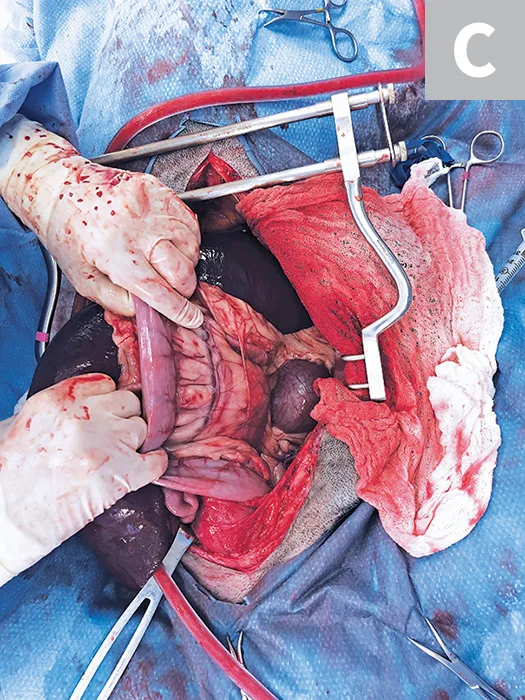
Move the patient to the operating room, and perform a sterile surgical scrub. If the patient is male and the urethra does not need to be accessed, towel clamp the prepuce out of the field (C). Drape the patient. If the patient is male, place the quarter drape over the preputial orifice (D).

STEP 2
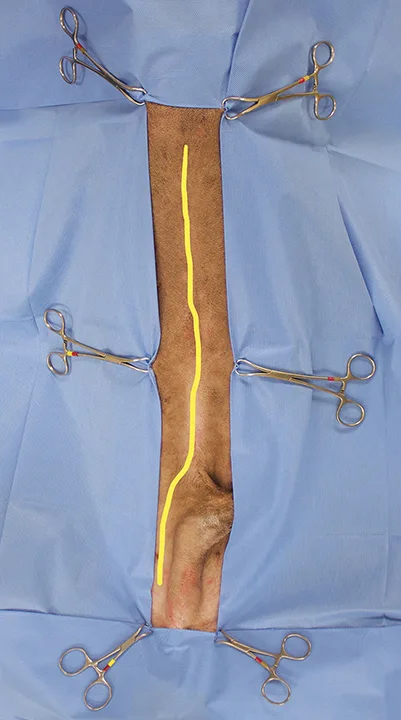
Make an incision from the xiphoid to the pubis; if the patient is male, curve the skin incision around the prepuce. Identify and incise the linea alba.
STEP 3
Inspect the falciform fat for abnormalities, then use electrosurgery or scissors to reflect the falciform fat and ligate it cranially at the level of the xiphoid.
STEP 4
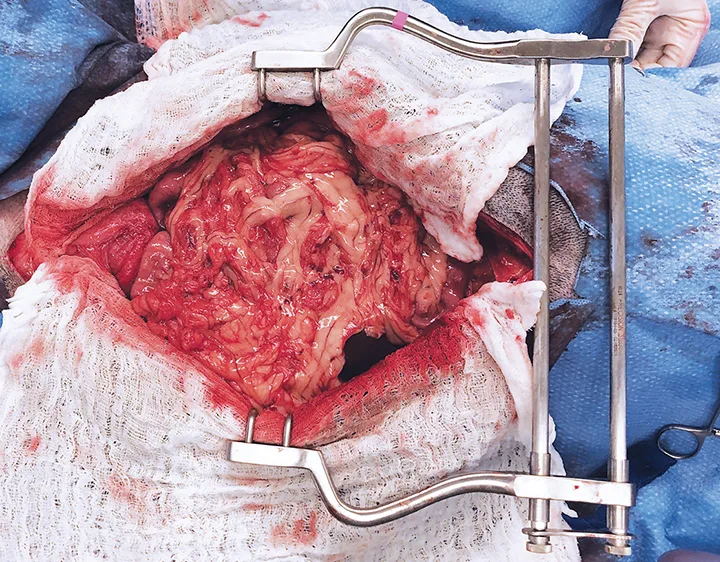
Cover the edges of the incision with moistened laparotomy pads, then insert an abdominal retractor.
Observe the abdomen for active hemorrhage and other lesions. With a flat hand, gently retract the liver caudally and examine the diaphragm. Inspect each liver lobe. In appropriate cases, gently squeeze the gallbladder, applying continuous pressure to express it. Retract the gallbladder (with attached quadrate and right medial liver lobes) cranioventrally, and retract the duodenum caudally to inspect the cystic and common bile ducts.
STEP 5
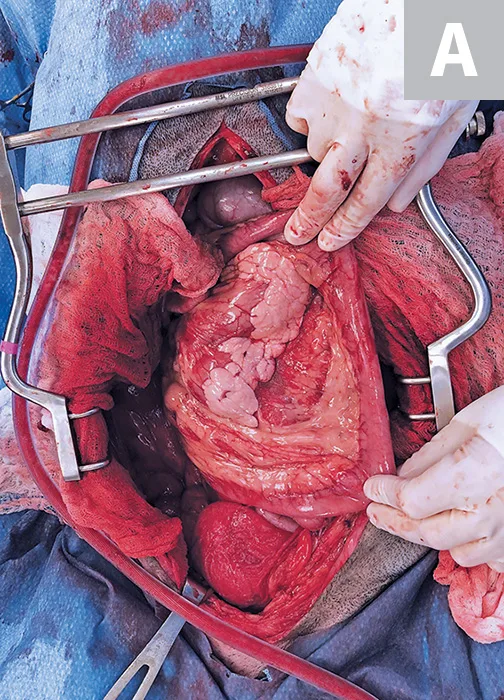
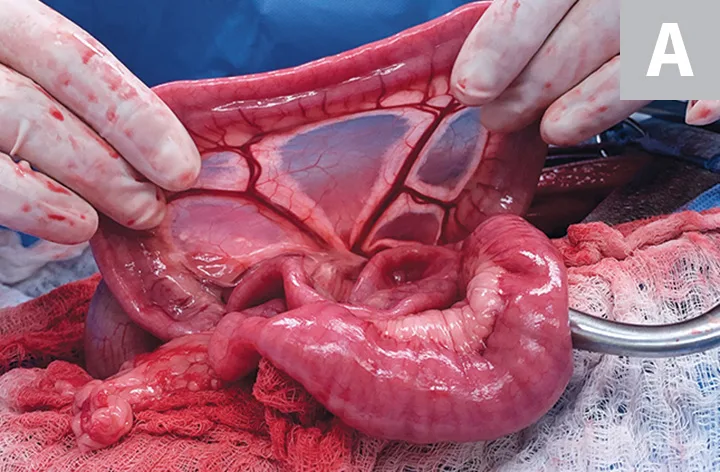
Inspect the right dorsal abdomen (A and B). Lift the duodenum, and retract it medially to expose the right dorsal abdominal structures (A). Insert a finger dorsal to the caudate process of the caudate lobe and cranial to the right kidney, and palpate the right adrenal gland for the presence of masses.
Repeat with the left dorsal abdomen (C).

STEP 6
Gently grasp and lift the spleen to evaluate the surface and vasculature.
STEP 7
Palpate the esophageal hiatus by passing a hand between the stomach and the left body wall, moving dorsally and following the curve of the stomach until it meets the diaphragm. Make a hole in the ventral leaf of the greater omentum, and lift the stomach ventrally. Place a finger or atraumatic forceps (eg, Babcock) on the dorsal stomach and lift it ventrally. Only leave the forceps in place briefly to avoid damaging delicate tissues. Visualize and palpate the dorsal stomach, and inspect the left limb of the pancreas through the rent in the omentum (see Video). Retract the stomach cranioventrally to visualize the GI tract.
STEP 8
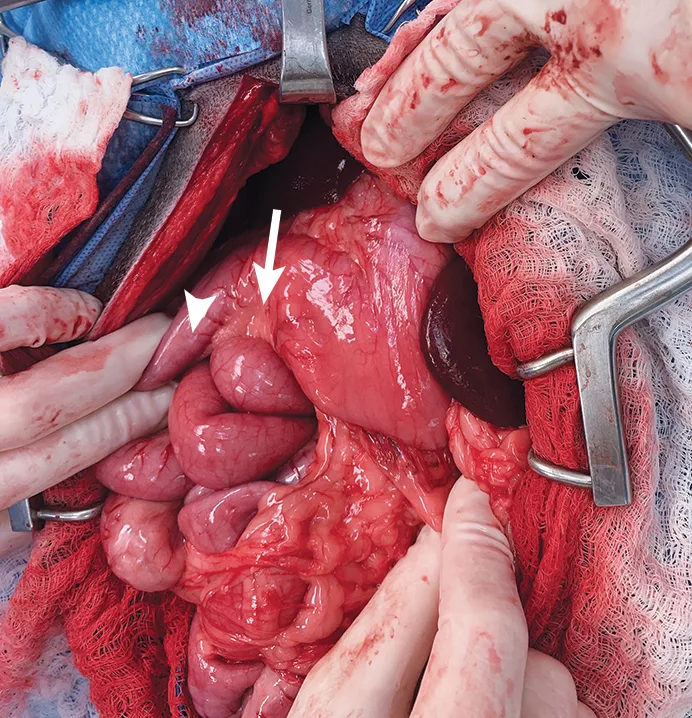
Palpate the pylorus (arrow) and the descending duodenum (arrowhead), and inspect the right limb and body of the pancreas.
Author Insight
A normal pylorus should feel thicker than the remainder of the stomach.
STEP 9
Sweep the jejunum craniomedially, and examine the intestines from an oral or aboral approach. Using a gentle hand-over-hand motion (A) and without aggressively pinching the intestines while they move through the fingers, inspect each surface of the jejunum, ileum, cecum, and colon, and gently palpate for abnormalities. Inspect the mesentery, jejunal lymph nodes, and colic lymph nodes.
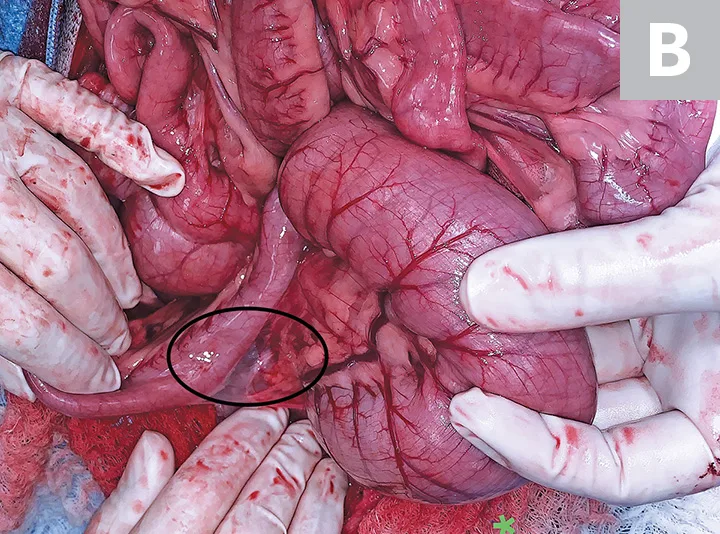
Author Insight
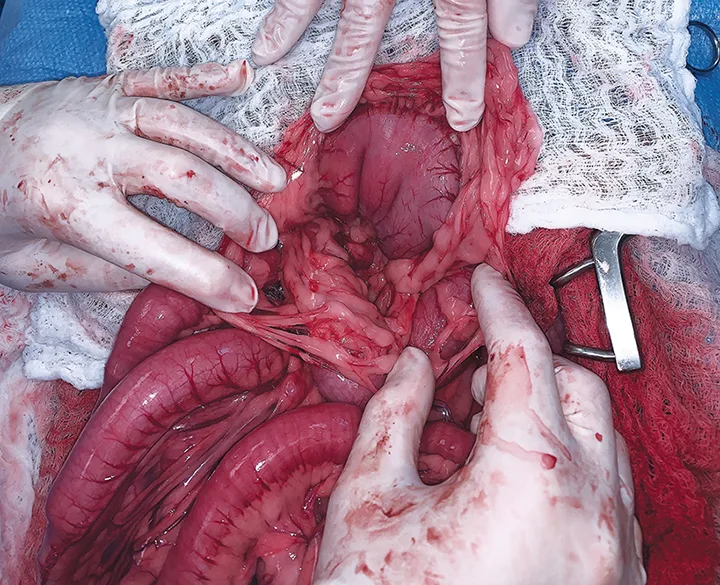
If a foreign body is located in the caudal duodenal flexure, the duodenocolic ligament can be transected to increase mobility and facilitate foreign body removal. The duodenocolic ligament (B; circled) is continuous with the peritoneum, which covers the mesenteric root (ie, jejunal arteries); therefore, transection of this structure can be safely performed in the translucent avascular area.
STEP 10
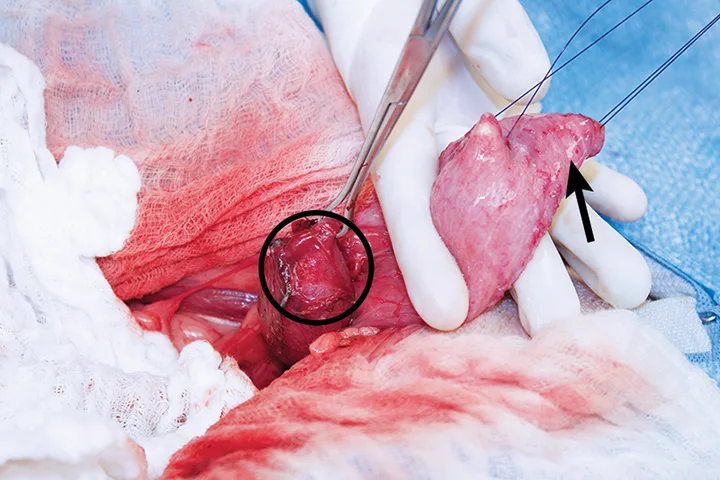
Inspect the urinary bladder and prostate or uterus/uterine stump. Identify the ureters entering the urinary bladder by reflecting the bladder ventrally and caudally (arrow). At the same time, inspect the uterus or uterine stump in its location dorsal to the urinary bladder (circle shows an enlarged uterine stump), or palpate the prostate.
Editor's note: This article was originally published in October 2019 as "Exploratory Celiotomy."