Cytology from Fine-Needle Aspirates
Laurie Millward, DVM, MS, DACVP (Clinical), The Ohio State University Veterinary Medical Center

Part 1 of a 2-part series
Creating high-quality cytology slides is easy and inexpensive, and few materials are required. Diagnostic yield of samples obtained with fine-needle aspiration is improved when cytology samples are well prepared.
The following are practical methods for preparing cytologic samples with a focus on increasing diagnostic yield of fine-needle aspirates.
Preparation
Before performing fine-needle aspiration in patients, advise clients of potential complications associated with aspiration of cutaneous and subcutaneous masses and lymph nodes. Uncommon reactions include mild-to-moderate hemorrhage, infection, swelling, and pain at the sample site. More serious complications such as pneumothorax, severe hemorrhage, infection, tumor cell seeding, or organ laceration are rare possibilities when fine-needle aspiration of internal organs is performed.1-3
Most cutaneous and subcutaneous masses and lymph node aspiration sites need no preparation, but some practitioners prefer to clip and lightly scrub the sample area. Shave and surgically prepare the site of ultrasound-guided fine-needle aspiration of internal organs to prevent introduction of infectious organisms into body cavities.
Required Materials
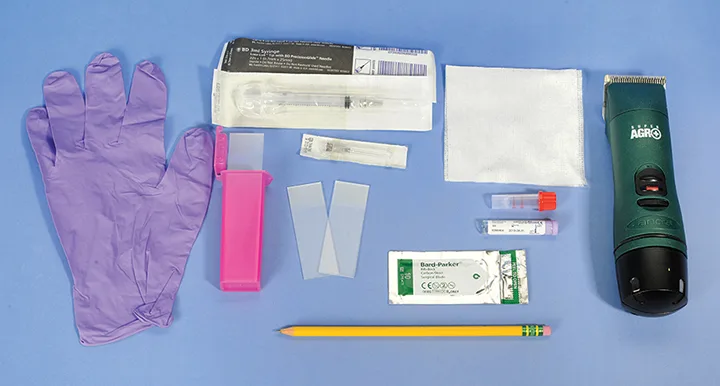
Gather all materials in advance to ensure that cytology samples can be collected and prepared quickly and efficiently. (See Figure 1.) New glass slides with frosted ends, stored to minimize dust and debris contamination, are recommended. Glass slides should never be washed or reused because used slides can introduce artifacts or produce inaccurate results if cells from previous samples remain. Glass slides with frosted ends allow easy labeling of the sample location and patient name. Use a pencil to label samples on the frosted end of the slide.

Gather the following materials for collecting cytologic samples: alcohol-soaked gauze or alcohol swabs, clippers, EDTA (lavender top) blood tubes, 20- or 22-gauge, 1- to 1.5-inch needles, new glass slides with frosted ends, #10 scalpel blades, pencil or solvent-resistant markers, a plastic or Styrofoam slide box, powder-free gloves, and syringes (5 or 6 mL). Image courtesy of Laurie Millward, DVM, MS, DACVP (Clinical)
Steps for Sample Collection
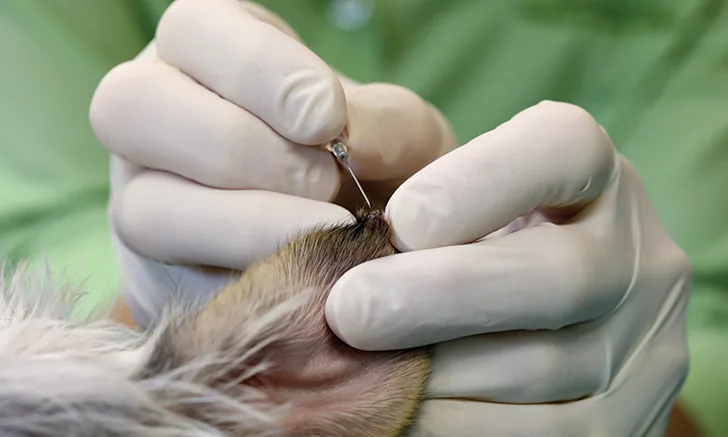
Nonaspiration technique, or use of a needle without an attached syringe, is sufficient for cell collection from many subcutaneous and cutaneous tissues. This technique minimizes blood contamination, especially in highly vascular tissues.
Firmly grasp the area to be sampled between the thumb and forefinger and insert the tip of a 20- or 22-gauge, 1- to 1.5-inch needle.
Advance the needle and incompletely retract it 3 to 6 times in different directions so that the needle never fully exits the tissue. Once needle redirection is complete, remove the needle from the tissue.
Attach a 5- or 6-mL syringe filled with air to the needle, and eject the sample onto the slide with a firm, swift compression of the syringe plunger. For each site, obtain 2 to 3 samples using a new needle with each attempt. When aspirating larger masses with necrotic centers, sample the lesion center and the margins.
True aspiration technique (ie, use of negative pressure provided by a syringe attached to the needle) may be necessary when aspirating poorly exfoliating lesions.
Insert a 20- or 22-gauge, 1- to 1.5-inch needle with an attached 5- or 6-mL syringe into the target tissue.
Apply negative pressure by retracting the plunger. Advance the needle and incompletely retract it 3 to 6 times in different directions so that the needle never fully exits the tissue. Once complete, release the negative pressure by letting go of the plunger, before the needle is removed from the tissue, to prevent the sample from being aspirated and trapped in the syringe barrel.
Detach the needle from the syringe and fill the syringe with air. Then reattach the syringe and eject the sample onto the slide using a firm, swift compression of the syringe.
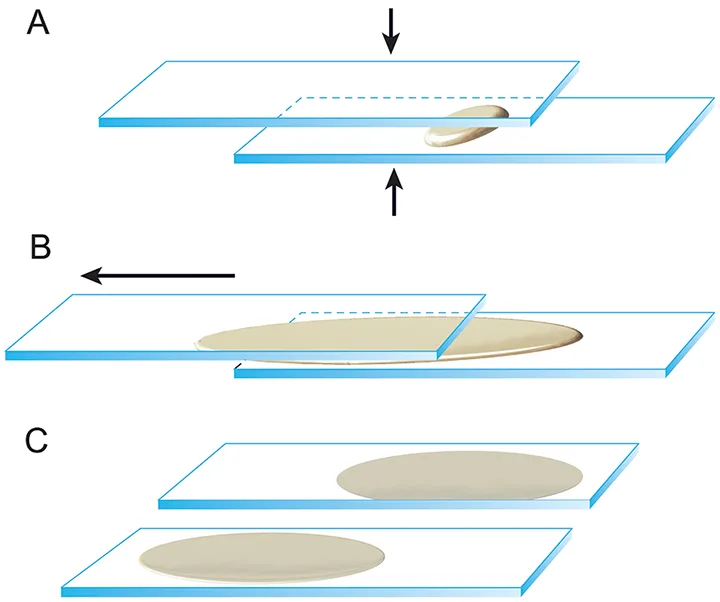
Once the cellular material has been ejected on the slide, immediately spread the sample to create a monolayer of cells that will facilitate optimal staining and accurate microscopic interpretation. Most samples from solid tissue masses and sites that produce semisolid-to-mucoid material can be prepared using a compression or squash technique. (See Figure 2.) Place a second clean spreader slide at a 180-degree angle over the sample. Use the weight of the slide to compress the material, then immediately and smoothly pull the slides in opposite directions to move the sample away from the frosted ends of the slides. The slides must remain flat and parallel as they are pulled apart to ensure even spreading of cells. To avoid breaking the cells and rendering the sample nondiagnostic, do not apply additional pressure to the sample as it is spread.

Illustration of the squash, or compression, technique. (A) Once the cellular material is ejected onto the slide, a second spreader slide is gently placed over the first slide at a 180-degree angle. (B) Use the weight of the slide to compress the material, then immediately and smoothly pull the slides in opposite directions to move the sample away from the frosted ends of the slides. The slides must remain flat and parallel as they are pulled apart to ensure even spreading of cells. (C) This technique provides 2 slides that are sufficiently cellular for staining and interpretation. Reproduced with the permission of The Ohio State University
If a lesion contains fluid, collect the fluid in an EDTA tube. Use a new needle to obtain a second aspirate sample of the remaining tissue and prepare as described above.
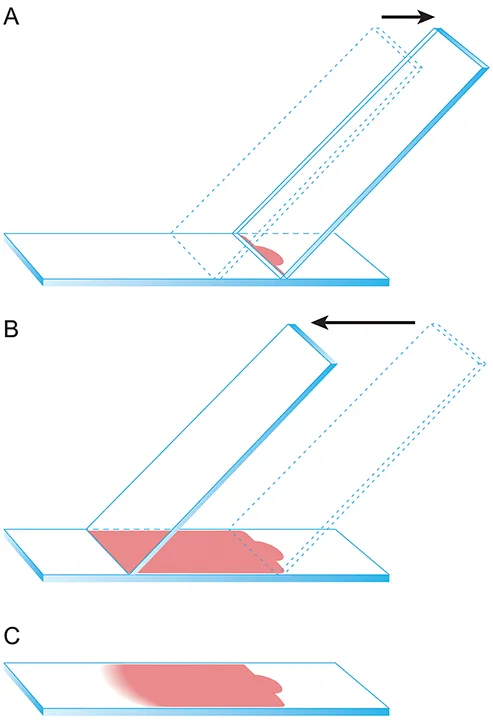
Promptly prepare 1 or more slides of the fluid using the direct smear technique, which is similar to the technique used to prepare blood smears. (See Figure 3.)
Apply a small drop of fluid 1 cm from the frosted end of the slide. Gently slide back a second spreader slide toward the fluid drop so that the fluid spreads along the spreader slide edge, then advance the spreader slide smoothly and quickly along the slide to create a smear. Direct smears are sufficient for some fluid samples, but fluids with low cellularity may benefit from additional preparation techniques, which are described elsewhere, to concentrate the cells.4

Illustration of the direct smear technique. (A) Apply a small drop of fluid 1 cm from the frosted end of the slide. Gently slide back a second spreader slide toward the fluid drop so that the fluid spreads along the spreader slide edge. (B) Gently advance the spreader slide smoothly and quickly at an approximately 45-degree angle along the slide to create a smear. (C) An appropriately prepared fluid cytology sample will appear similar to this image with a visible feathered edge. Be sure not to run the sample off the end of the slide. Reproduced with the permission of The Ohio State University
Sample Preparation
Once the sample has been collected and spread onto slides using one of the techniques listed above, there are a few important points to remember with regard to additional sample preparation.
Always prepare cytologic slides at a distance from formaldehyde. Formaldehyde fumes ruin unstained cytologic samples by partially fixing the cells, which prevents adequate staining and accurate interpretation.5,6
Use a hairdryer on a low-heat setting to help liquid samples dry evenly.
Fine-needle biopsy samples do not need to be heat fixed before staining.
Romanowsky quick stains such as Diff-Quik (Siemens, US) can be used to interpret specimens in-house or determine if a sample is diagnostic before sending to a diagnostic laboratory.
If a sample will be shipped to a diagnostic laboratory, only 1 slide should be stained in-house and both the stained slide and the remaining unstained slides should be shipped to the laboratory.
Stains should be changed at least once a week to avoid stain precipitate formation and stain quality reduction or stain exhaustion.
Thicker cytology samples may require longer staining protocols to effectively stain the higher number of cells.
A glass coverslip is needed to view samples using the 40 objective on a microscope.
Immersion oil (not mineral oil) should be used with the 50 and 100 objectives only.
Submitting Samples to Diagnostic Laboratories
Many veterinary practices submit cytologic samples to veterinary diagnostic laboratories for staining and interpretation. Follow these guidelines to help ensure cytologic samples arrive at the diagnostic laboratory in good condition.
Do not store slides containing cytologic samples in the freezer or refrigerator because cold temperatures and condensation lyse delicate cells.
Place dry slides in plastic or Styrofoam (not cardboard) slide containers to provide better protection from breaking during shipping.5,6
Submit fluid samples in an EDTA blood tube with one or more unstained direct smears of the fluid.
Submit cytologic samples in separate packages from formaldehyde-fixed tissue samples.
Complete submission forms legibly, and at minimum, include patient signalment, site and method of cytologic sampling, and pertinent history.
Conclusion
Collection of cytologic samples via fine-needle aspiration requires limited materials and minimal patient preparation, and slides are easily created from fine-needle aspirate samples. Care must be taken to avoid formaldehyde during collection and preparation, as this chemical can adversely affect the quality of cytologic samples. Slides that will be examined in-house should be stained appropriately. Slides and fluid samples submitted to veterinary diagnostic laboratories must be accurately labeled and shipped in containers that provide protection from accidental breakage. (See Resources.) When cytologic samples are prepared with a focus on increasing the diagnostic yield, fine-needle aspiration is a very useful addition to a practices toolbox.