
Indications for extraction of canine teeth in dogs and cats can include tooth trauma with pulpal compromise (ie, exposed pulp canal or irreversible pulpitis with nonvital pulp), periodontal disease, malocclusion (malpositioned canine tooth causing trauma to other oral tissues), tooth resorption, and/or other oral and dental conditions.1
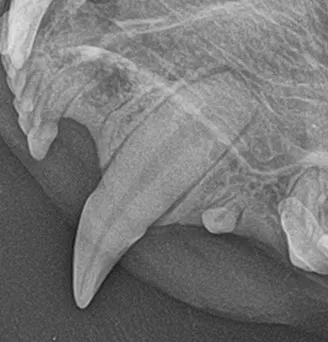
Pre-extraction steps include locoregional nerve block administration and intraoral radiography. The periodontal ligament space should be evaluated; if it is visible and distinct, the periodontal ligament is more likely to be fatigued effectively, resulting in a less complicated extraction. If there are changes (eg, loss of clarity, blending of the alveolar bone and tooth structure) to the periodontal ligament space, tooth ankylosis or resorption may be present and can result in a challenging extraction.
Use of appropriate equipment and sharpened instruments is critical. The following steps describe full surgical extraction of maxillary canine teeth with intact roots and healthy periodontal ligament. Teeth with resorption, ankylosis, or other lesions may require modified techniques.
Step-by-Step: Maxillary Canine Tooth Extraction
What You Will Need
Local anesthetic
Scalpel blade (15, 15c) and handle
Periosteal elevator(s) (Molt #2, Molt #4 [double ended])
High-speed burs
Crosscut fissure burs (#699, #700, #701)
Round burs (#1/2 [cats and smaller dogs], #1, #2)
Round carbide burs (#4, #6, #8), pear-shaped (#332)
Diamond bur
Small, sharp scissors (LaGrange, Goldman Fox)
Dental elevators (winged; sharpened and sized appropriately for tooth root contour)
Dental luxators (flat blade)
Extraction forceps (small-breed size preferred by author)
Needle drivers and thumb forceps
Absorbable suture material (4-0 with reverse cutting needle to 5-0 with tapered needle)
Osteopromotive/conductive substance (optional)
Dental loupes with light (optional)
Step 1: Create a Fresh Edge
Incise 1 mm of tissue from the free gingival margin to create a fresh edge.

Author Insight
This step can also be performed by freshening the edge of the gingival flap directly prior to closure; however, in the author’s experience, creating a fresh edge at the beginning of the procedure can be simpler.
Step 2: Make Gingival Flap Releasing Incisions
Make releasing incisions for a full-thickness mucoperiosteal flap through the attached gingiva, past the mucogingival line, and at least a couple of millimeters into the alveolar mucosa to provide adequate exposure.
Author Insight
Flap Considerations
A rectangular, triangular, or envelope flap can be made.
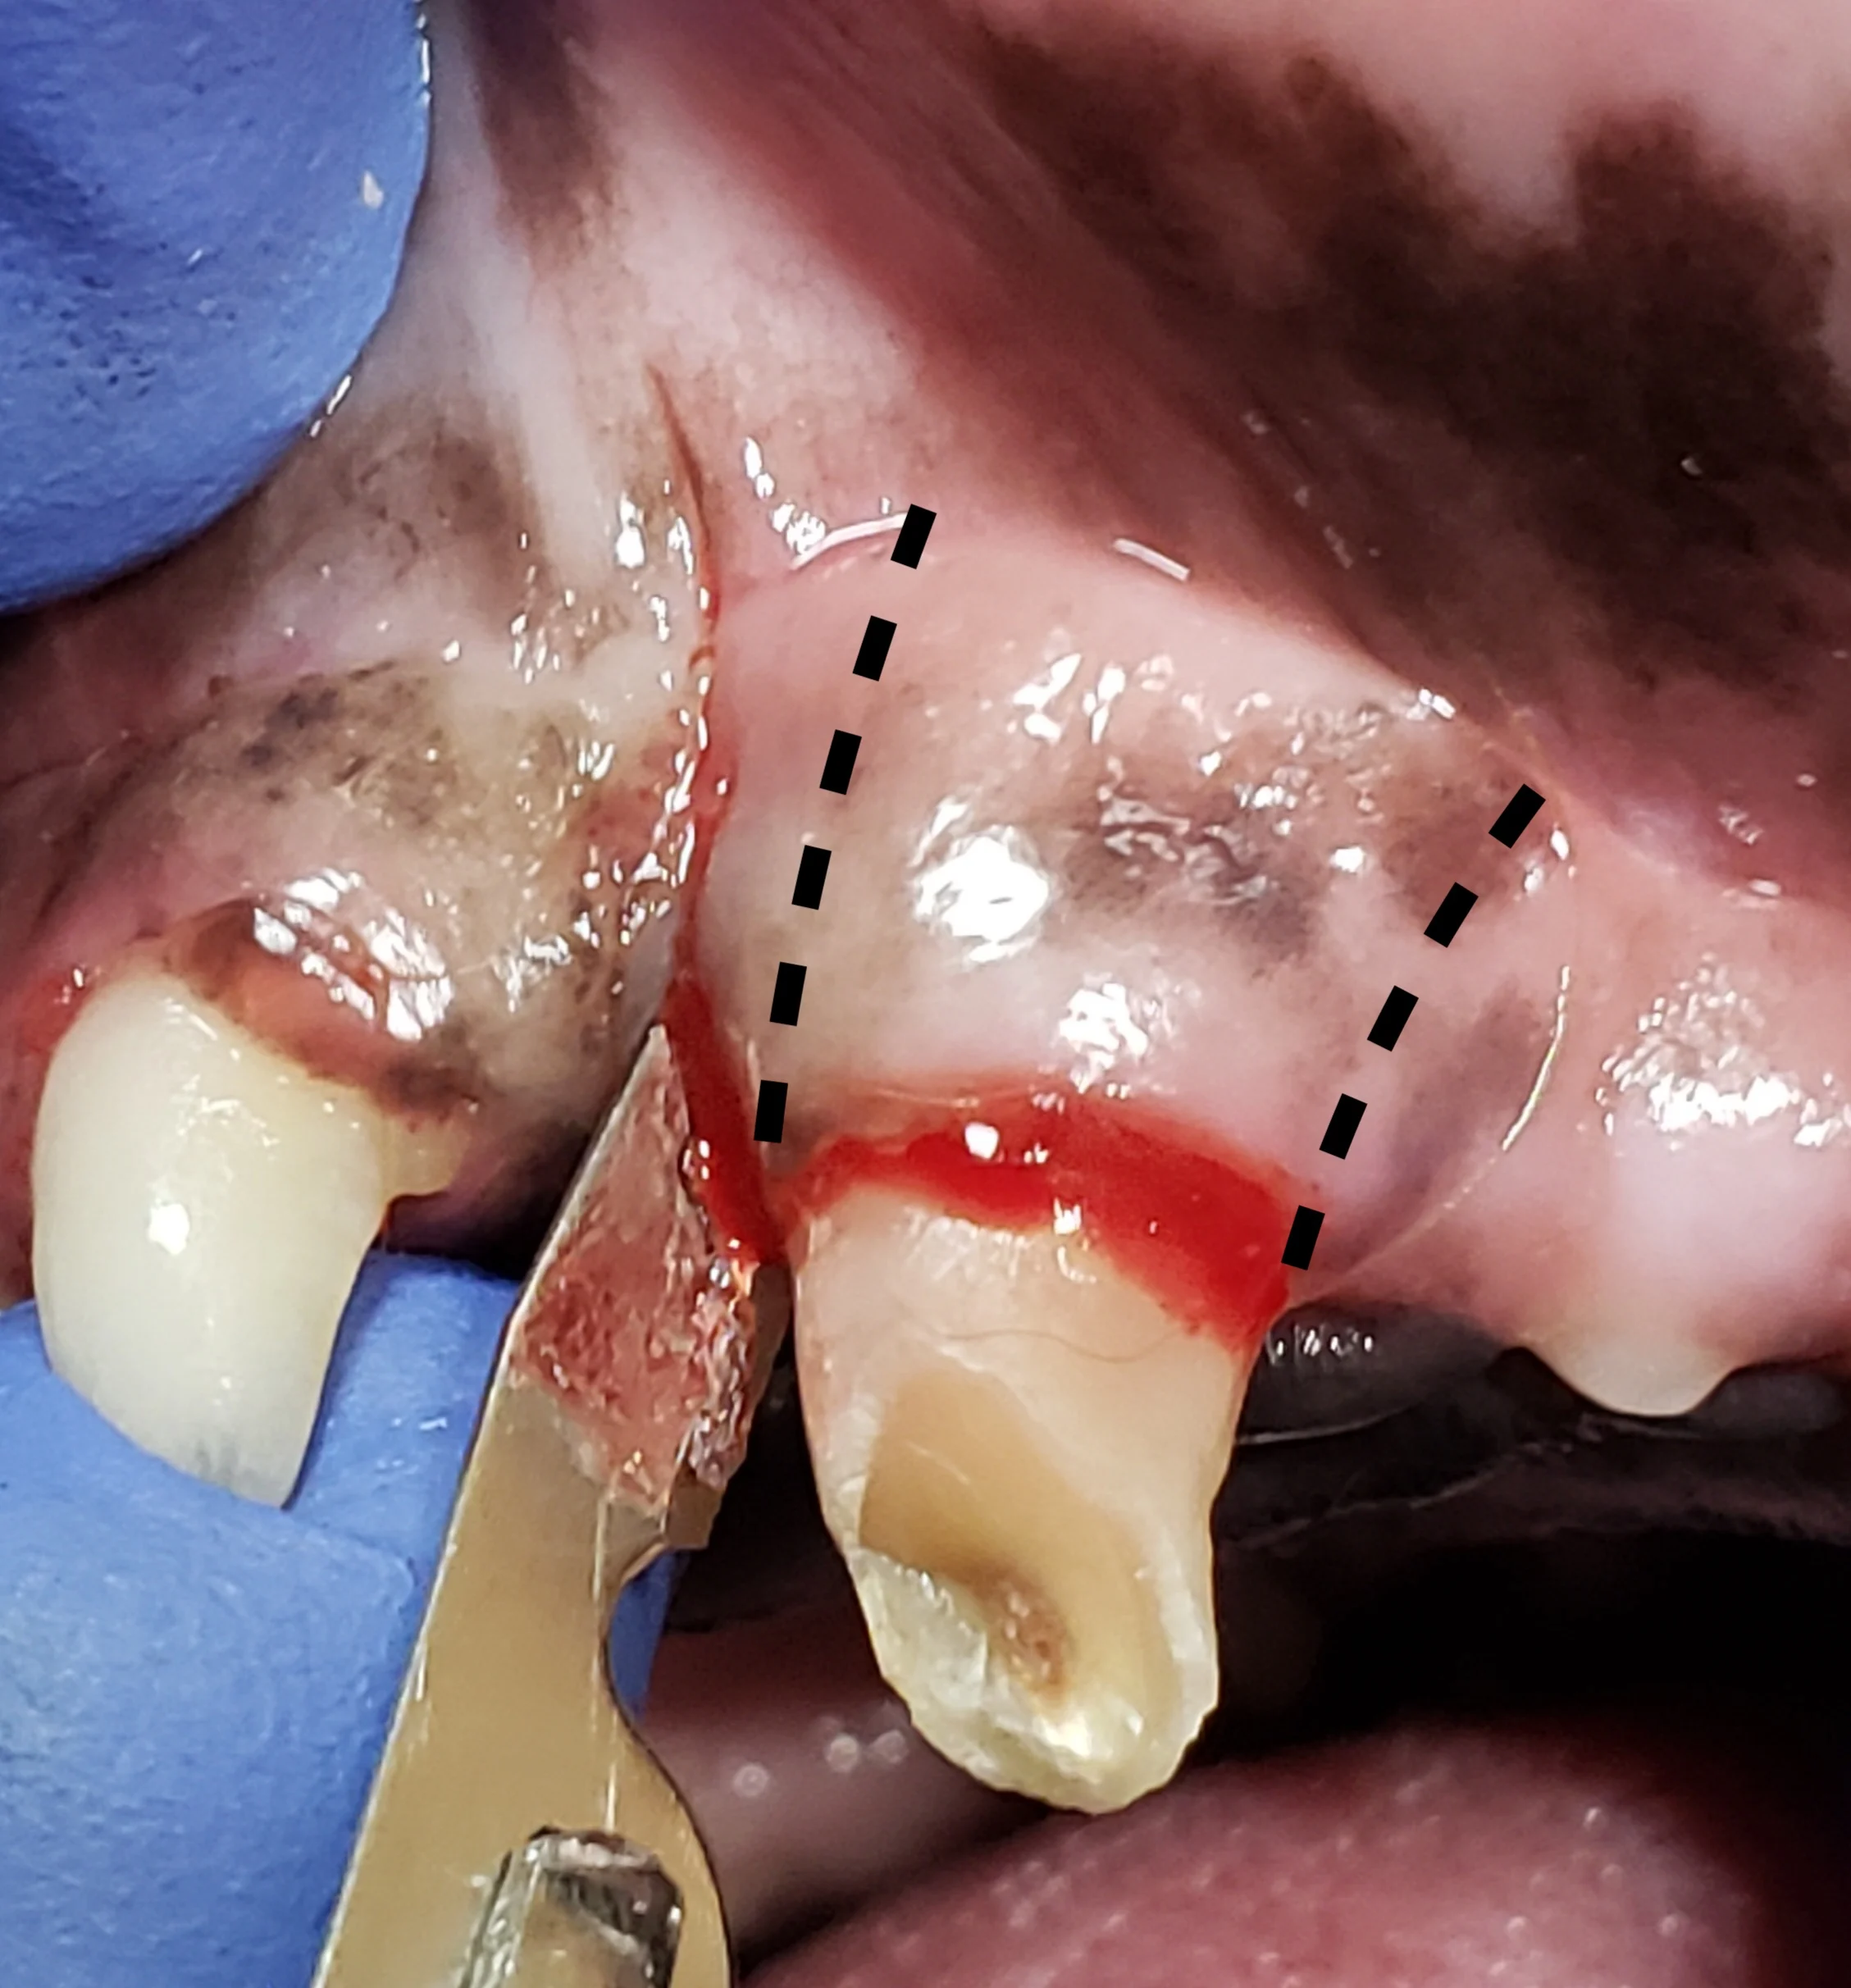
Rectangular Flap
A rectangular flap is created by making a mesial incision and a distal incision angled away from the tooth, following the distally curving position of the root. Releasing incisions should extend at least to the level of the widest part of the root and should be slightly divergent from each other, keeping the alveolar mucosa at the base of the flap wider than the coronal aspect with the attached gingiva, to provide enough tissue for closure. A flap wider at the gingival margin is important if an oronasal fistula is present. Making releasing incisions 1 to 2 mm from the outline of the tooth edge (dotted lines) places the incisions over bone, enhancing access to the periodontal ligament space and supporting the suture line following closure. In the author’s experience, this flap design provides optimal accessibility for tooth elevation and does not result in disruption of blood supply during healing.
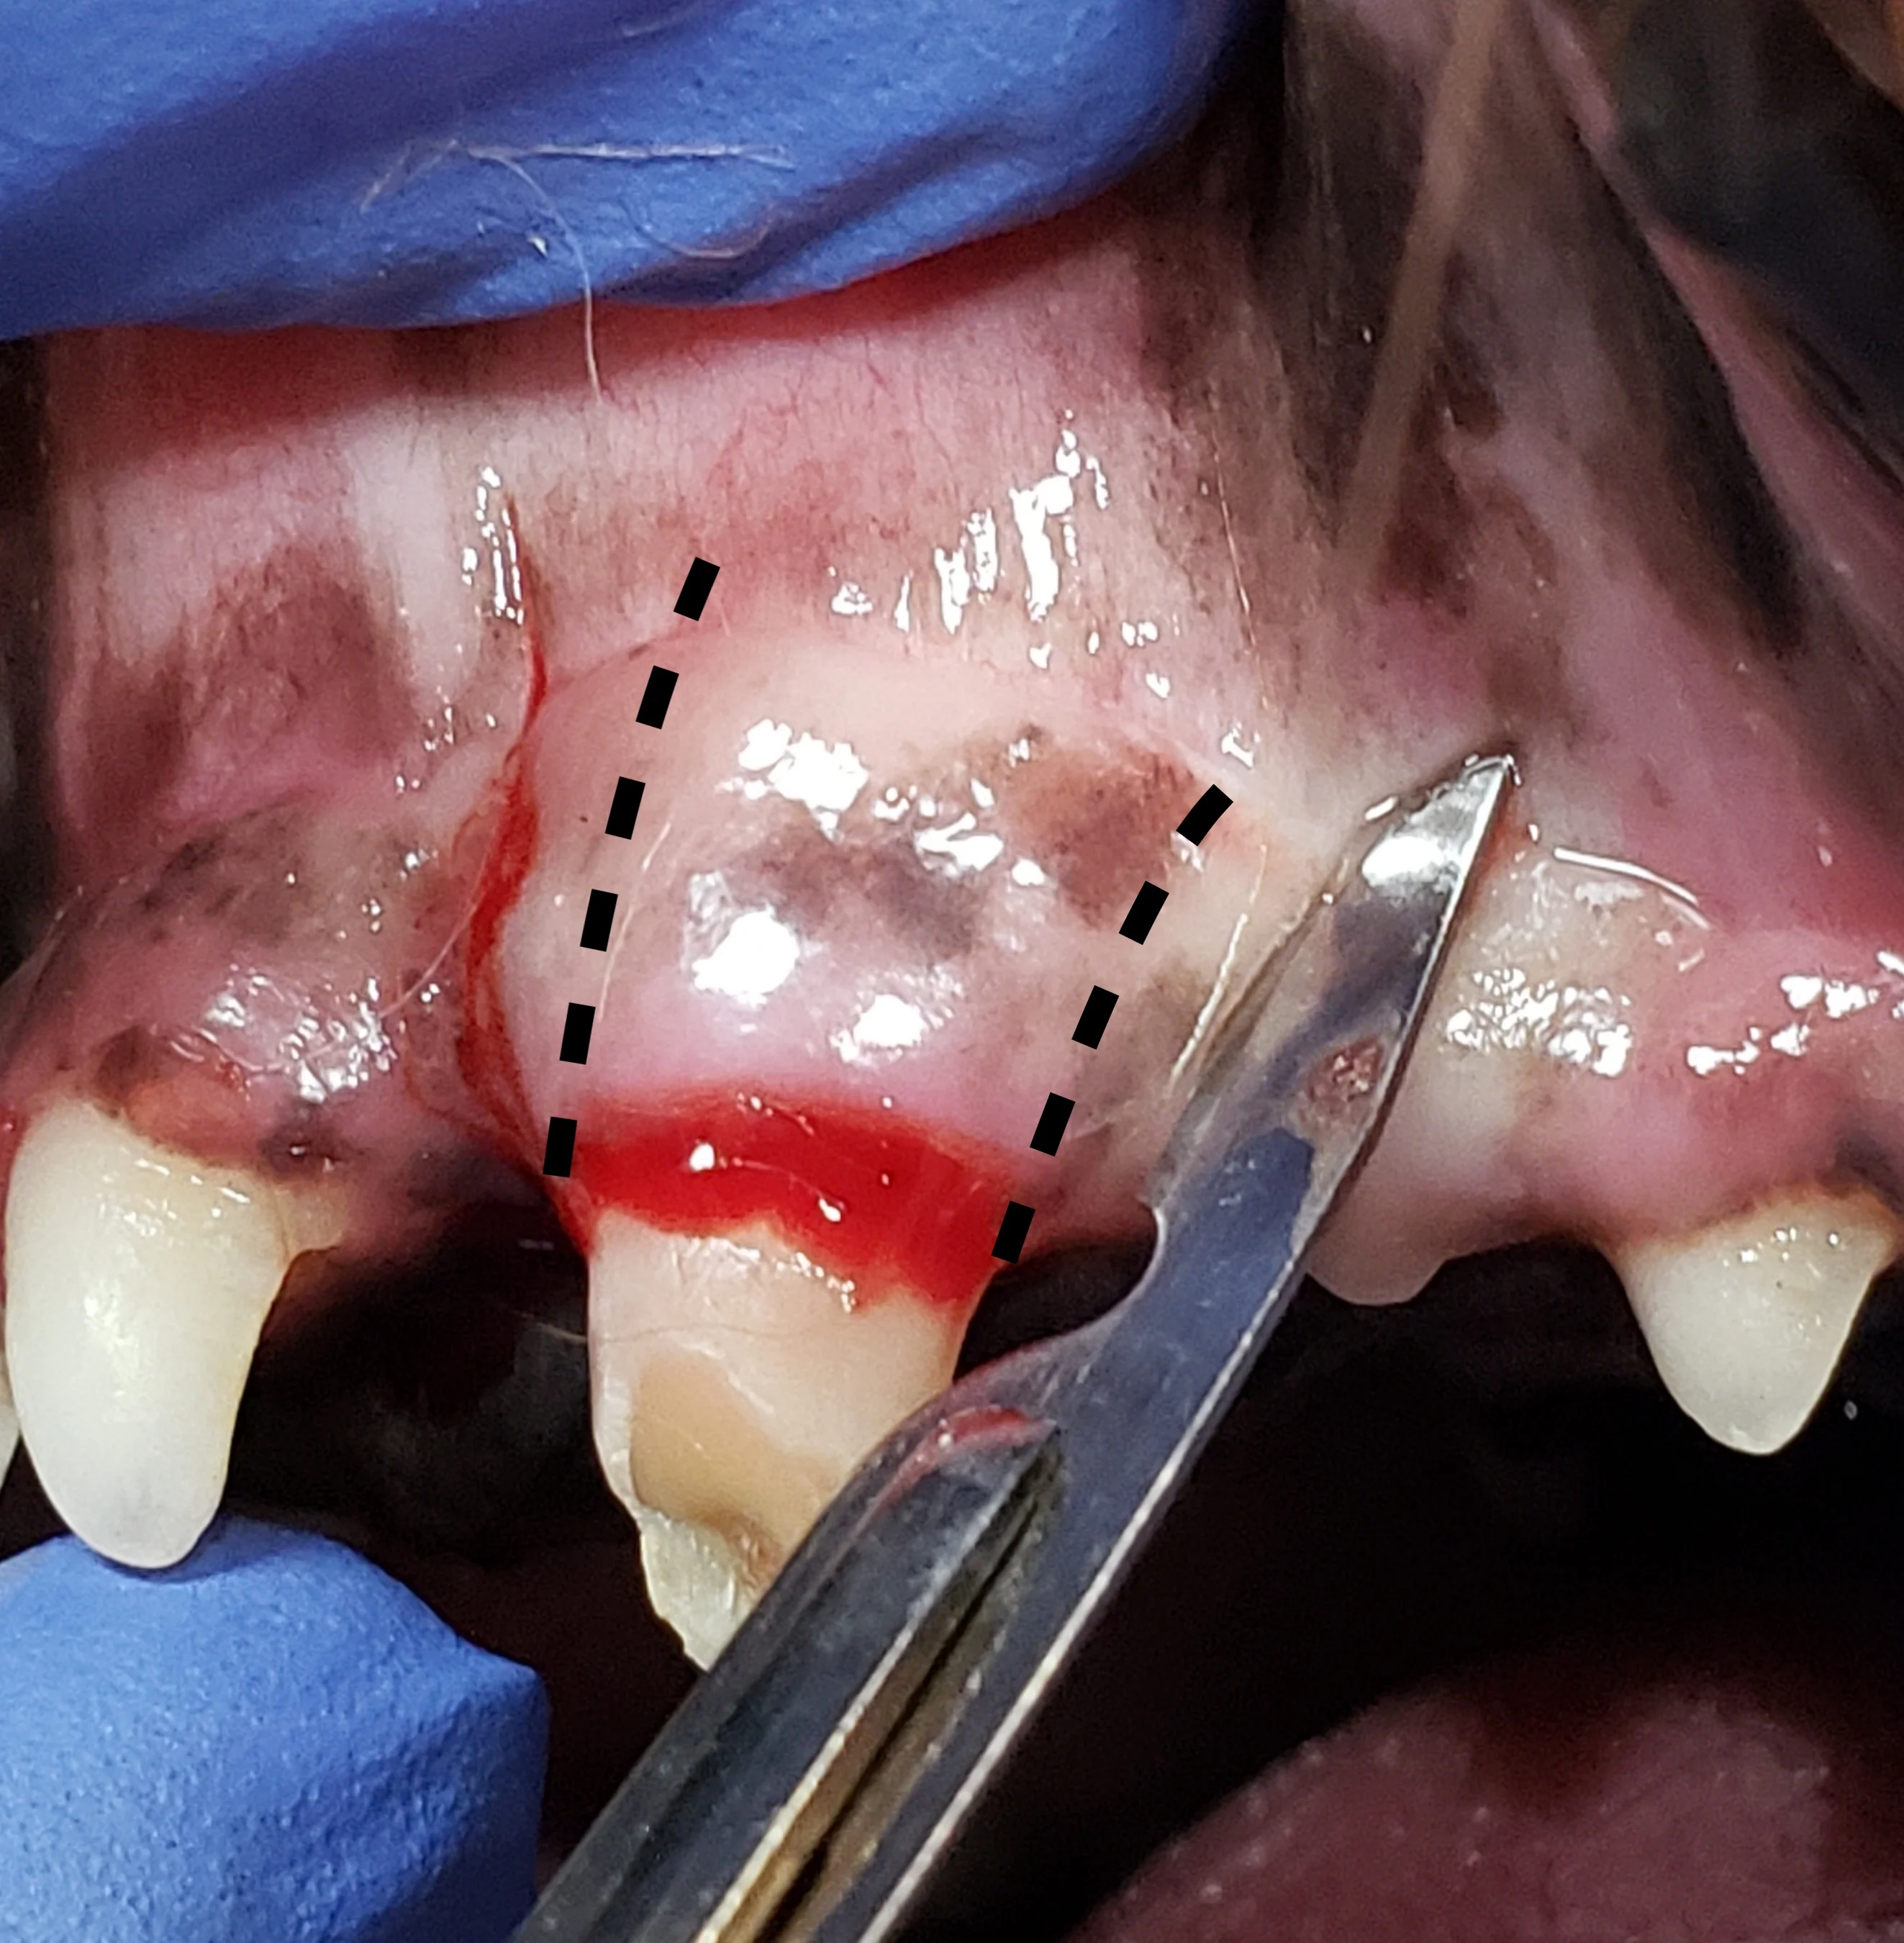
Triangular Flap
A triangular flap is created by making a mesial releasing incision and an incision at the ventral alveolar border (line). The releasing incision should extend at least to the level of the widest part of the root.
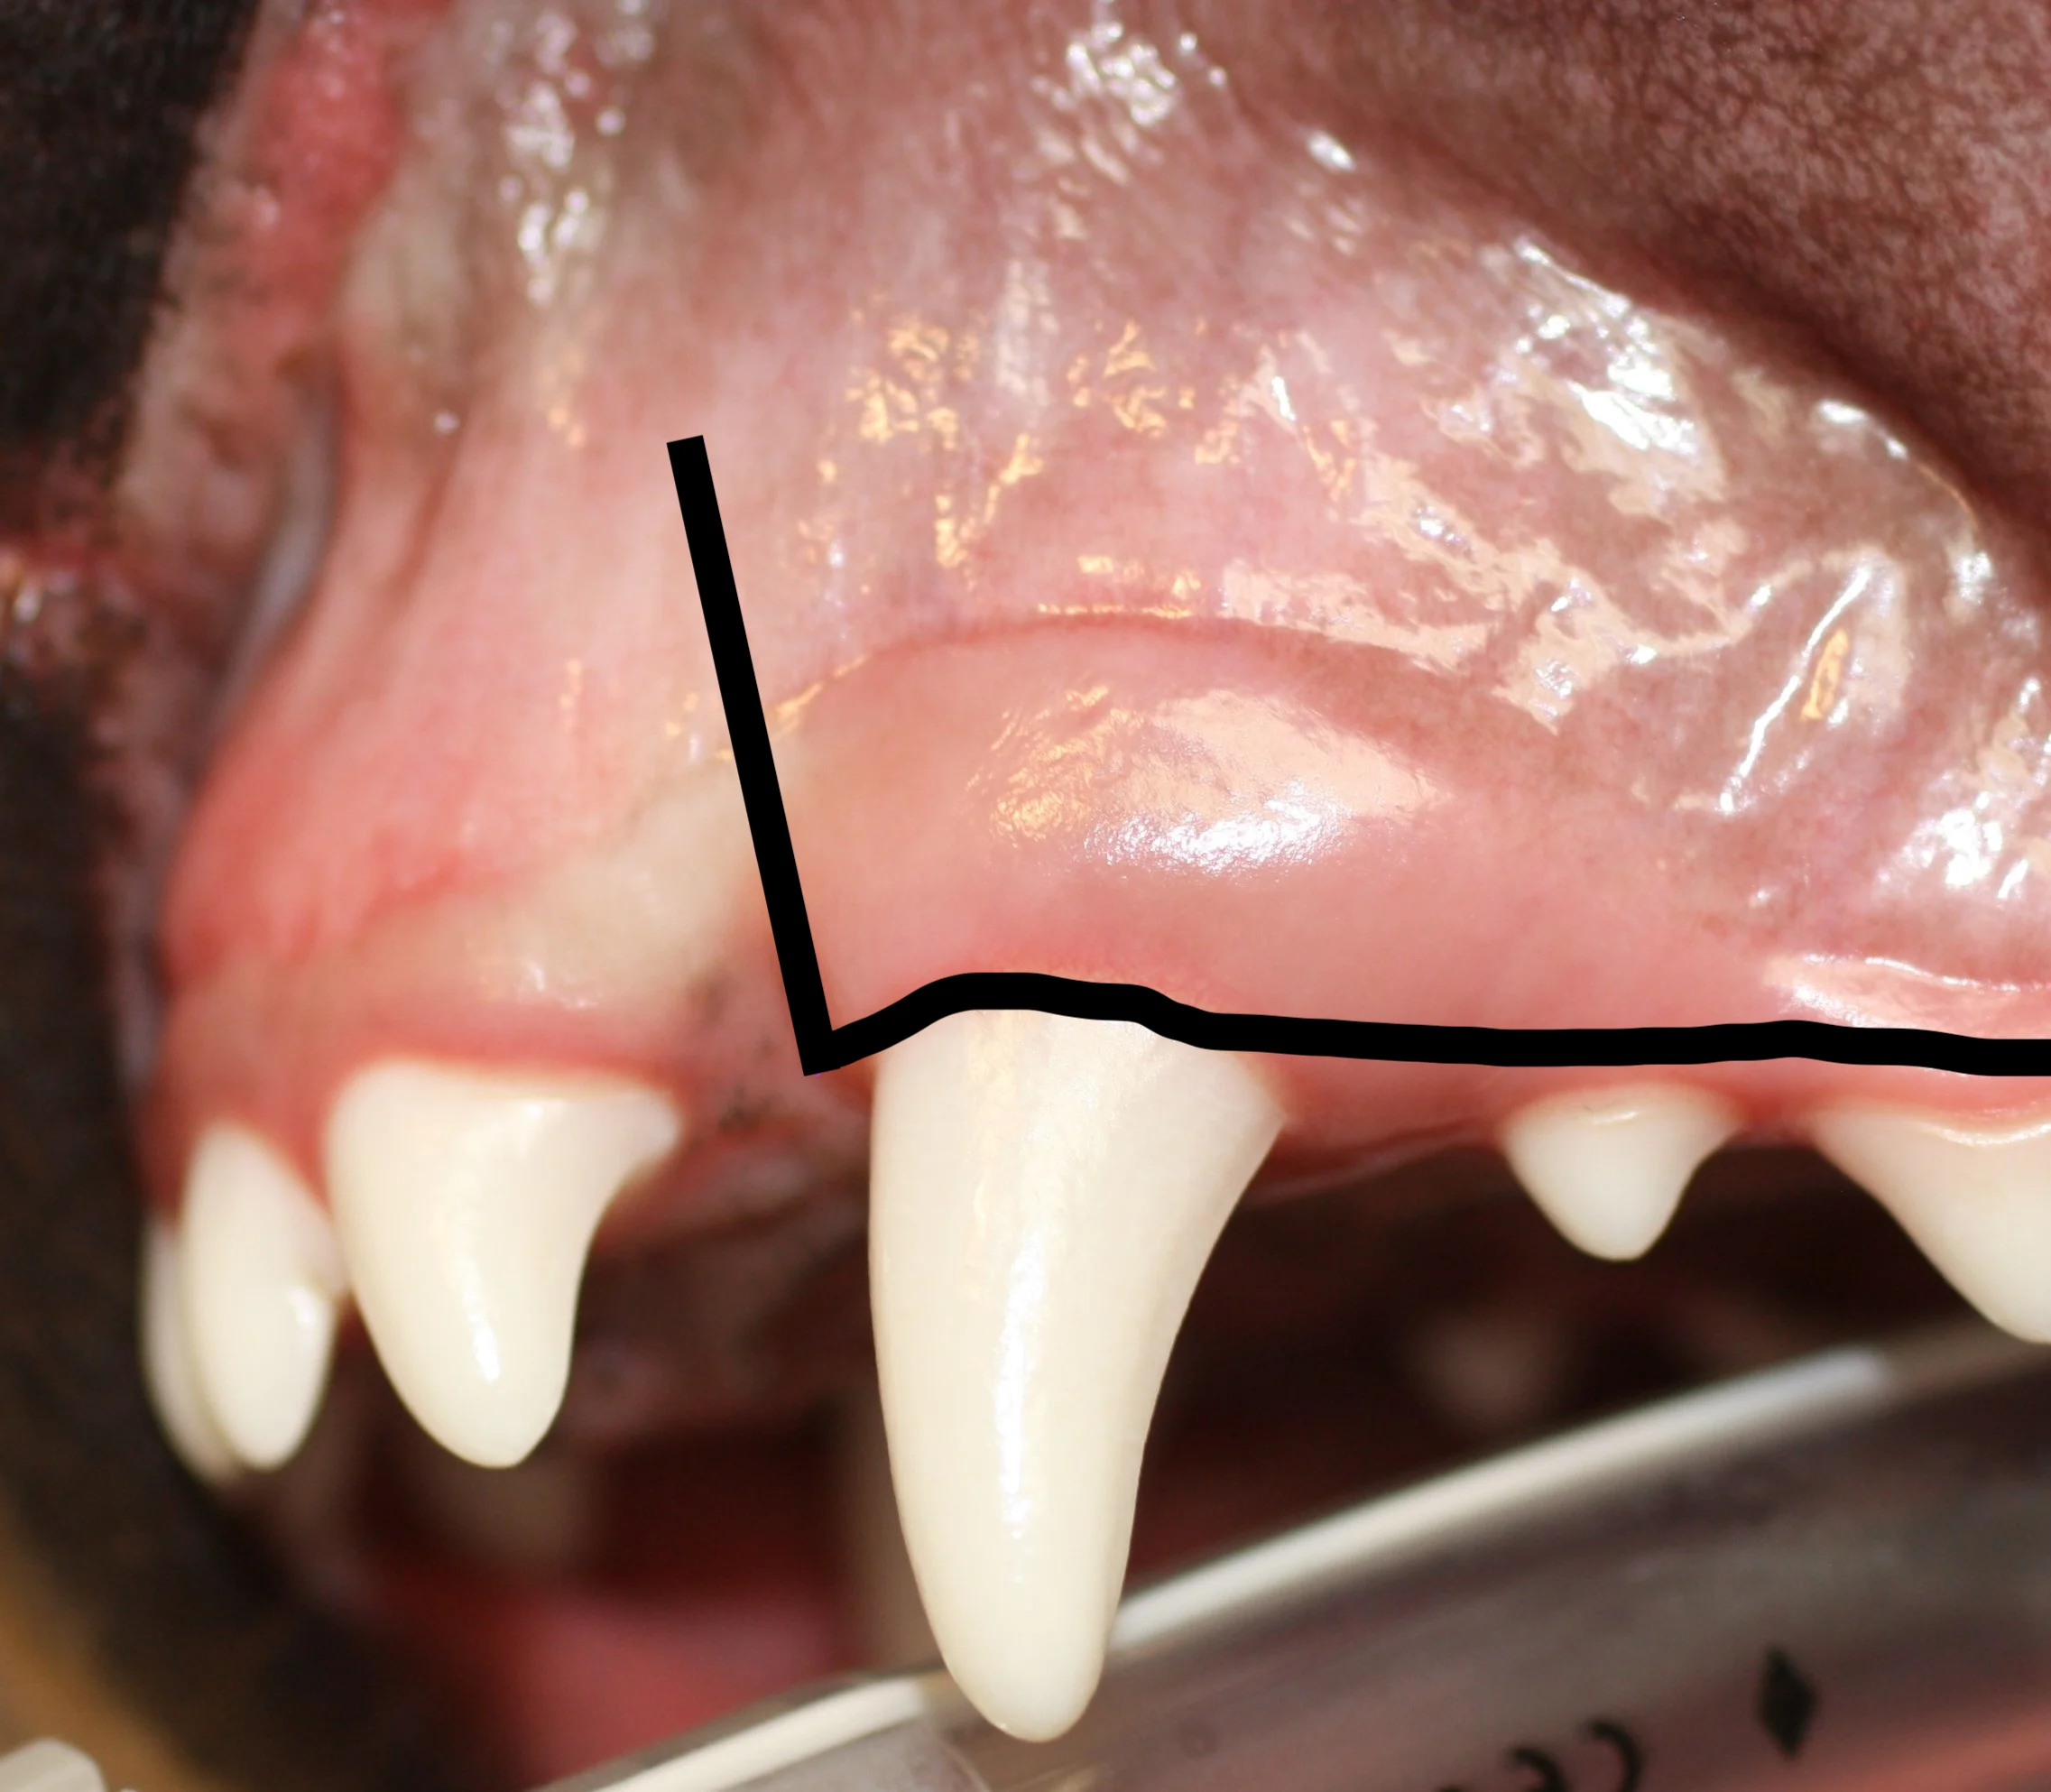
Envelope Flap
An envelope flap is created by making an incision at the ventral alveolar border (line). This type of flap may be preferred because vertical releasing incisions can contribute to complications (eg, dehiscence).

Species Considerations
In cats, canine teeth are nearly cylindrical (root is not wider; A), so simple elevation may be sufficient, particularly if the tooth is already mobile due to chronic alveolitis or osteitis in older cats. In these cats, the gingiva may be very thin, making full-thickness mucoperiosteal flap creation challenging. In most dogs, however, the diameter and width of the root is broader than the widest part of the crown at the neck of the tooth, with a larger dimension from front to back (mesial to distal) than side to side (buccal to palatal; B). A full-thickness pedicle mucogingival flap with alveolar bone removal is recommended for both species but is more critical in dogs.
A
Step 3: Elevate the Flap
Use a periosteal elevator to raise the full-thickness flap off the bone, past the mucogingival junction.

Author Insight
A short-stopped grip on the periosteal elevator should be used to gently reflect the mucosa from the underlying bone to avoid creating a hole in the flap. The full-thickness flap should be reflected as a single, intact flap. The fibers of attachment resist forces to reflect the gingiva and mucosa from a coronal to apical aspect; therefore, a mesiodistal or distomesial direction (ie, reflect from the sides at the vertical releasing incisions toward the center of the flap) may more effectively reflect the gingiva from the bone.
Step 4: Release Tension on the Flap
Provide additional tension release by carefully incising the thin layer of periosteum on the inner side of the flap using small, sharp scissors (eg, LaGrange, Goldman Fox) or a 15 or 15c scalpel blade.

Author Insight
This step can also be performed directly prior to close, but the author prefers to release tension at this point because soft tissue instruments are already in use. Care should be taken to not cut through the flap.
Step 5: Alveolar Bone Removal
Use a round, pear-shaped, or crosscut fissure bur to create grooves at the mesial and distal aspect of the root, at least to the level of the widest part of the root.


Author Insight
Bone removal is performed to provide adequate exposure, form an exaggerated periodontal ligament space following the root contours, and provide an opening for easier root elevation. A pear-shaped or round bur may be preferred for creating these grooves in the periodontal ligament space, as a crosscut bur can be too aggressive if used incorrectly.
Making a cut in the bone at the widest part of the root can help delineate the area in which buccal bone can be removed. A coarse diamond-cut bur is sometimes preferred to remove this buccal bone.

Additional alveoloplasty can be performed later if bone removal at this level is not sufficient for elevation of the tooth. If extensive buccal alveolar bone is removed, the mandibular canine tooth may impinge on the upper lip; this should be monitored for following the procedure, especially in cats.
Step 6: Prepare for Elevation
Use dental luxators to begin severing and breaking down the periodontal ligament. Carefully advance the luxator into the periodontal ligament space without rotating the instrument to start forming a gap between the tooth and alveolus.

Author Insight
Dental luxators should be used with care, as they are thinner and sharper than typical dental elevators. Dental luxators can be useful on the flatter lingual and buccal sides of most canine teeth.
Step 7: Fatigue the Periodontal Ligament (Elevation)
Advance the blade edge of a winged elevator (sized appropriately for the diameter of the tooth root) using controlled apical force, with the tip of the elevator just past the fingertip grip. When positioned in the periodontal ligament space, rotate the elevator to engage the side or edge of the tooth surface, stretching the periodontal ligament. Apply slow, steady pressure for 5 to 10 seconds.


Author Insight
Although a rocking motion may be preferred over slow, steady pressure in some cases, this may result in a force that is not as effective, and care should be taken not to apply too much pressure. Winged elevators are primarily used on the mesial and distal aspects of maxillary canine teeth. If the entire crown is present, the curved portion may interfere with the ability to place the dental elevator in a straight line to access the distal periodontal ligament space. A portion of the crown may be removed to avoid this obstruction (dotted line).

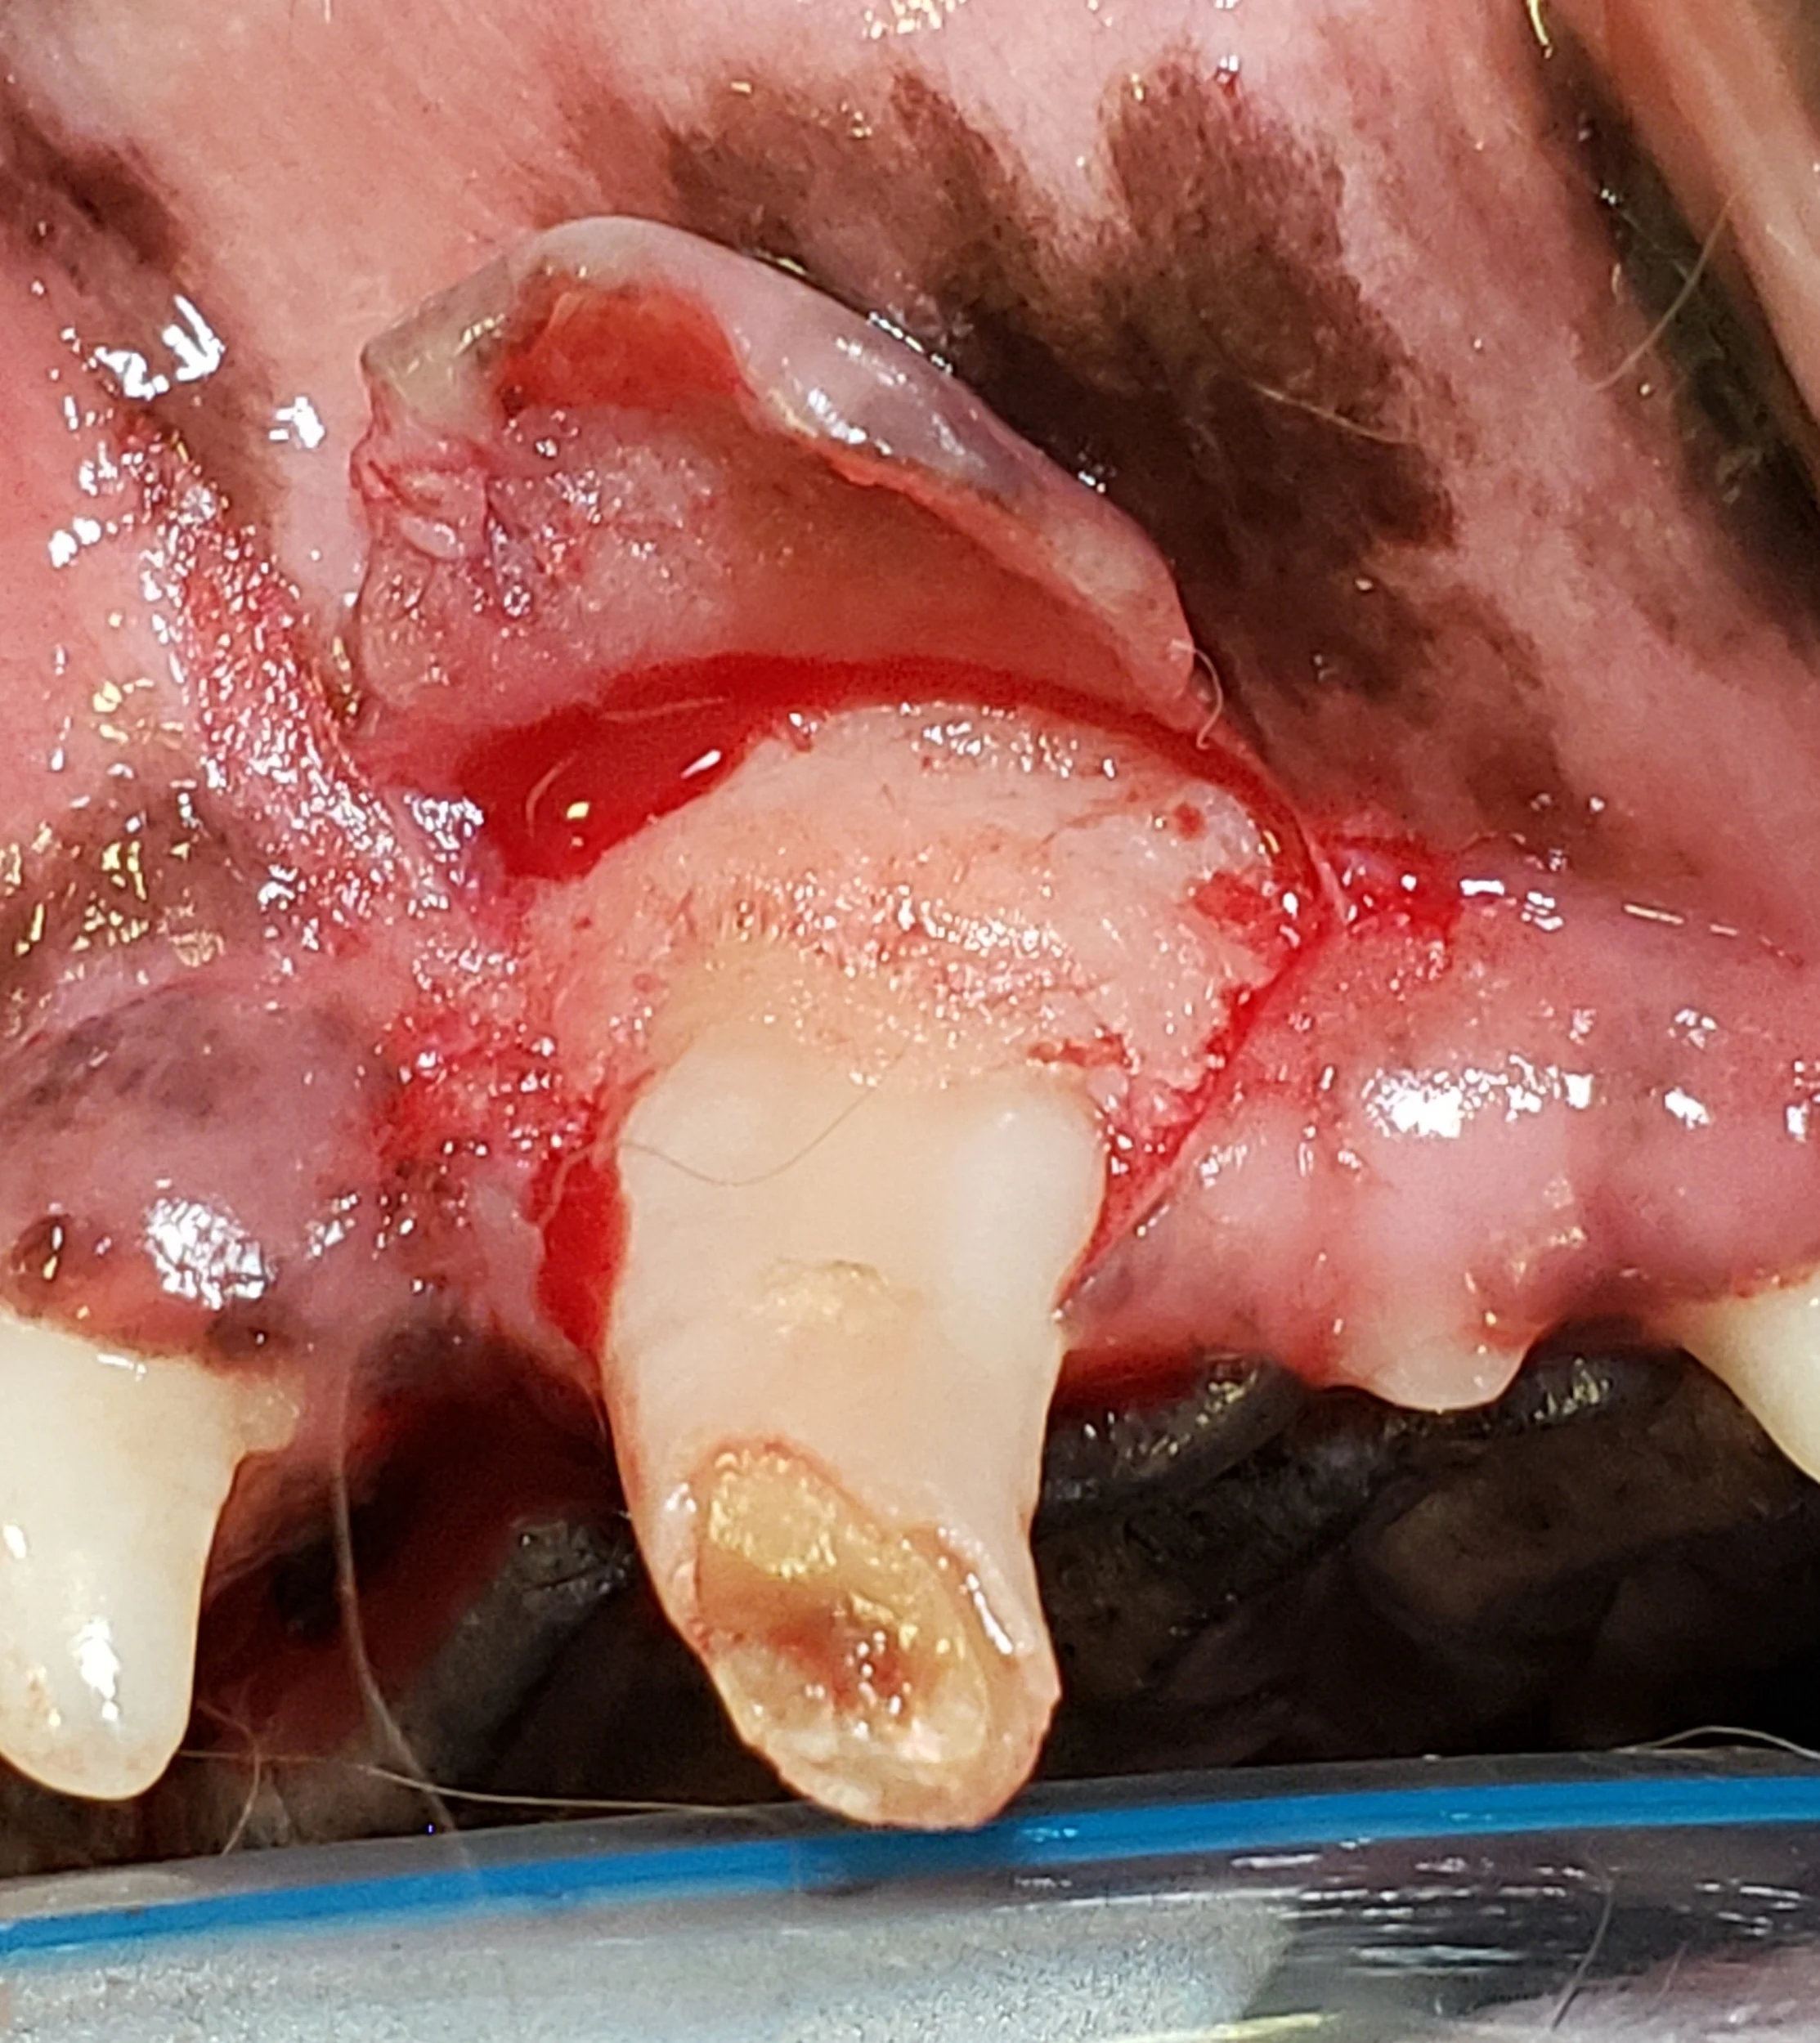
Step 8: Extract the Tooth
When the tooth is sufficiently loose, grasp the crown near the base (ie, neck) with small-breed extraction forceps. Gently rotate the tooth around its axis in one direction, hold, then rotate it in the other direction. Do not rotate the apex into the nasal cavity. If there is resistance, determine where the tooth needs additional bone removal or elevation (A). If the tooth can be easily removed with a pulling force, fully extract the tooth (B).

A
Step 9: Elevate the Palatal Mucosa
Use a periosteal elevator to elevate the palatal mucosa and the attached gingival edges at the releasing-incision sites 1 to 2 mm from the alveolar bone. Freshen any intact epithelial edges with scissors.

Step 10: Perform Alveoloplasty
Use a bur (preferably diamond) to remove rough or diseased bone in the alveolus to provide a smooth surface. Use hand curettes or serrated periosteal elevators to debride granulation tissue or diseased soft tissue adjacent to or in the alveolus.

Step 11: Suture the Extraction Site
Confirm the flap is released enough to be placed over the extraction site without tension (A). If not done previously, incise a thin layer of periosteum on the underside of the flap (see Step 4). Close the mucogingival flap over the extraction site using absorbable suture (B). Use simple interrupted sutures to anchor the flap to the mesial and distal aspects and simple interrupted, cruciate, or continuous sutures to close the remaining edges (C; lines indicate where additional sutures should be placed).

A
Author Insight
Osteopromotive/conductive substance may be placed prior to flap closure but is not frequently used at this site.
A reverse cutting needle with 4-0 suture can be used to close extraction sites in dogs, and a tapered or cutting tapered needle with 5-0 suture can be used in cats. The author prefers absorbable, dyed poliglecaprone suture.
Postoperative Care
Pet owners should be given instructions for postanesthetic care and procedure-specific aftercare (see Owner Instructions for Maxillary Canine Tooth Extraction Aftercare). At the 2-week recheck, the surgical site should be evaluated and restrictions lifted if the site has healed well. Although sutures may still be present, absence of dehiscence or obvious infection (eg, odor, drainage, nonvital tissue) indicates sufficient healing.
Owner Instructions for Maxillary Canine Tooth Extraction Aftercare
For 2 weeks following the procedure:
Feed only soft food.
Do not allow chewing of chew toys or other objects.
Physical activity may need to be restricted or supervised if there is a possibility of damage to the incision site.
An Elizabethan collar may be needed to prevent damage to the site.
Do not lift the lips to observe the site. Contact the clinic if there is swelling, drainage, odor, sneezing, or nasal discharge or if the lower canine tooth is outside of or snagging on the upper lip.
Pain medication will likely be prescribed.
Give oral medications in a soft treat. Avoid forcing medications.
Cats can sometimes be given medication in the cheek pouch or under the tongue (transmucosally).
If a transdermal pain medication was applied to the skin between your cat’s shoulder blades, additional oral pain medication may not be needed, as this medication lasts 4 days.
Antibiotics are not typically needed because the source of potential infection has been extracted.