Blood Transfusion in Dogs
Nuno Manuel Félix, DVM, MD, MSc, PhD, Hospital Distrital de Santarém, Santarém, Portugal
Although veterinary transfusion medicine has developed significantly in the past 30 to 60 years,1 blood transfusions are not benign,2,3 with transfusion reactions occurring in up to 3% to 15% of patients.2,4,5 The safe administration of blood products requires precautionary measures, including careful sourcing of blood products; blood typing and crossmatching between donor and recipient; and adoption of appropriate blood collection, processing, storage, and administration techniques. In the event of a possible transfusion reaction, several corrective measures should be followed and the cause of the transfusion reaction should be identified.
This 3-part series covers what you need to know to ensure safe blood transfusion in dogs: blood collection and storage, patient selection, how to transfuse, and treating potential acute transfusion reactions.
Part I: Collection & Storage
Blood Product Sourcing
Blood products are readily available from animal blood banks in many countries and can also be obtained in-house or from an external donor program.6,7 About 15 to 20 mL/kg of blood can be safely collected from a dog. There is no need to administer crystalloid solutions during blood collection from dogs. Blood products may also be acquired via cell salvage and autotransfusion techniques.8,9
Dogs rarely need sedation for blood collection; if sedation is elected, acepromazine should be avoided due to its effects on platelet function. Several other sedative agents can be used. One common combination consists of butorphanol at 0.2 mg/kg IV +/- dexmedetomidine at 1 µg/kg IV for nonsensitive MDR1 breeds, or methadone at 0.2 mg/kg IV +/- dexmedetomidine at 2 µg/kg IV for MDR1-sensitive breeds can be considered.
Blood Donation Criteria
Whether selected in-house or from external programs, dogs that are candidates to become blood donors must meet several conditions:
Clinically healthy and assessed with annual examinations and testing (see Donor testing)
1-8 years of age
Weigh >20 kg
Normal body condition
Good temperament
Updated vaccination status
Packed cell volume (PCV) >40%
Negative for dog erythrocyte antigen-1 (DEA 1)
Ideal canine blood should be DEA 1, DEA 3, DEA 5, and DEA 7 negative and positive for DEA 4.1
Readily accessible jugular vein
No previous history of receiving blood product transfusions
No previous history of pregnancy
Pregnancy is known to lead to alloantibody formation against erythrocyte antigens.10 The few studies available about this issue in dogs did not demonstrate that these alloantibodies are associated with increased incidence of transfusion reactions. Nevertheless, until further research is available, it is advised to avoid previously pregnant female dogs as blood donors, except in emergency situations where no other source of blood products is available.
Donor Testing
Although infectious disease testing should in part be based on the local and regional prevalence of infectious agents, several national and international societies have released guidelines regarding this subject. One of them is the 2016 American College of Veterinary Internal Medicine Consensus Statement on Infectious Disease testing for blood donors.11 This suggests that any canine blood donor should be tested for:
Blood type
Complete blood count (CBC)
Serum chemistry panel
Fecal analysis (every 6 months)
Heartworm antigen
Babesia spp
Anaplasma spp
Ehrlichia spp
Bartonella spp
Mycoplasma spp
Leishmania spp (geographic)
Trypanosoma cruzi (geographic)
Hepatozoon canis americanum (geographic)
Brucella canis
Blood obtained from closed cavities can be safely used for autotransfusion if there is no evidence of septic, bile, intestinal content, and urine contamination; if the dwelling time in the cavity is fewer than 72 hours; and if no gross clotting is apparent. Neoplastic disease can also be considered as a contraindication to blood product autotransfusion, although the risk of metastatic spreading may be reduced by leukocyte depletion filters.9 Blood for autotransfusion can also be collected and processed with cell salvage devices.
Step-by-Step: Blood Collection
What You Will Need
Peripheral venous-inserted catheter
Cutaneous asepsis kit (ie, antiseptic solution, alcohol, gauze swabs, clippers)
Sterile gloves
Blood collection bags (simple for whole blood collection, or with a dedicated collection system with satellite bags if blood is going to be processed to produce blood components)
Step 1
Take the donor’s temperature, pulse, and respiratory rate before placing in lateral recumbency. Evaluate the quality and location of the jugular vein before shaving and sterilizing the skin around the jugular vein.
Step 2
Place the collection bag (available through Animal Blood Resources International) on a gram scale and zero the scale. Flush and fill the line tubing of the collection system and the connected needle with the bag’s anticoagulant. Most commercially available blood bags now use a citrate-phosphate-dextrose-adenine [CPDA-1] or citrate-phosphate-dextrose/adsol preservation solution as an anticoagulant. Avoid kinking or twisting the line tubing to prevent red blood cell (RBC) damage. Clamp the collection line 3 to 4 cm distal from the needle (use a plastic hemostat to avoid damage to the collection line).
Step 3
Have an assistant compress the thoracic inlet to increase jugular vein distension, then insert the needle in the jugular vein in a cranial direction and with the bevel up (Figure 1). Once blood enters the collection system, remove the hemostat clamp and let blood flow into the tubing and collection bag.

For blood collection, the blood donor should be placed in lateral recumbency, with its neck extended. The needle is inserted in the jugular vein in a cranial direction with the bevel up.
Photo courtesy of Dr. Isabelle Goy-Thollot, SIAMU/ICU, VetAgro Sup, University of Lyon
Author Insight
Consider diverting the first 10 mL of blood to a separate collateral bag to prevent contamination of the blood unit with skin microorganisms.12,13 This blood can be used for donor testing, if needed.
Step 4
An assistant should carefully agitate the collection bag back and forth during collection to allow blood to mix with the anticoagulant. Once 405 to 480 g of blood is collected, have an assistant remove the pressure to the thoracic inlet. (Figure 2). Remove the needle and perform compression over the puncture site for 1 minute. Wrap the jugular site with cohesive bandage wrap for at least 30 minutes to prevent bruising and hematoma formation.

Let the blood flow by gravity to the collection bag. An assistant should gently agitate the collection bag back and forth during collection to allow mixing of the blood with the anticoagulant.
Photo courtesy of Dr. Isabelle Goy-Thollot, SIAMU/ICU, VetAgro Sup, University of Lyon
Step 5
Hemoclip or heat seal the collection line at least 3 cm above the bag to imprint a unique identifying line number on the bag. Identify the collection bag with donor identification, date, time, and amount collected. Record the donation in the donor record, including its weight, vital signs, and PCV/total protein before and 30 minutes after transfusion. Include data about vessel and draw position used, and record any problems that occurred during donation.
Author Insight
Blood removed from closed cavities for autotransfusion can be collected into a 60-mL syringe, empty sterile crystalloid bags, or blood collection bags.9 Anticoagulant (citrate-phosphate) may be added (0.05-0.14 mL for each mL of collected blood) to the syringe or the crystalloid bag. However, because blood becomes defibrinated when in contact with serosal surfaces for more than 1 hour,9 the amount of anticoagulant needs to be decreased if blood is present in body cavities longer than this period. Alternatively, the coagulation system status of the recipient should be carefully monitored after the transfusion, especially during the first 72 hours posttransfusion.
Processing Blood Products
In the first 4-6 hours after blood collection, blood can be administered as FWB, be refrigerated and stored as WB, or refrigerated until processing for component therapy. If the latter option is chosen, the collected blood should be stored at 4°C to 6°C (39°F-42°F) until processing. Blood component therapy is commonly used in human medicine and is becoming more frequent in veterinary medicine. Its main advantage is that it permits the veterinarian to tailor therapy more appropriately while avoiding transfusion-related reactions, as it spares the patient exposure to unnecessary blood products. In addition, it makes transfusion medicine more efficient, because a single unit can be divided in multiple components, which can be used for more than one patient. Each blood component has its own indications, advantages, and disadvantages. A summary of all blood components available is described in Blood Products: Main Indications, Doses, & Additional Information.
Blood Products: Main Indications, Doses, & Additional Information
Fresh whole blood (FWB): blood collected from donor without processing
Composition: RBCs, WBCs, platelets clotting factors, all components of plasma
Indication: Acute hemorrhage (especially trauma); need for multicomponent therapy; life-threatening thrombocytopenia
Dose:
20 mL/kg raises recipient´s PCV by 1%
VT (mL) = BW (kg) x BV (mL/kg) x [(desired PCV-recipient PCV)/donor PCV]
Additional information: 10 mL/kg of FWB is expected to raise the platelet count by about 10,000/μL Should be used in 4-6 h because platelets and clotting factors lose activity
Stored fresh blood: FWB stored up to 4 weeks
Composition: Same as FWB except without platelets and with decreased concentration of some clotting factors, in particularly the labile coagulation factors V and VIII
Indication: Same as FWB (except in cases of thrombocytopenia); in hemophilia A, it is preferable to use FWB than stored FB, especially if the latter is stored >24 h
Dose: Same as FWB
Additional information: Storage decreases factors V and VIII, especially if storage is longer than 24 hours and at temperature of 4°C. Platelets do not survive refrigeration. For critically ill patients, preference should be to use younger units to prevent injury associated with storage lesions (see Blood Product Storage, below)
Packed Red Blood Cells (pRBCs): RBCs centrifuged with most plasma discarded
Composition: RBCs, may have WBCs
Indication: Anemia, in patients that are normovolemic, without the need of coagulation factors and/or that are susceptible to volume overload
Dose: See Preparing to Administer Blood Products, in Part 3
Additional information: For critically ill patients, preference should be to use younger units to prevent injury associated with storage lesions (See Blood Product Storage, below)
Leukoreduced pRBCs: Same as pRBCs, but WBCs removed before storage
Indication: Same as pRBCs
Additional information: Leukoreduction may decrease immunomodulation and nonhemolytic febrile transfusion reactions
Fresh Frozen Plasma (FFP): Plasma obtained from FWB and frozen in the first 8 hours and <1 year age
Composition: Coagulation factors; anticoagulant factors such as antithrombin; albumin; immunoglobulins
Indication: Inherited and acquired coagulopathies; prophylaxis before invasive procedure in patient known to have a specific coagulation factor deficiency
Dose: 10-30 mL/kg (higher in vWD and hemophilia A)
Additional information: May be used in acute necrotizing pancreatitis and DIC; management of endothelial dysfunction in sepsis and hemorrhagic shock
Frozen Plasma (FP): Plasma obtained from FWB that was not frozen within the first 8 hours or is stored >1 and < 5 years
Composition: Same as FFP, but without factors V and VIII
Indication: Same as FFP except not hemophilia A. Rodenticide and warfarin-induced coagulopathy
Dose: 10-15 mL/kg
Cryoprecipitate: The precipitate containing cold insoluble proteins, formed when FFP is slowly thawed and centrifuged (it can also be obtained through the use of plasma extractor)
Composition: vWF, VIII, XIII, fibrinogen, and fibronectin
Indication: Hemorrhage or prophylaxis before invasive procedures in deficiency of vWF and factor VIII
Dose: 1 unit per 10 kg BW
Cryoprecipitate-Poor Plasma: Supernatant that remains after preparation of cryoprecipitate
Composition: Stable coagulation factors II, VII, IX, X; anticoagulant, and fibrinolytic factors; albumin
Indication: Coagulation deficiencies of factor II, VII, IX, or X resulting in active hemorrhage that does not require vWF
Dose: 6-12 ml/kg IV over 1-2 hours (rate of administration should not exceed 4 ml/kg/hr in patients with cardiac or renal insufficiency)
Platelet-Rich Plasma (PRP): Plasma and platelets separated from RBCs after centrifugation
Composition: Platelets and plasma
Indication: Hemorrhage or prophylaxis before invasive procedure in severe thrombocytopenic or thrombocytopathic disorders
Dose: 1 unit per 10 kg BW
Platelet Concentrate: Further centrifugation of PRP to have a smaller volume or platelets obtained via plateletpheresis
Composition: Platelets, small amount of plasma
Indication: Same as PRP
Dose: Same as PRP
Frozen Platelets: Platelet concentrate created by plateletpheresis and then frozen using DMSO for platelet stability
Composition: Platelets
Indication: Same as PRP
Dose: Same as PRP
Lyophilized Platelets: Platelet concentrate created by plateletpheresis, followed by stabilization of platelets using aldehyde cross-linking, then lyophilization
Composition: Platelets
Indication: Same as PRP
Dose: Currently under evaluation
Lyophilized Plasma: Plasma that is rapidly frozen, dried and maintained in low temperatures in vacuum
Composition: Same as FFP
Indication: Same as FFP; compared with FFP can be stored at room temperature, transported easily, and reconstituted rapidly in remote and austere environments
Additional information: Studies have shown promise in human medicine; No studies available regarding its use in dogs with the recent products
Albumin: Protein is extracted from pooled plasma
Composition: Albumin
Indication: Hypovolemia oncotic support
Dose: Albumin deficit = 0.3 x BW (kg) x 10 (albumin desired - current albumin); 1.5 g/kg
Additional information: Human and canine albumin available; Administration of human serum albumin to dogs and cats is controversial due to safety concerns, in particular the possibility of developing type III hypersensitivity reactions
Intravenous Human Immunoglobulin: Pooled IgG extracted from multiple human donors
Composition: Immunoglobulins
Indication: Immune-mediated diseases
Dose: 0.5 g/kg/day
Additional information: Type I and III hypersensitivity reactions possible
Specific Clotting Factors and Concentrates
Composition: Antithrombin; fibrinogen; factors VII, VIII and IX; prothrombin complex concentrates
Indication: Several indications; mostly used in the management of coagulopathies
Dose: Varies depending upon blood product used
Additional information: Not yet used or produced in veterinary medicine
BV-blood volume; BW-body weight; DIC-disseminated intravascular coagulation; FB-fresh blood; FFP-fresh frozen plasma; FP-frozen plasma; PCV-packed cell volume; pRBCs –packed red blood cells; PRP-platelet-rich plasma; RBCs-red blood cells; VT-volume transfused; vWD-von Willebrand disease; vWF-von Willebrand Factor; FWB-fresh whole blood; WBCs-white blood cells
The different blood components are mainly obtained by centrifugation; each blood component needs its established times and speeds of centrifugation to obtain the correct blood product components (Figure 3).1
For example, to obtain packed red blood cells (pRBCs) and fresh frozen plasma (FFP), WB is first centrifuged and then, with the use of a plasma separator, separated into those 2 components (Figure 4). If any solutions are added to pRBCs, this should be clearly indicated in the blood product identification label, as various preservative solutions have different expiration dates.
During the process of obtaining them, blood products should be handled with care and with aseptic technique to prevent mechanical damage and contamination (ideally in a laminar flow chamber; Figure 5).

FIGURE 3
Processing whole blood units to obtain blood components involves centrifugation. During this step, blood units should be adequately placed in the centrifuge buckets to allow an adequate separation between blood components.
Photo courtesy of Dr. Joana Gomes, Banco de Sangue Veterinário, Lisbon Faculty of Veterinary Medicine, Lisbon, Portugal
If possible, consider the use of leukoreduction before RBC product storage. Leukoreduction, the process where white blood cells (WBCs) are removed from an RBC unit, is normally performed by passing the blood product through specific filters. Leukoreduction may reduce storage lesions, transfusion reactions, transfusion-related inflammation, and disease transmission.1,8 Storage lesions consist of changes in RBC metabolism, protein activity and function, phenotype, and morphologic properties induced by storage. Storage lesions were associated with an increase in reactive oxygen species, pro-inflammatory mediators, and microvesicle concentration, with the potential to have deleterious side effects in the blood component transfusion recipient.1
Blood Product Storage
Stored blood products should be labeled with blood type, donor’s name, collection date, and expiration date (Figure 6). The ideal storage time that preserves the functional qualities of the blood product without significantly increasing storage lesions is still being studied. In the case of WB and pRBCs, although these blood components can be stored for longer periods, it has been suggested to use units with storage time no greater than 21 days (and no greater than 14 days if the recipient is a critically ill patient).1,3,8 Regarding FFP, whether using “younger” units has benefits to the recipient or not is currently unknown. Currently advised storage times and temperature for FFP are -30ºC to -20ºC (-22°F to -4°F) for 1 year (see Table 1).1,7

Blood products should be properly identified with blood type, donor’s name, collection date, and expiration date.
Photo courtesy of Dr. Isabelle Goy-Thollot, SIAMU/ICU, VetAgro Sup, University of Lyon
A dedicated refrigerator that records temperature fluctuations should be used for blood product storage. The importance of a dedicated refrigerator should not be underestimated, as a recent study associated the lack of a dedicated blood product refrigerator with the development of hemolysis in the blood product units, leading to 3 fatalities.14
However, if a dedicated refrigerator is not available, a dedicated space may be acceptable. In this case, blood products should be kept separate from other products to avoid chemical and biologic contamination. Frozen products should be stored in a freezer set on manual defrost.
Blood products should be stored vertically, with airspace between each bag, and never in crisper drawers. Blood product storage refrigerators should be opened as infrequently as possible to prevent temperature fluctuations, as this can cause damage to RBC products. Blood products with RBCs should also be inspected and gently rotated every other day to allow mixture of RBCs with the anticoagulant.
Table 1: Suggested Blood Product Storage Times
Part II: Patient Selection
The Decision to Transfuse
The decision to transfuse should not be based on a single transfusion trigger but instead, be made on an individual basis after evaluating several components. These may include clinical signs (especially related to cardiovascular and respiratory systems), laboratory values (including hemoglobin, PCV, and lactate levels), underlying disease, and the speed at which hemoglobin or RBC count decreases.15,16
Transfusion may be deemed necessary when hemoglobin or PCV levels are less than 5.8 g/dL (58 g/L) or less than 12%, respectively, although animals with underlying cardiac and pulmonary disease should be transfused at higher hemoglobin levels. In human patients, this corresponds to hemoglobin levels of 10 g/dL (100 g/L) (hematocrit ≈30%).17 Because the correspondent level in small animals has not yet been determined, human medicine guidelines can be used as a starting point.15,16
A scoring system based on clinical signs (eg, mucous membrane color, pulse quality, heart rate, mentation, exercise intolerance) has recently been shown to be useful in deciding when to transfuse pRBCs to anemic dogs.15
Confirming Blood Product Compatibility
Compatibility between the blood product and the recipient is assessed by blood typing and crossmatching.
Blood Typing
Dogs have several blood types, with the majority belonging to the DEA system. The latter comprises more than 13 groups with 20 antigen specificities, although only DEA 1, DEA 3, DEA 4, DEA 5, and DEA 7 can be routinely identified by typing.1 DEA 1 is the most important of these blood groups, as it has the strongest antigenicity, is highly prevalent, and exists with nearly equal distribution of DEA 1-positive and DEA 1-negative dogs among breeds globally.18 DEA 1 was previously believed to consist of 3 different subgroups (DEA 1.1, DEA 1.2, and DEA 1.3); however, recent research has shown the differences to be due to varying surface protein expression levels.19
Dogs do not have natural alloantibodies to DEA 1; if a DEA 1-negative dog receives DEA 1-positive blood, an initial antibody-mediated reaction will not occur. Consequently, for the recipient’s first transfusion, there is no need to worry about the DEA 1 compatibility between donor and recipient.8 However, because this transfusion leads to formation of anti-DEA 1 antibodies, a second exposure can induce a severe hemolytic reaction.
Some dogs do have natural antibodies against DEA 3, DEA 5, and DEA 7. These were reported to cause mild or delayed transfusion reactions and to decrease the survival of transfused RBCs.1,20
Ideally, blood typing should be performed before every transfusion in both donor and recipient to prevent incompatibility reactions. However, in most clinical practices blood typing is restricted to determining DEA 1 status by the use of in-house kits. Blood typing to other groups is available only in a few specialized blood service laboratories (eg, Animal Blood Resources International). Blood group determination other than DEA 1 is currently reserved for donor screening or to evaluate cases of crossmatch incompatibility.
The 2 in-house kits most commonly used to determine DEA 1 status include a rapid immunochromatography test and an agglutination card test. Results from both tests are generally comparable although the former may be superior in dogs with immune-mediated hemolytic anemia because it is not affected by agglutination and the agglutination card test may miss weak agglutination. The immunochromoatography test also has the advantage of detecting all levels of DEA 1 antigen expression (from very strong to very weak).21
If blood typing is not available, the recipient has previously received transfusions, and/or the recipient’s blood type is unknown, one should use only blood products from a DEA 1-negative donor. In addition, in these cases, crossmatching should always be performed before blood transfusion.
Crossmatching
Crossmatching determines the serologic compatibility between the donor and recipient through an agglutination reaction. The latter occurs when there are natural preformed alloantibodies or antibodies produced during previous sensitization. Crossmatching (see Manual Crossmatch Procedure) should always be performed:
If there is history of a previous transfusion reaction.
If the recipient’s transfusion history is unknown.
If DEA 1 status of the donor is unknown.
Prior to performing a second transfusion if the first transfusion was more than 4 days before the second transfusion.
A gel-based crossmatch test, if available, is preferred to manual crossmatching because it is equally efficacious, less cumbersome, and less time-consuming; in addition, it can be saved for later evaluation and used when there is agglutination (Figure 7).1 Recently, a new crossmatch test in a strip, based on immunochromatographic technology, has also become available.

Autoagglutination in a dog with autoimmune-mediated hemolytic anemia
Photo courtesy of Dr Joana Gomes, Banco de Sangue Veterinário, Lisbon Faculty of Veterinary Medicine, Lisbon, Portugal
Manual Crossmatch Procedure7
Collect 3 mL of blood from the donor and recipient. For both donor and recipi-ent, 2 mL of blood are placed into an EDTA tube (to obtain RBCs) and 1 mL of blood in a nonadditive tube (to obtain serum).
Centrifuge (1000x or 3400 rpm) to separate plasma and serum from RBCs. Save the serum and discard the plasma from the EDTA tube.
Wash RBCs: resuspend 0.25 mL of RBCs in 2-4 mL saline in a second tube; centrifuge 1 minute, discard supernatant, and repeat the procedure twice.
Resuspend 0.1-0.2 mL of RBCs in 4.8 mL saline to make a 2%-4% solution.
Label tubes to make the following admixtures.
Major Crossmatch: 2 drops patient´s serum with 1 drop donor´s RBC suspension
Minor Crossmatch: 1 drop patient’s RBC suspension with 2 drops donor´s serum
Control:1 drop patient´s RBC suspension and 1 drop patient´s serum
Incubate for 15 to 30 minutes at 37°C (98°F).
Centrifuge for 15 seconds.
Interpretation
Note serum color and record presence of hemolysis. Gently resuspend the RBC button into the overlying serum layer and check for the presence of agglutinating clumps. Place a drop of the resuspended RBCs on a slide, apply coverslip, and read at 100-400x.
Presence of hemolysis or agglutination indicates an incompatible cross-match. In a compatible crossmatch, RBCs are individually distributed.
To distinguish agglutination from rouleaux formation, centrifuge the tubes again for 15 seconds, remove serum, and add 2 drops of saline. Then centrifuge the tubes again and re-examine the RBC suspension.
Crossmatch is unreliable in cases of severe autoagglutination (Figure 7) and severe hemoglobinemia.
Adapted from: Lanevschi A, Wardrop KJ. Principles of transfusion medicine in small animals. Can Vet J. 2001; 42(6):447–454.7
Part III: Administration & Transfusion Reactions
Preparing to Administer Blood Products
The blood product that is most appropriate to the patient’s condition should be chosen. When using pRBCs, units that have been leukoreduced should be used if available. When using FWB or pRBC transfusion to increase oxygen-carrying capacity, the goal is to achieve a PCV of 25% to 35% in the recipient. The volume to be transfused can be determined with the following formulas1,22:
For FWB or pRBCs:
VT (mL) = BW (kg) × blood volume (90 mL/kg) × [(desired PCV - recipient PCV)/donor PCV]
For pRBCs with PCV of approximately 60%:
VT (mL) = 1.5 × desired rise in PCV × BW (kg)
These formulas are only accurate if the patient does not continue to experience significant blood loss or hemolysis.
BW=body weight of the recipient, VT=volume to be infused, FWB=fresh whole blood, pRBC=packed red blood cells, PCV=packed cell volume
Refrigerated blood products should be warmed to room temperature without the use of a microwave. Frozen blood products can be thawed with a warm water bath to 30°C to 37°C (86°F-98°F).
pRBCs that have been stored with a preservative solution do not need to be administered with normal saline as their PCV is approximately 55% to 65%. In contrast, pRBCs which were not stored with a preservative solution have a PCV of approximately 80% and consequently the unit should be re-suspended in normal saline. To promote an adequate transfusion rate, 10 mL of 0.9% saline is typically added per 30 to 40 mL of pRBCs.
Although commonly used in the past, the preemptive use of steroids has not been shown to prevent transfusion reactions and consequently it should be abandoned.2 However, the prophylactic use of antihistamines to prevent acute allergic reactions may be considered.2
Step-by-Step: Administering Blood Products
What You Will Need
Peripheral venous inserted catheter (ideally >22-gauge)
Blood administration set with incorporated filter (standard filter size is 170 μm1; range: 150-170 μm)
0.9% saline bag (to infuse with pRBCs)
Transfusion monitoring form
18-μm filter that attaches to IV tubing (small-volume transfusion; autotransfusion9)
Step 1
Administer blood products intravenously (if unavailable, by intraosseous catheter). Blood products with RBCs should only be delivered by syringe or volumetric pump if the equipment has been validated for this purpose. In fact, the use of non-validated syringe or volumetric pump for blood component transfusion has been associated with an increased early loss of transfused RBCs in dogs.23 Maintain asepsis in all procedures involving blood product administration.
Step 2
Initiate blood transfusion at 0.25 mL/kg/hr. If no side effects are noted after 30 minutes, increase the rate (normal increase, 2-10 mL/kg/hr; maximum tolerated rate, 10-20 mL/kg/hr). If volume overload is a concern (eg, decompensated cardiac disease), administration rate should not exceed 4 mL/kg/hr. In cases of massive hemorrhage associated with hypovolemic shock, the transfused rate can exceed 10-20 mL/kg/hr.
Step 3
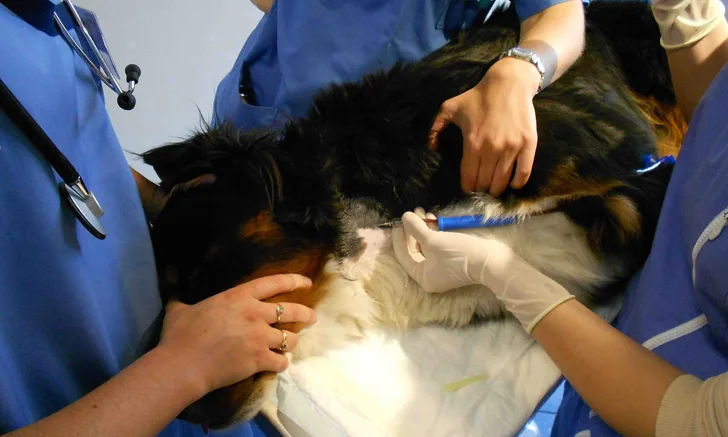
Monitor temperature, pulse/heart rate, mucous membrane color, capillary refill time, respiratory rate and effort, blood pressure, and mentation status every 15 minutes, for the first hour and every 30 to 60 minutes until one hour after transfusion is complete (Figure 8). Transfusion should be complete in 4 to 6 hours. Record all adverse clinical signs including urticaria, facial swelling, and vomiting. Discontinue transfusion if any of these signs are noted. Blood transfusion monitoring should continue during the first 24 hours following the transfusion (although less frequently), because some adverse reactions to blood transfusion can be delayed.

During the administration of blood products, the animal should be monitored frequently, at predefined time points.
Photo courtesy of Dr. Isabelle Goy-Thollot, SIAMU/ICU, VetAgro Sup, University of Lyon
Author Insight
If an 18-μm filter is used, replace it after every 50 mL of transfused blood to prevent clotting.
Treating Possible Acute Transfusion Reactions
If an acute transfusion reaction is suspected, the transfusion should be stopped immediately. Record the volume infused and the rate of infusion, but do not discard the blood product, line, or fluids. Perform airway, breathing, and circulation assessment of the patient, followed by a complete physical examination. Focus mainly on the cardiovascular, respiratory, and neurologic systems and look for the presence of hemolysis (including hemoglobinemia and hemoglobinuria; Figure 9).

Hemoglobinuria in a dog following an IV hemolytic transfusion reaction
Photo courtesy of Dr. Isabelle Goy-Thollot, SIAMU/ICU, VetAgro Sup, University of Lyon
If signs of shock are present, initiate oxygen supplementation and crystalloids and/or colloids to increase intravascular volume. If the patient has clinical signs compatible with anaphylaxis, antihistamines and epinephrine should be administered. Glucocorticoids can also be considered, although the benefits of glucocorticoid administration in this setting have not been proven.
After stabilizing the patient, verify if the blood product being transfused was the correct one decided for the recipient. Check blood type and expiration date on the blood product´s label and examine the blood product unit for signs of hemolysis, discoloration, or presence of blood clots. In the latter case, perform Gram stain and blood product culture and initiate empiric antibiotic therapy. In addition, the recipient and donor blood types should be retested, and a crossmatch on a pre- and a post-transfusion sample should be performed.
Depending upon the clinical findings, several other diagnostics tests can be considered. These may include chest radiography, echocardiography, and blood cultures. In addition, due to the risk of severe complications such as disseminated intravascular coagulation and renal failure, a CBC and general serum chemistry panel—including coagulation profile, renal function, electrolytes (including calcium), acid-base status, and tissue perfu-sion indicators (eg, lactate)—should also be performed. This is especially important in cases of autotransfusion, as hypocalcemia, hemolysis, and prolonged clotting times have been reported as the most frequent reactions during and after autotransfusion.9 Continuous ECG, pulse oximetry, blood pressure, and urine output should be used as part of patient monitoring.
One of the most common reactions to transfusion is an increase in the recipient's body temperature. The main differentials for this are febrile nonhemolytic transfusion reaction (defined as an increase of 1°C (1.8°F) in the first 1 to 2 hours of transfusion with-out hemolysis or other explanation), hemolysis, and sepsis. Consequences of hemolysis include hemoglobinemia, hemoglobinuria, vasoconstriction, renal ischemia, acute kidney injury, and disseminated intravascular coagulation. Treatment of hemolysis depends upon its severity. After stopping the transfusion, the main goals of treatment are to prevent /treat hypotension in order to preserve perfusion to vital organs such as heart and brain and to maintain an adequate renal blood flow and urine output. Febrile non-hemolytic transfusion reaction is managed by decreasing the rate or even temporarily stopping the transfusion and giving a nonsteroidal anti-inflammatory agent to manage associated fever.