Abdominocentesis is an important diagnostic tool that can identify the etiology of abdominal effusion. Hemorrhage, urine, infection (ie, sepsis), bile, intestinal content, and pure transudates are common types of abdominal effusion. Prompt identification of the cause of effusion is key, as emergent surgical intervention may be needed. Diagnostic abdominocentesis is indicated when free abdominal fluid is identified on physical examination, radiography, abdominal ultrasonography, and/or CT.1 Physical examination findings that may suggest abdominal fluid include a fluid wave appreciated on abdominal ballottement and evidence of periumbilical ecchymosis (ie, Cullen sign).1,2 Abdominocentesis can also be used therapeutically to relieve abdominal distention in patients with large effusions.
Contraindications & Complications
Coagulopathy, organomegaly, and wounds in the area where centesis will be performed can be contraindications for abdominocentesis.1 Performing the procedure in patients with coagulopathy may cause life-threatening hemorrhage.
When performed correctly, abdominocentesis is a relatively safe diagnostic procedure; benefits of prompt diagnosis generally outweigh the risks. Major complications are rare but can include introduction or spread of infection or neoplastic cells, laceration of an abdominal organ, hemorrhage, subcutaneous fluid leakage, and/or subcutaneous hematoma formation.1 Ultrasonography should be used in patients with organomegaly to avoid inadvertent penetration of an abdominal organ. Intestinal or uterine penetration is rare, except in cases in which the viscus is dilated and adherent to the abdominal wall.1 Perforation of bowel loops is unlikely, as the bowel moves away as the needle tip makes contact.
Following abdominocentesis, iatrogenic abdominal free gas may be present; radiography and ultrasonography findings should be interpreted with caution.
Patient Preparation
Sick and critically ill patients do not typically require sedation, but active patients may not tolerate the procedure without being sedated. Venous access (typically via IV catheter) should be established, and sedatives should be selected based on patient signalment, physical examination findings, cardiovascular stability, and underlying illness (Table 1).
Table 1: Sedatives That Can Be Given Prior to Abdominocentesis in Dogs & Cats
The centesis site should be identified based on the volume of abdominal fluid and intended abdominocentesis technique (see discussion of techniques below). Fur should be widely clipped and the area aseptically prepared.
Local anesthesia for abdominocentesis is uncommon but may be considered when large catheters will be used to facilitate abdominal drainage. A cutaneous local anesthetic block with 2% lidocaine may be instilled along the abdominal wall penetration site.
Monitoring & Care for Critically Ill & Unstable Patients
Sick and critically ill patients should have a patent IV catheter and be closely monitored to identify deterioration in hemodynamic parameters caused by underlying disease or adverse effects from sedation. Recommended monitoring includes ECG to monitor the heart rate and detect arrhythmias, blood pressure measurement to detect hypotension, and pulse oximetry to assess oxygen saturation. Hypoxemic patients should receive supplemental oxygen throughout the procedure.
Ultrasound-Guided Abdominocentesis
Ultrasound-guided abdominocentesis has several advantages compared with blind abdominocentesis, including facilitating collection of a small volume of effusion within the abdominal cavity that may be missed with blind abdominocentesis and minimizing the risk for inadvertent organ or blood vessel puncture, thus reducing the likelihood of organ laceration and iatrogenic hemorrhage.3 Ultrasound-guided abdominocentesis may be used diagnostically or therapeutically for small- or large-volume effusions.
Step-by-Step: Ultrasound-Guided Abdominocentesis3
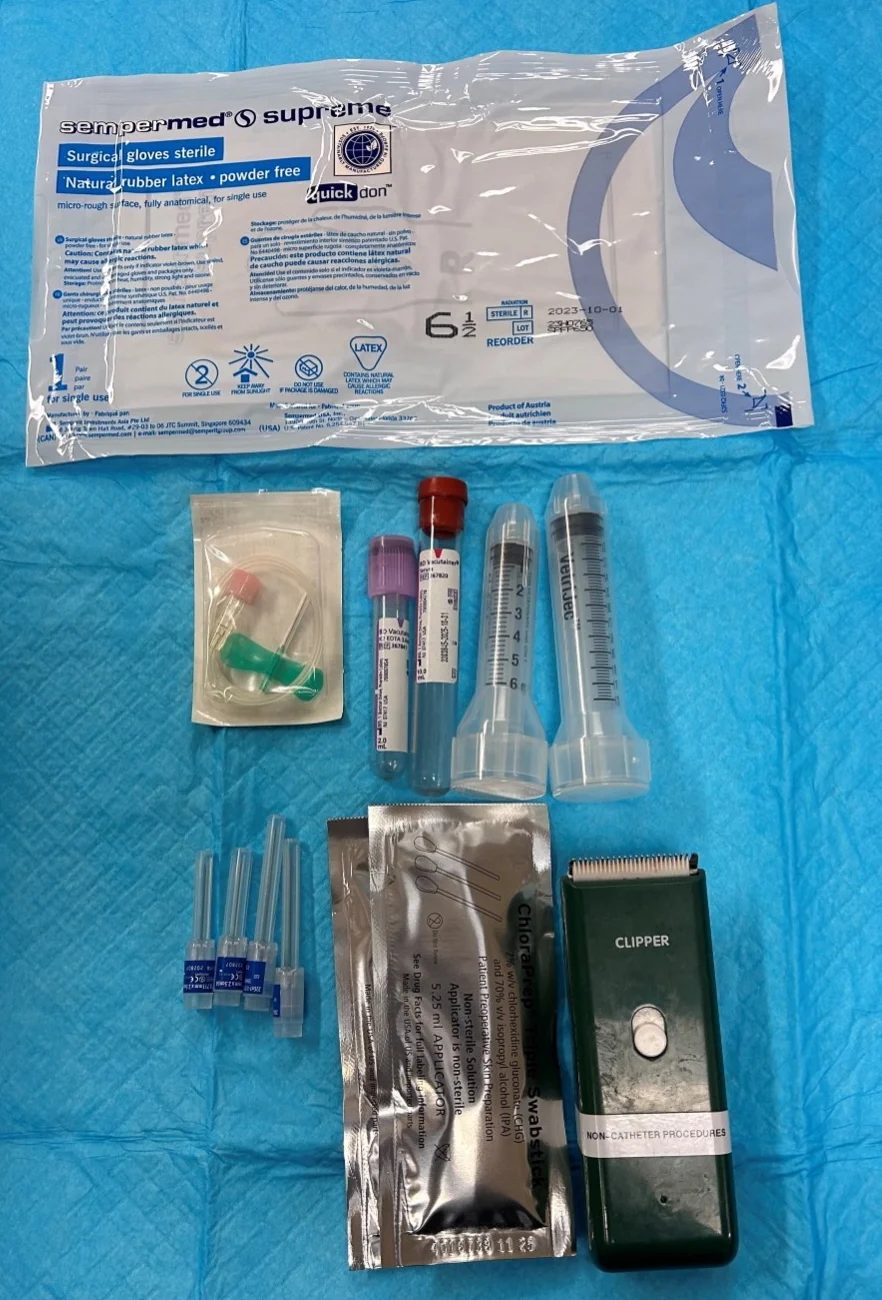
What You Will Need
Needles or catheters
Hypodermic needles (19-22 gauge, 0.75-1.5 inch) or
Over-the-needle catheters (18-20 gauge, 1-5.5 inch) or
Multifenestrated catheters or small-bore guidewire catheters
Syringes (1-3 mL; 20-35 mL for large-volume effusion)
Sterile gloves
Clippers
Surgical scrub
Alcohol
Ultrasound machine
2% lidocaine (rarely required)
Blood tubes (EDTA [ie, purple top], no additive [ie, red top])
Large-volume effusion supplies (optional)
IV fluid line and fluid collection bag
3-way stopcock
Bowl or graduated cylinder for collection
Extension tubing
Diagnostic peritoneal lavage supplies (optional)
Warm sterile 0.9% sodium chloride
Step 1: Position the Patient & Locate the Effusion
Place the patient in left lateral recumbency, sternal recumbency, or a standing position. Use ultrasonography to identify and localize abdominal fluid pockets for centesis.
Author Insight
Placing the patient in left lateral recumbency reduces the risk for accidental laceration of the spleen.
Step 2: Prepare the Patient
Clip the fur widely, as needed, around the centesis site. Aseptically prepare the skin and ultrasound probe with surgical scrub and alcohol.
Step 3: Obtain an Ultrasound Window & Administer Local Anesthesia if Needed
Wearing sterile gloves, use the nondominant hand to hold the ultrasound probe at the centesis site to obtain a clear image of the fluid pocket and the anticipated path of the needle. Aseptically draw up 2% lidocaine and administer a cutaneous local anesthetic block if needed.
Author Insight
Fluid pocket should ideally be close to the abdominal wall and not obstructed by adjacent organs.
Step 4: Place the Needle
With the dominant hand, introduce a needle (attached to a syringe) at a 30- to 45-degree angle from the surface of the skin. Advance the needle in the plane of the ultrasound beam to ensure continuous visualization.

Author Insight
Hypodermic needles are preferred for diagnostic centesis. Over-the-needle catheters are preferred for therapeutic centesis. Multifenestrated catheters or small-bore guidewire catheters are preferred for therapeutic and large-volume centesis.
Step 5: Aspirate
Once the target fluid pocket is reached, aspirate the effusion.
Author Insight
For additional guidance, see Diagnostic Peritoneal Lavage and Large-Volume Abdominocentesis.
Step 6: Place Effusion in Sample Tubes
Aseptically place the effusion into a no-additive tube for culture and an EDTA tube for cytology.
Blind Abdominocentesis
Blind abdominocentesis is an easy method to obtain an abdominal fluid sample and can be performed with a closed- or open-needle technique.3 A positive centesis result requires at least ≈5 to 6 mL/kg of effusion in the abdominal cavity.4 A false-negative result can occur when only a small volume of effusion is present. Blind abdominocentesis can be used diagnostically or therapeutically for small- or large-volume effusions.
Closed-Needle Technique
In the closed-needle technique, a needle is affixed to a syringe prior to insertion into the abdominal wall. The needle is slowly advanced a few millimeters at a time, and aspiration with the syringe is performed after each advancement until effusion is observed in the syringe.3
Open-Needle Technique
In the open-needle technique, a needle is inserted without an affixed syringe, and fluid from the abdominal cavity is allowed to flow freely through the needle and into a container.1,5 Rotation of the needle hub may facilitate flow. This technique should be used when the closed-needle technique fails to retrieve effusion, as false-negative results are more likely when suction is applied.3,5 Leaving the needle unattached during insertion avoids negative pressure created by aspiration, minimizing occlusion of the needle by the omentum; however, this technique can introduce free air into the abdominal cavity that results in iatrogenic pneumoperitoneum and should therefore only be used after abdominal radiography.1,3,5
Step-by-Step: Blind Abdominocentesis3

What You Will Need
Needles or catheters
Hypodermic needles (19-22 gauge, 0.75-1.5 inch) or
Over-the-needle catheters (18-20 gauge, 1-5.5 inch) or
Multifenestrated catheters or small-bore guidewire catheters
Syringes (1-3 mL; 20-35 mL for large-volume effusion)
Sterile gloves
Clippers
Surgical scrub
Alcohol
2% lidocaine (rarely required)
Blood tubes (EDTA [ie, purple top], no additive [ie, red top])
Large-volume effusion supplies (optional)
IV fluid line and fluid collection bag
3-way stopcock
Bowl or graduated cylinder for collection
Extension tubing
Diagnostic peritoneal lavage supplies (optional)
Warm sterile 0.9% sodium chloride
Step 1: Position & Prepare the Patient
Place the patient in left lateral recumbency (preferred), sternal recumbency, or a standing position. Clip the fur in a wide margin around and caudal to the umbilicus. Aseptically prepare the skin with surgical scrub and alcohol. Wearing sterile gloves, administer local anesthesia at the planned needle insertion site if needed.
Step 2: Place the Needle
Insert a needle (with or without a syringe attached, depending on technique) perpendicular to the body wall 1 to 3 cm caudal to the umbilicus. Avoid the epigastric arteries and veins. Slowly advance the needle as appropriate for a closed- or open-needle technique until effusion is observed.
Author Insight
Hypodermic needles are preferred for diagnostic centesis. Over-the-needle catheters are preferred for therapeutic centesis. Multifenestrated catheters or small-bore guidewire catheters are preferred for therapeutic and large-volume centesis.
Step 3: Collect Fluid
Collect the fluid aseptically in an EDTA blood tube and a no-additive culture tube. If using the open-needle technique, allow the effusion to drip freely into the tubes.
Author Insight
If the effusion appears hemorrhagic, collect the fluid in a no-additive tube and observe for a few minutes for blood clot formation. If no clot forms, hemorrhagic abdominal effusion is likely. If a clot does form, the blood is likely from accidental laceration of an organ or blood vessel. For additional guidance, see Diagnostic Peritoneal Lavage and Large-Volume Abdominocentesis.
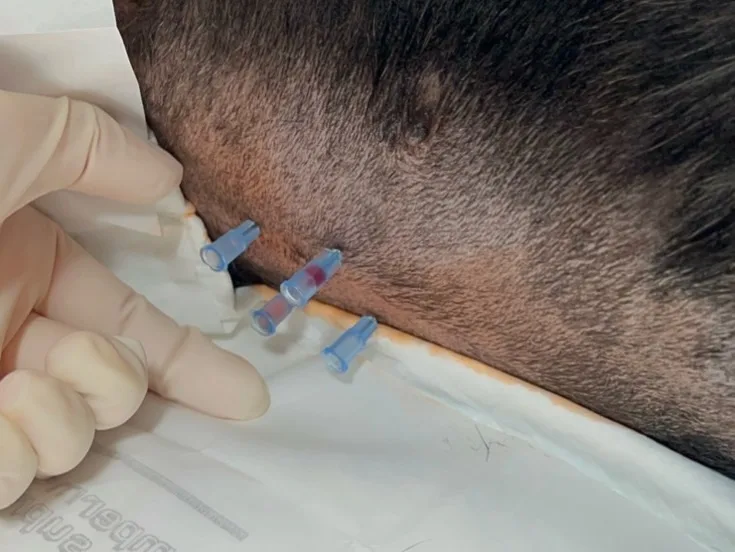
Four-Quadrant Centesis
Four-quadrant centesis employs an open-needle approach and can increase the sensitivity of effusion sampling results.6 The four quadrants are defined as 1 to 2 cm cranial to the umbilicus, extending 1 to 2 cm to the right and left of the midline (right and left cranial, respectively), and 1 to 2 cm caudal to the umbilicus, extending 1 to 2 cm to the right and left of the midline (right and left caudal, respectively; Figure 1).
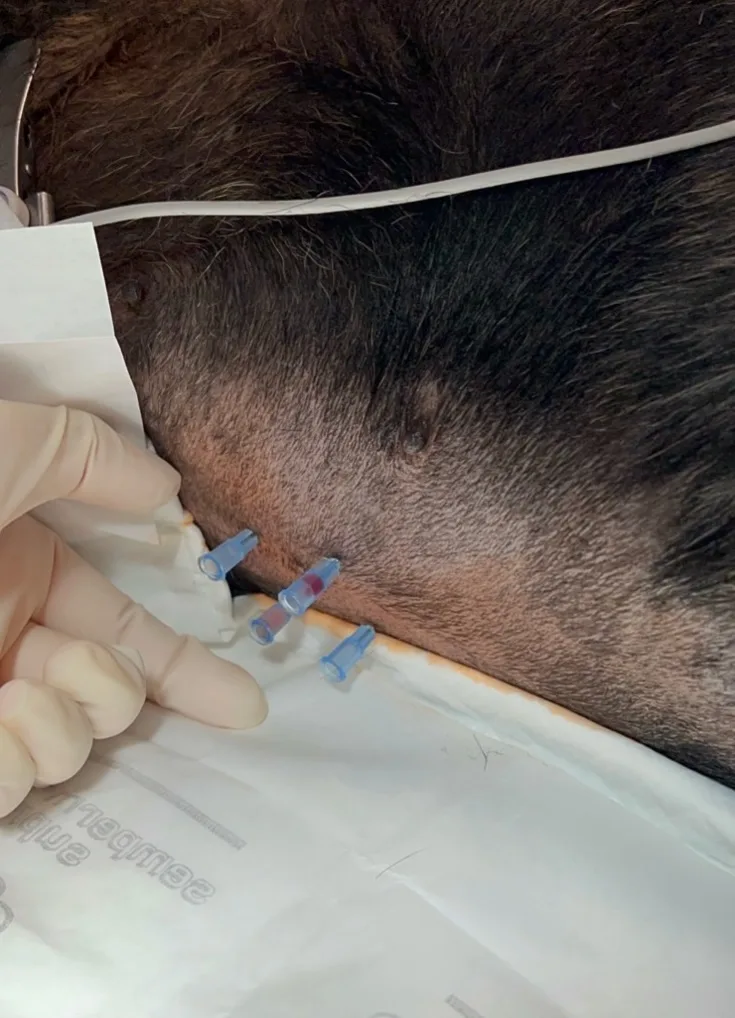
FIGURE 1 Abdominocentesis is performed with the four-quadrant technique in a dog in left lateral recumbency (head to right of image). Four needles are inserted into the abdomen, each targeting a specific quadrant.
Alteration of transabdominal pressures caused by introduction of a needle into each quadrant may increase the probability of effusion retrieval. After the needles are inserted into the abdomen, a syringe may be used to aspirate for effusion (Figure 2). Conversely, if there is a sufficient volume of effusion, the fluid may be allowed to drip into collection tubes held under the needle hub.

FIGURE 2 Abdominocentesis is performed with the four-quadrant technique in a dog in left lateral recumbency (head to right of image). A syringe is attached to the needle to collect effusion in the right cranial quadrant.
Diagnostic Peritoneal Lavage
Diagnostic peritoneal lavage is reported to have increased accuracy in identification of intra-abdominal fluid compared with blind abdominocentesis and can be used when ultrasonography is unavailable, a blind technique does not provide a positive diagnosis, or the fluid pocket is too small or cannot be safely aspirated, even with use of ultrasonography.6-10
Step-by-Step: Diagnostic Peritoneal Lavage3,9

What You Will Need
Catheters
Over-the-needle catheters (18-20 gauge, 1-5.5 inch) or
Multifenestrated catheters or small-bore guidewire catheters or
Peel-away catheters
Syringes (1-3 mL; 20-35 mL for large-volume effusion)
Sterile gloves
Clippers
Surgical scrub
Alcohol
2% lidocaine (rarely required)
Warm sterile 0.9% sodium chloride
IV fluid line
Blood tubes (EDTA [ie, purple top], no additive [ie, red top])
Ultrasound machine (optional)
Step 1: Empty the Bladder
Empty the urinary bladder via catheterization or expression when possible.
Step 2: Administer Sedation & Local Anesthesia if Needed
Administer sedation and local anesthesia (2% lidocaine) if needed to place the catheter.
Step 3: Position & Prepare the Patient
Place the patient in left lateral or dorsal recumbency. Clip the fur and aseptically prepare the ventral abdomen (centered over the umbilicus) with surgical scrub and alcohol.
Step 4: Place the Catheter
Wearing sterile gloves, insert a catheter at a 45-degree angle through the body wall, 2 to 3 cm caudal to the umbilicus, directed caudodorsally toward the urinary bladder.
Author Insight
A large (14-18 gauge) over-the-needle catheter, small-bore guidewire catheter, or peel-away catheter (ie, catheter that can be used to introduce other catheters) may be used.17 Ultrasound guidance is preferred to minimize complications.
Step 5: Infuse 0.9% Sodium Chloride
Slowly instill warm sterile 0.9% sodium chloride (20-22 mL/kg) into the peritoneal cavity through the catheter using an IV fluid line attached to a fluid bag or a syringe. Clamp off the fluid line using the roller clamp. Gently massage the abdomen or carefully roll the patient to ensure dispersal of the fluid throughout the abdomen.
Step 6: Drain the Fluid
Unclamp the fluid line and allow the fluid to drain (via gravity) into an empty fluid bag or apply suction with a syringe.
Author Insight
If a fluid bag was used to infuse 0.9% sodium chloride and all fluid in the bag was infused, the same bag may be used to collect the sample. If not, the bag should be replaced with an empty bag before the sample is collected.
The amount of fluid retrieved is typically significantly less than the amount infused. Anecdotally, ≈10% of the infused volume is obtained. Repositioning the patient or gentle ballottement of the abdomen may aid in retrieval of a fluid sample.
Samples should be collected into tubes. EDTA tubes should be used for cytology, and no-additive tubes should be used for culture. Samples will be diluted; therefore, cell counts, total protein concentrations, and blood chemistry analytes may be misleading. Samples may be useful for detection of septic effusion via cytologic evaluation.
Large-Volume Abdominocentesis
Therapeutic abdominocentesis may be required to remove large volumes of fluid secondary to heart failure, pericardial effusion, neoplasia, or hypoalbuminemia. Therapeutic centesis may relieve clinical signs associated with respiratory distress and increase patient comfort. Fluid samples for diagnostics may also be obtained during the procedure.
Large-volume abdominocentesis may be performed with a blind or ultrasound-guided technique and uses a catheter connected to a closed collection system, which allows collection of fluid while minimizing contamination. The closed collection system may use a fluid line and collection bag that drains via gravity (Figure 3) or a 3-way stopcock and syringe to drain the fluid.
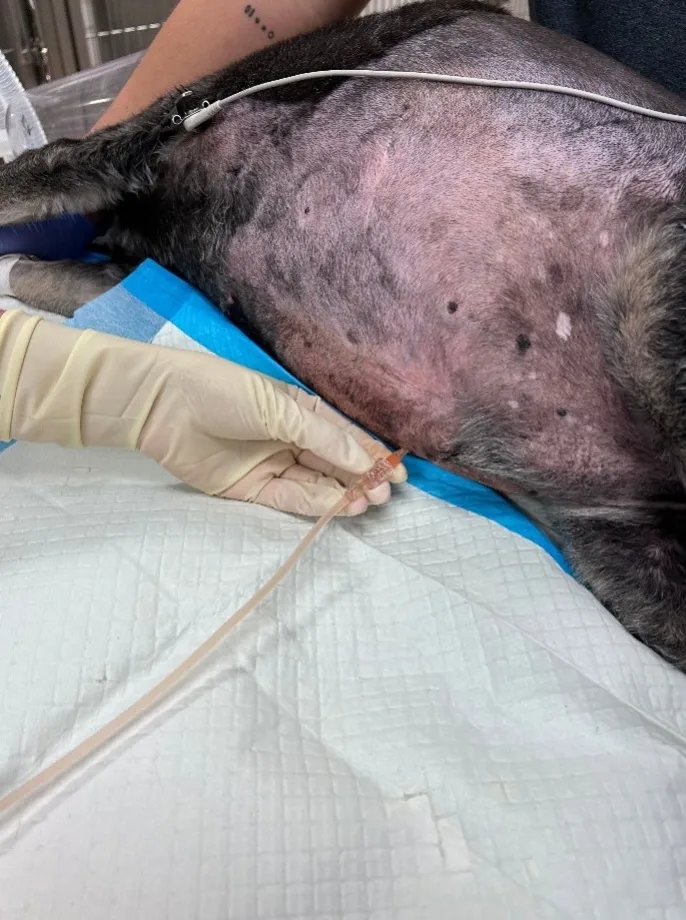
FIGURE 3 Dog in right lateral recumbency (head to left of image) with a large-volume effusion undergoing therapeutic abdominocentesis (A) via the gravity method with a closed IV fluid line and empty fluid collection bag (B). Approximately 700 mL of serosanguinous fluid that was removed is shown (C).
In humans, large-volume abdominocentesis (ie, paracentesis) has not been reported to cause significant changes in blood volume,11,12 but paracentesis-induced circulatory dysfunction that leads to faster reaccumulation of ascites, renal impairment, and shorter survival has been described in patients with refractory ascites due to liver cirrhosis who have >5 liters of fluid removed.13 To the authors’ knowledge, these complications have not been described in veterinary patients, but perfusion parameters (eg, heart rate, blood pressure, mucous membrane color, capillary refill time) should be monitored after a large volume of abdominal effusion is removed.
Fluid Analysis
Abdominal fluid should be analyzed to determine the cause of effusion. The fluid should be saved in a no-additive tube for culture and sensitivity testing (and potential PCR testing for infectious causes) and in an EDTA tube for fluid analysis and cytology.14
Evidence of a blood clot in a hemorrhagic sample in a no-additive tube (or syringe) usually indicates the sample was obtained from a blood vessel or parenchymal laceration. Packed-cell volume and total solids should be measured for all samples that appear hemorrhagic. Blood chemistry testing can be performed on abdominal effusion using standard in-clinic equipment, although manufacturer recommendations should be verified.
Other diagnostic tests that can be performed on abdominal fluid are outlined in Table 2. Full details about fluid analysis—including classification of transudates, high-protein transudates, and exudates—are available in the literature.9,15,16
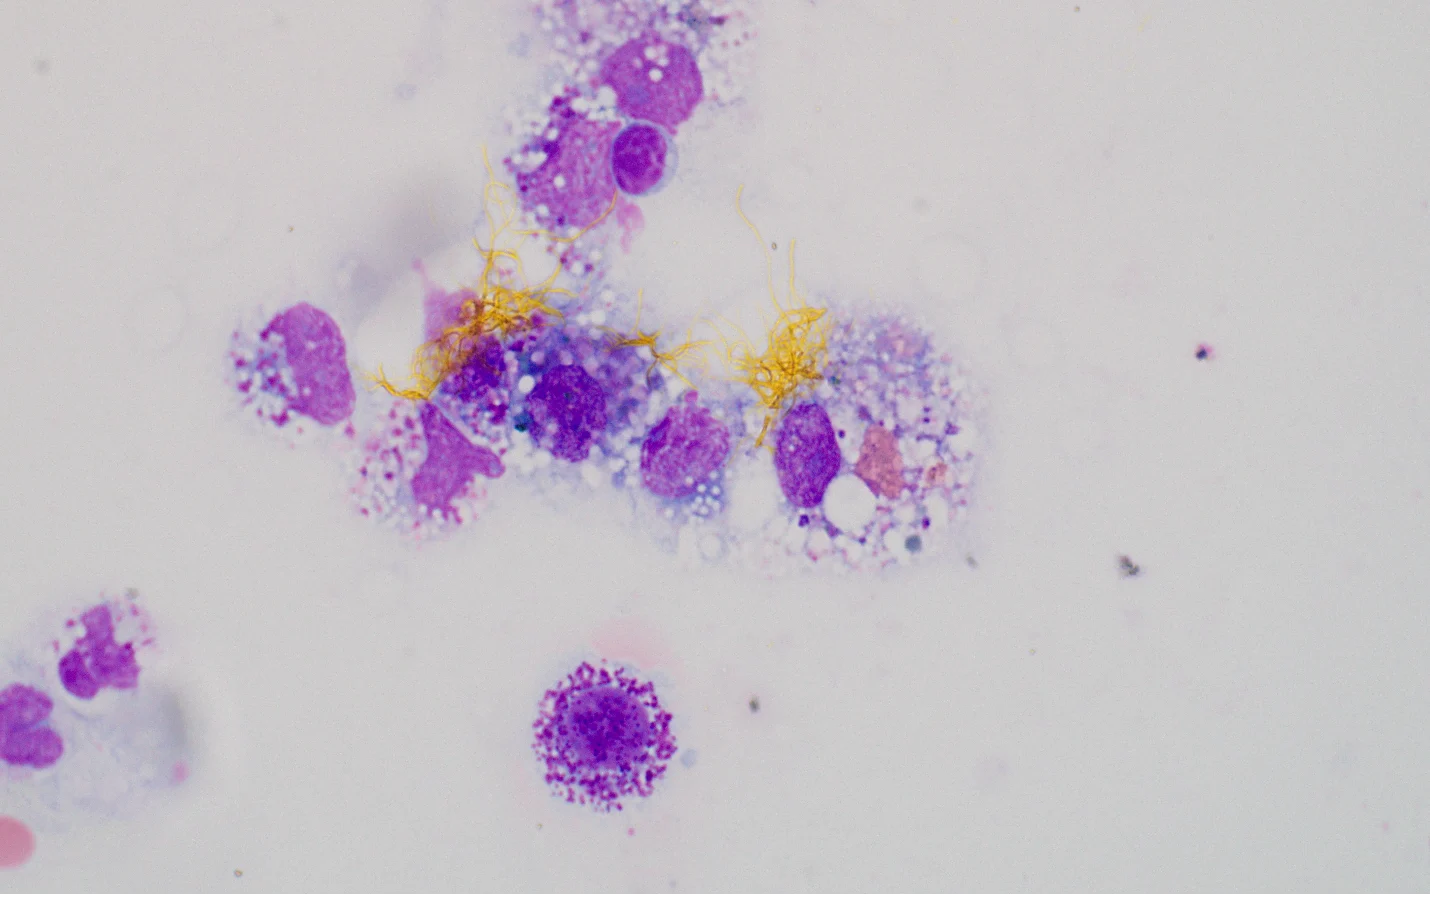
FIGURE 4 Cytology showing bilirubin crystals surrounded by an aggregate of macrophages in a patient with bile peritonitis. Image courtesy of Rachel Whitman, DVM