The 90-90 Flexion Bandage
Daniel D. Lewis, DVM, DACVS, University of Florida
Quadriceps contracture (ie, quadriceps tie-down) can be a devastating sequela to stabilization of femoral fractures. It is a severe manifestation of fracture disease that occurs most frequently in skeletally immature dogs and cats that sustain physeal or other fractures involving the distal femur. In cases of quadriceps contracture, the involved pelvic limb becomes permanently fixed in rigid extension, impeding ambulation (Figure 1). Some cases of quadriceps contracture are unavoidable, such as those resulting from vascular compromise of the quadriceps muscle group sustained during a traumatic incident that caused the fracture. Other cases can be attributed to faulty fracture management.

With quadriceps contracture, the involved pelvic limb becomes permanently fixed in rigid extension.
Previous Methods & Application
Previously, distal femoral fractures were frequently managed in a closed fashion by placing the limb in coaptation, which positioned the stifle and hock joints in extension, predisposing the patient to develop quadriceps contracture. With advancement in orthopedics, open anatomic reduction and stable fixation became standard for most femoral fractures; however, some patients still developed quadriceps contracture even when appropriate surgical techniques were applied. Many animals maintain the repaired pelvic limb in extension after anesthesia and appear painful and uncooperative when manual flexion of the affected stifle and hock is attempted.
A Different Approach
Aron and Crowe described application of the 90-90 flexion bandage, which maintains the stifle and hock joints in 90° of flexion to decrease the occurrence of quadriceps contracture following open stabilization of femoral fractures.1 Prolonged coaptation is contraindicated following open fracture reduction, as a splint or bandage provides no appreciable mechanical stability to internal implants placed during surgery, and prolonged immobilization of involved limb segments promotes development of fracture disease. The 90-90 flexion bandage maintains the quadriceps muscle group in an extended position transiently during the early postoperative convalescent period.
As originally described, the 90-90 flexion bandage was maintained for a mean of 11 days (range, 7–21 days)1; however, the author has found maintaining the splint for 48 to 72 hours to be sufficient. After bandage removal, most patients begin placing weight on the affected limb, can maintain the affected stifle positioned in a normal standing angle (ie, 135°), and are amenable to manual flexion of the involved stifle.
Step-by-Step: 90-90 Flexion Bandage

Step 1
Confirm acceptable reduction and fixation with postoperative radiographs, and apply the bandage while the patient is still anesthetized. Place a nonadherent adhesive bandage over the surgical wound and position the patient in lateral recumbency.

Step 2
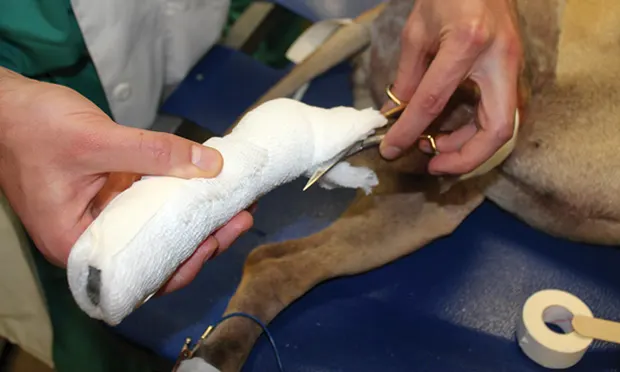
Apply strips of porous white adhesive tape to the medial and lateral aspects of the paw; several centimeters of tape should extend beyond the digits. Place a tongue depressor between the adhesive surfaces of the tape so the stirrups can be easily separated later.

Step 3
Apply 3–4 layers of cast padding to the paw. The cast padding should extend from, but not beyond, the distal ends of the digits.
Author Insight
Extend the cast padding proximal to the hock to secure the bandage to the limb; alternately, the bandage can be terminated just distal to the hock.

Step 4
Apply 2–3 layers of stretch bandage over the cast padding with firm, even tension; a 2–3-mm margin of cast padding should be visible at the proximal extent of the bandage

Step 5
Separate the stirrups and double back the strips of porous white tape on their respective sides of attachment, securing the adhesive surface to the stretch bandage.

Step 6
As the hock is flexed, the bandage material over the cranial aspect of the talocrural joint will bunch, which can cause pressure necrosis of nearby skin. Use bandage scissors to incise the bandage material over the cranial aspect of the distal crus and hock (A) until this region is tension free (B).
Author Insight
Extending the bandage above the hock can reduce irritation from the adhesive that was placed circumferentially around the distal crus.

A
Step 7
While wrapping the adhesive elastic tape over the region of the thigh, pull the skin distally over the cranial aspect of the thigh. Once the adhesive elastic tape is in place, the skin is released and the tape will be positioned more proximal on the thigh and less likely to slip over the stifle (A).
Wrap adhesive elastic tape around the paw several times circumferentially (cranial to medial to plantar to lateral). Next, wrap the adhesive elastic tape over the cranial surface of the thigh as proximal as possible, then back around the hock. Repeat the process several times (B).

A
Step 8
Wrap an additional segment of adhesive elastic tape circumferentially around the distal crus to secure the first application of adhesive elastic tape in place (A) and help maintain the limb in flexion (B).
